Thursday 24 December 2015

Waverne development = Waivy

For a while, I've been working on a new version of my Waverne synthesiser. Waverne takes the Laverne synthesiser example from Max (by Cycling'74) and replaces the waveform-based synth engine with a swept segment wavetable that provides very complex sounds instead of static ones. Kind of 'effects within' rather than 'at the end of the' audio processing... If you've ever used the Tide synthesiser from Christian Kleine, then that is Waverne expanded in several directions! But what about making Waverne simpler and smaller?


Waivy is a teeny, tiny version of part of the forthcoming new version of Waverne. I now have a more powerful wavetable tool to work with (Wave Creator) and this simplifies the job of creating the large wavetables that the engine requires. For Waverne I used Audacity a lot to generate the custom wavetables, but for Waivy I have used the Wave Creator 512 tool, and the results are very encouraging.

Waivy has a minimalistic set of controls. But don't let this fool you: Waivy is a powerful little plug-in, with lots of sound generating capability.

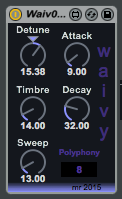
[Detune] allows you to tune the two oscillators to 'in-tune' by clicking on the triangle (or setting it to 0.00. Moving th control away from 0.00 detunes the two oscillators symmetrically, so there isn't any overall pitch change, but it does mean that the direction you move in does not matter - the tune sounds the same if you move the control to the left or the right. I considered putting the detune so that 0.00 was on the left hand end, and full detune was on the right, with clockwise rotation giving more detune, but this felt all wrong - 'in tune' had to be in the centre of the control, so that's where it is.

[Timbre] allows you to select the part of the wavetable that you want to use as the basic sound. You have complete freedom of where you choose within the range. There are 28 basic waveforms, plus ll the overlaps, so there are a lot of different starting points to explore.

[Sweep] allows you to control the amount of movement through the wavetable that the envelope causes. At the 0.00 position (left-most rotation), you get the basic wavetable itself: static and boring), but rotating it to the right causes more and more envelope modulation of the wavetable sweeping, and this gives a nicely animated feel to the sounds. There is a bit of interaction between the Timbre and Sweep controls at the extremes of the ranges (I'm still learning about the wonderfully-named 'pong~' function in Max) and so you may need to do some tweaking to get solid sounds.

[Attack] and [Decay] are a very simple 'contour'-type AD envelope, where there is no sustain, and once triggered, the envelope does its thing with no re-triggering or release complications. Just about as basic as envelopes get, but because the wavetable sweeping is intimately linked to the envelope, the Attack and Decay controls are very much part of the timbral control set, so don't just think they are controlling the amplitude.

[Polyphony] is the final control, and this gives away the roots of this instrument: the ever-popular Pluggo 'Big Ben', possibly one of the most edited M4L examples ever created, and the core of many M4L giveaways from lots of online sources, including, now, me! (It will be interesting to see if any 're-skinned' variants of Waivy turn up in the next few months...) Click on the number and move it up or down to set the polyphony limit, after which note stealing will occur. 8 is okay for most purposes, but long decays might need more to avoid sudden loss of audible notes.

And that's it. Simple but rather effective for some sounds, and it seems to be reasonably light on CPU resource, which is useful in some circumstances! Enjoy.

Waivy is available from MaxForLive.com.


Here is an early version of Waivy in a typical chain: Waivy first, then echo, then reverb...

Saturday 19 December 2015

Sine3Generator

I've just published a new sound generator on the MaxForLive.com web-site. Here's the usual extended user guide...


Sine3Generator is a sound generator - and yes, I've done them before, and this is another one. Currently in a 'light' version with purple trim, I will update it to a 'dark' version over the next few weeks, and I may be unable to resist making a few tweaks too. 


This sound generator does not respond to MIDI inputs - it just sits there and makes noises continually...

What seems like a long time ago now, I wrote a series of 15 generators in 'Reaktor', and this represents a revisiting and updating of those ideas in M4L. There is lots of history to this type of stand-alone 'sound generator'. Modular synthesisers lend themselves quite well to this type of FM chaining, particularly if there are only a few VCOs... Back in the 1970s I built cascaded relaxation oscillators using injunction transistors, and discovered that frequency ability and tuning were very important, which is very apparent in some synthesisers of the time - the vernier dials on the EMS VCS3 are a good example, and the VCS3's matrix interconnection panel lends itself very well to complex chains of devices... 

More recently, Noisedrone .1 and Noisedrone2 have used Max For Live (M4L) to make sounds using cascaded chains of oscillators, and these have been popular downloads on the MaxForLive.com web-site. Another popular generator is my Noise Generator 0.4... So with 15 designs languishing on my hard drive, it seemed like a good time to blow the dust off them and try publishing them again.

The basic idea is very simple. A sine wave oscillator with LFOs that can modulate the pitch and the output is frequency modulated by another similar oscillator, which is modulated by another similar oscillator. It's a simple FM generator with a lot of controls, and a flexible output stage. The output allows mixing of three harmonically-diverse outputs: the third modulated oscillator itself ('Sine'), the ring modulated output of the third and second oscillators ('Ring') and the output of the second oscillator 'sample & hold' processed by the third oscillator, with LFO modulation of the mixing, plus LFO panning as well. 

A good way to start is to turn all the controls to the leftmost minimum position (and save this as a preset of course!), and then to select the Sine button, adjust the volume to your preference, and choose the pitch you want in Oscillator 3 (there's just a Pitch control there, so it is easy to find!). This is a good place to learn the output options: LFO modulation of volume, plus LFO panning. A lot of my M4L has similar approaches to things, so if you've seen one of my 'Pan' sections, then you will recognise the same controls across many of my devices. One variant here is that my 'usual' LFO has the ability to free-run or to sync with the Live timing, but for Sine3Generator, then you only get free running LFOs. 

Once you have the basic Oscillator 3 under your control (some ping-pong echo is very often applied to the output of this type of generator...) then there is the LFO modulation of the pitch of the oscillator to try out. 'Under control' is an interesting phrase. When I worked in a music shop we used to do listening exercises: someone would play a chord and the rest of us would say what it was, or someone would make a sound on a synth and everyone would have to recreate it from scratch. Rick Wakeman was famous for being able to set up a sound on a MiniMoog just by adjusting the knobs, and then playing it without the incremental audition/edit cycle that you often see, and of which I'm often a big user, particularly for FM synthesis. Which neatly brings me back onto the topic...

When you are comfortable with all of the controls for Oscillator 3, then you can try moving to the left and try exploring the pitch and modulation controls for Oscillator 2, then the LFO pitch modulation for that oscillator, and so on. (There's a bit of a theme here too - my devices often start in the middle and move outwards, but just to keep your awake, some of them start on the left and move to the right. Which format I use usually depends on the workflow...)

Because Oscillator 1 is at the top of a stack of FM then it can cause big changes to the oscillators underneath it, so be cautious at first with the pitch and modulation controls. If everything gets too much, then just go back to the 'all leftmost' preset that you saved and start again from Oscillator 3.

There's a lot to explore in Sine3Generator, and a lot of sounds waiting to be created. Recording the output and processing it further is thoroughly encouraged! Audacity is my editor of choice here, although mine is very customised...


(As always, my M4L stuff is a 'work in progress', so it may not be perfect (in fact, it probably won't be, because perfection is a rare thing indeed!), and early versions tend not to have very much help on controls included in the M4L. I know that this is a good thing to have, but I'm short on time an speed gets you fun things quickly, and none of my stuff is supposed to be professional, with timely support and detailed help inside. But please feel free to report bugs via the comments on MaxForLive.com, and I will try to fix them when I can find time. )


There is now also a 'dark' version...
Related articles


Sunday 22 November 2015

ModeAudio Articles on MIDI Velocity

There are now two additional ModeAudio interviews with me available on the ModeAudio web site. This time the topic is MIDI Velocity, and there's a free MaxForLive plug-in that makes working with velocity much easier.

The articles:
The VeloView M4L plug-in MIDI effect takes MIDI Velocity messages and shows them as vertical lines in a sideways scrolling window. Simple but very effective - suddenly velocity is visible!

Sunday 19 July 2015

A surprise from history!

In my last blog post I mentioned PanEcho, a Max For Live plug-in that I wrote back in 2011, but I didn't check my page on maxforlive.com to make sure that PanEcho was there...

You can guess what I found when I did check! Yep, it turns out that PanEcho was one of those bits of  programming that never made it into the real world, and had been sitting in my 'dev' area, gathering dust...

So, rather than simply rework it into a more modern context, I tried it out 'as is', and discovered that the stylistic changes over the last 4 years are interesting (tighter spacing of controls, different layout of Left/Right channels, more graphics to indicate status of LFOs, more technical detail, no abstractions, etc...), but that the jump back in time was actually informative, and it was still a usable effect! So I've now uploaded PanEcho to maxforlive.com so that it can be tried out by a wider audience!


PanEcho isn't a completely conventional echo effect. There are two independent stereo delay sections, each with feedback (in the same channel) and cross-feedback (to the other channel L->R, R->L), and then there is a master feedback and cross-feedback around both delays. You can also swap the channel outputs for the first stereo delay if you want, by using the 'Normal/Swap' button. With all of this channel flexibility and feedback, things can get complex, so there are indicators which light up 'red' when the controls exceed 100% and you get an indication of when runaway is going to happen. At this stage I didn't include a limiter in the output section of my plug-ins, and so if the feedback does get out of control, then you can get some loud outputs.

Inside the delay sections, there are stereo chorus/pitch-shift effects, so that the echoes have a bit of variation. There are several ways to do this - the most obvious being that you modulate the delay time slightly... But here I added the chorus/pitch-shift as a separate effect, partly because it allows you a bit more flexibility and it removes the need for a separate depth control.

The pan section shows how much things have moved on over time. The controls don't exactly make using the LFO-driven panner easy to use! Actually there are two LFOs: one modulates the frequency of the other, and you get separate control over the pan position (Phase) and the depth of auto-pannng (Depth). The 'Mode' button alters how the panning happens, and the 'No-Pan/Pan' button isn't exactly obvious at first sight. In my more recent plug-ins, I've changed the layout, controls and indicators for the output panning considerably, so this bit is very much a trip into history.

Download PanEcho from maxforlive.com

Suprisingly...

Whilst I was preparing the screen shot (above) for maxforlive (and here), I wondered what it would look like inverted. I've been gradually moving over the the fashionable 'dark' look that M4L plug-ins seem to get these days, and these have a light on dark background look, plus a blue highlight colour. I'm not sure what my intention was - I just thought I'd try it out and see what it looked like. (Many of my best discoveries come from simple 'what if' explorations, so I tend to do it a lot!) What I got surprised me:


Surprised? I was! It turns out that the basic 'dark' look is a modified version of a simple inversion of the original default Ableton colour scheme. Inverting the image turns a 2011 'early M4L' plug-in into something that appears much more up-to-date, way more appealing in some ways, and the layout looks okay as well. Possibly the easiest and most stunning makeover I've seen in quite a while...

As an experiment, I'm going to add both versions onto maxforlive.com and see which one is more popular...

Related articles

Monday 13 July 2015

Random Echoes

Sometimes ideas for audio effects seem great conceptually, but the actual result doesn't match up to those expectations. Comber 3 added random modulation to my MaxForLive Comber phase shifter, but it didn't sound quite as awesome as I had imagined.

Persistence can pay off, though. So I added random modulation to my PanEcho M4L effect, using the built-in 'M4L.vdelay~' glitchless delay module. The 'M4L.vdelay~' is good for messing about with modulation because it tends to be stable even if you are changing the delay time quite rapidly, which was going to be useful when using filtered noise as the modulation source. Here's what Rnd_Echo looks like:


Notice that I wasn't sure how to indicate that the modulation source was random, so I just added random dots to the background of the modulation section. I think it works quite well as a visual cue.

Surprisingly, the result is better than the random phasing, but still not exactly what I expected. Adding random delay times to audio echoes is difficult to describe - almost like smearing the sound out. But it is very usable, and quite unusual - it isn't the sort of sound that you hear and immediately know what is producing it, which is always good in my book.

Control-wise, there's a lot of commonality with many of my recent releases, although I've experimented here with moving things around to see if that makes things more intuitive. The 'noisy' modulation panels have two controls for the randomness - use L to control the basic rate of change, and H to control the jitteriness. The Mod control sets the depth of modulation, with an indicator light for when the delay line is at minimum delay. The two delay panels let you set the Delay time (increase this when the mod light keeps lighting up), the Sync, and the feedback, which can be to the other channel, or inside the channel. The Pan panel lets you move each delay line in the stereo image (but not randomly - yet!) and I've added a horizontal 'pan position' indication. Finally, the 'Limiter' button is left over from the Comber effect, and I've kept it because it can be useful when the feedback gets too high.

As always, Rnd_Echo is available for download from the maxforlive.com website. Enjoy.

Saturday 27 June 2015

ModeAudio Magazine articles

I've recently done four interviews for the ModeAudio online Magazine about how I explore the more unusual side of sample use, mis-use and manipulation in Ableton Live. Here's a quick index to all of the articles:

Exploring 'Found Percussion Bundle': Part 1     

Exploring 'Found Percussion Bundle': Part 2

Exploring Float's Guitar Samples: Part 1

Exploring Float's Guitar Samples: Part 2

There are accompanying blog entries here as well:

Winning was only the beginning...   

Drums - using layers in a rack...

When is a guitar not a guitar?

The DAW as synthesizer...

I'd like to thank Niall from ModeAudio for all of his support, help and enthusiasm for this project.

The DAW as synthesizer...

The fourth part of my 'playing with samples and loops' series has now been published in ModeAudio's online magazine. As always, I'm fascinated by the way that finding alternative ways to look at things is a two way process - a new loop triggers an idea, or a 'what happens if I do this?' turns into an interesting variation that opens up different possibilities. But this time, I managed to put into words something that I've been trying to express for some time - the way that modern DAWs, sequencers, host software, audio workstations, or whatever else you call them, are more than just digital tape recorders.


The blurring of the distinction between sound generation as in synthesis, and performance capture as in a recording, has been ongoing for a long time. A modern DAW now allows me to change the pitch of a synthesizer by modifying the MIDI data at its input, or by processing the audio output of the synthesizer through a frequency shifter - or both. And any of these can be captured, edited and replayed, or even added live. Effectively, the synthesis engine is the whole of the sound production chain, from sound generation, through performance capture, to live playback and interaction.

In one example in the ModeAudio article, I take a guitar-based audio loop, separate out the individual notes and stack them together, into a big, gorgeous-sounding bass synth sound. Actually, there's quite a bit more fine detail involved to do this, and this is where it gets interesting. I'd argue that the facilities that a modern DAW like Ableton Live give you to work with sound are a lot like a modular synthesizer, but with a few freedoms that modulars don't have, plus faster trying out of ideas (sometimes). The downside is that it can be just as difficult to figure out exactly what someone has done when they've stacked samples, edited them, added effects, velocity switching, and more, as it can be to work out what is happening in a modular synthesizer patch.


In the spirit of making ideas and tips more widely available (4 parts so far for ModeAudio!), then here's another one that arises from this. Why don't software modular synthesizers provide an alternative 'straightened-out' view of a patch? Instead of showing all those patch-cords linking modules, why not shorten the patch-cords, remove the detail and just show the linkages, and move the modules into a sensible order, so that you can see the generation and then the flow of the audio through the processors, and the way that the controlling modules (LFOs and Envelopes, etc.) are influencing things.


Kind of like the way that the London Underground map doesn't actually show where the lines go, but abstracts the lines so that you can understand how to get to Mornington Crescent without worrying about where it is, or how the lines bend and twist on the way. This doesn't just apply to a modular synth - it could be a complex Rack in Ableton Live as well. This type of 'abstracted view' could make it lots easier to comprehend how a sound is produced and controlled, and I'd say that that's a new feature that we should all be clamouring for! 

Why not ask your current DAW manufacturer if they are planning to do this type of view in their next release? You can always tell them I sent you!

Sunday 21 June 2015

When is a guitar not a guitar?

One answer could be: 'When it's a sample of a guitar!' Samples, or their 'here's one I prepared earlier' cousins: loops, can be rich sources of inspiration, new sounds, and more. Previously, I talked to the nice people at ModeAudio about mis-using a percussion pack. but since then, they offered me a chance to look at another of their packs.

The ModeAudio 'Float' pack contains 'Chillwave' guitar samples and loops, and so it isn't what you might immediately associate with a synthesist like me, but exploring something 'out of your comfort zone' is often very good at nudging you into making new discoveries.

As you might expect these days, this is an idea that is also available in a formalised form on the 'Interweb': http://www.oblicard.com/ (Olique Strategies: originally a set of cards by Brian Eno and Peter Schmidt, but now available via browsers and mobile apps too.)

In my case, taking some guitar loops and playing with them yielded some very interesting results - and in many of the cases, I worked with the samples as if they were raw material for synthesis, not specifically as 'guitar' loops. As a result, I didn't do much in the way of realistic guitar sounds, but instead I found a lot of very unusual and interesting sounds. One synth bass sound, made by reverse engineering a loop and then stacking the individual notes, is a sound that I'd pay good money for - just that one sound! 

I'm increasingly aware of the lowering of the barriers between synthesis and production in modern DAWs (sequencers, host applications, whatever your favourite term is!), and my whole experience with 'Float' reinforced this view. Back in the days of analogue tape, people experimented a lot (using tiled bathrooms or big suspended metal sheets as ways of creating reverb spaces is just one example), and whilst the technology may have changed, the scope for going 'outside the box' seems to be undiminished, and if anything, better than ever. 

You can see the first part of my 'guitar sample-based synthesis in ModeAudio's magazine.

Monday 11 May 2015

Drums - using layers in a rack...

The second part of my exploration of a commercial sample bundle is now available on the ModeAudio web-site. This time I actually used the 'Found Percussion' sounds for their intended purpose - drum sounds.


Actually, what I really do is just do layering of samples within a Rack, plus a bit of tweaking here and there. I find that this is one of the most useful parts of Ableton Live - the ability to be able to put together sounds into composites easily and quickly, and to have pretty comprehensive control of each sound layer. In many ways, the Ableton Rack is very similar to a modular synthesizer, but presented in a way that leads you to a specific way of doing things. This has the useful result that analysing a Rack is straight-forward: you just open it up and then look at each layer in turn. On a modular synthesizer I tend to have to work backwards from the output when I'm trying to figure out what someone has done in a patch...

The beauty of layering is that you can copy a layer and adjust the copy, or you can switch things in and out as required. In the article I do a couple of variations of a snare sound, and show how they have different spectrums (you might have a gap in the overall spectrum that each fits into, for example) - and of course, you can switch Spectrum in and out by using the power button too. A lot of my audio paths have stuff turned off using the power button that were used during development, and so they are ready to be included again when I need them.

The time it takes to become familiar with the possibilities of using Racks creatively is time well spent, in my opinion. I encourage all Ableton Live users to spend some time with Racks!

Wednesday 22 April 2015

Winning was only the beginning...

I won a competition recently! (This is a rare event for me.) ModeAudio is an interesting web-site that combines informed articles on DAWs with thoughtfully curated audio packs, and two randomly selected people got to choose a bundle from their catalogue...


So, ModeAudio sent me a bundle of samples called 'Found Percussion': 4 Ableton Live packs containing an interesting and diverse set of 750 samples, plus kits, instruments, etc. Clear install instructions and neatly separated samples in named folders showed attention to detail, which matters more and more as you work with large numbers of samples. The 'UnderCover' set shows the thinking, with folders named: Woods (19), Metals (63), Plastics (29), Snaps (12), Lids (11), Glass (16), etc. (=number of samples in the folder), and containing named samples like: Bottle Rattle, Jewel case, Calculator Button, etc. 

First off, I auditioned all of each of the audio packs, then listened to the samples on their own, and then I explored deeper, adjusting the instruments and using the samples in ways that were probably slightly outside the intentions of the creators! It was great fun, and I found that the samples were a great trigger for creativity.

You can read more about my explorations in the ModeAudio magazine.

Friday 16 January 2015

Pitch Progression MIDI Effects

Pitch Progression Grid and Pitch Progression Follow are two MaxForLive MIDI Effects for Ableton Live. They provide control over the transposition of bar-length sequences, and so can quickly produce progressions of transposed sequences.

Pitch Progression Grid

Pitch Progression Grid grew out of a simple transpose control that I created. It allows semitone or octave transpositions, and I thought that it would be good if it could be extended so that it was more flexible, and the result is a mini-sequencer that runs at the 'bar-rate', and which allows whole bars to be transposed according to the settings on the grid (pitch or velocity).


(You can see the remains of the original transposer on the far left hand side... Note also that this is a MIDI Effect, so it is on the left hand side of the track area, and requires an 'Instrument' to be on the right hand side, otherwise you will not hear anything from the track. The 'Lectric Piano' from Simpler is shown here just as an example - you can use any Live Instrument.) 

Moving across, the next vertical set of controls are the LFO, which normally runs in 'Sync' mode for this effect. (If you run the LFO free-runnng, then the transpose is not tied to the bar boundaries, which can cause hanging notes and other problems. Please leave it in Sync mode at first!) The transpose amount is shown in the large box. The transposition in this first version is crude - it transposes chromatically, so for a transpose setting of 1 semitone, then every MIDI note input will be transposed by 1 semitone. Future versions may be more flexible and do more musically useful transpositions. 


The next vertical set of controls are for the 'Position'. The transpose change normally takes place at the end of the bar. You should not have any notes in the last part of the bar - the 'Position' control sets where the transpose changes. If you set it to 50% then it will happen in the middle of the bar. The normal position is at 99.2%, right at the end of the bar. The 'Position' of the transpose change is shown as a percentage of the bar (0% = start, 50% = half way, and 100% = end) as well as more conventional beat and unit (480 ppq) notation. The block of presets allows the storing and recall of grids of transpositions. Click to recall a stored grid, and Shift-click to store a grid.


The next vertical set of controls allows the number of Repeats to be set (1 gives one bar of this mini-sequencer per bar of the sequence in the track, 2 repeats the transposition twice before it moves to the next bar, so you could think of this as being a rate of half a bar, etc.) The 'Steps' control lets you control the number of steps in the mini-sequence. This is limited to 32 (Max allows 64, but the UI becomes too small for the layout I have used!) The steps that are not in range are still available, so if you set up an 8 step transposition, and then reduce the steps to 2, then you can always increase the steps to 8 and the mini-sequencer will loop around the 8 steps. So you can control this as part of a sequence using the unlinked Envelope section of the sequence controls. 


The grid is the next and largest section. Notes rise in pitch vertically, and horizontally, the sequencer runs from left to right, and loops when it gets to the right hand side. The higher the number of steps, the shorter the notes appear, but remember that each one is still one or more bars long (unless you are in async mode). You can also transpose the velocity of the notes in each bar by using the Pitch/Velocity button at the top right. 


For anything to happen then you need to set up a sequence (one bar in this version) in the track. When you play the track, incoming MIDI notes are transposed per bar - in the edited screenshot above, the end of the bar is inverted, and this is where the transposition change will happen - this is where the 'Position' control points at. So the first bar might not have any transposition (and the sequence will play as you see it), but the first repeat could be up a fifth (as shown in the top screenshot), the next bar might be up by a fifth again, and then back down a fifth and back down a fifth again, and then it repeats. The top screenshot shows exactly this transposition grid. 


Here's a diagram that reiterates the operation. Remember that this is not a conventional 'sequencer' - it advances by one step for every bar when set to 1/1 and Sync. (It advances less slowly if you set the Repeat to more than one bar.) The sequence itself is not transposed - only the notes that are passed through the MIDI Effect to the Instrument are changed. So if you want to edit the sequence, then you need to be aware that there is only one sequence - the untransposed one. If you edit the sequence, then all of the transposed ones will be altered as well. Also recall the previous note: the transposition in this first version is crude - it transposes chromatically, so for a transpose setting of 1 semitone, then every MIDI note input will be transposed by 1 semitone. Future versions may be more flexible and do more musically useful transpositions.

The Max For Live 'code' for this is pretty straightforward:


Incoming MIDI Note messages are filtered out of the stream, then unpacked into the note number and the velocity value. The note value is then transposed (r trans) from the mini-sequencer section, flushing for held notes is attempted, and the transposed notes are clipped so that they can't go outside the 0-127 allowed range. Then the transposed MIDI Note messages are passed to the rest of the track processing - normally the Instrument. This code doesn't show the velocity transpose, because that's made slightly more interesting by release velocity...

Sustained notes longer than a bar may not work correctly (remember the 'no notes in the last part of the bar' limitation.) Basically, the effect works well when there are notes or chords in the main part of the bar and there is a gap at the end of the bar. 8 or 16 staccato note sequences work nicely, and I leave the cliched transposition progressions up to the user!

The right hand set of vertical controls allow editing of the contents of the grid. 'Random' is not a very useful option to choose, but some may like it!

Pitch Progression Follow


If you want to transpose another track in sync, then use the Pitch Progression Follow MIDI Effect in that track. This will receive the transpositions from the 'master' Grid Effect track and apply them to the notes in the 'Follow'ing track. There is some delay in the transfer, so notes at the start of the 'Follow'ing track may not be transposed until the following bar (try moving the position to a lower value...). Again, you can see the simple roots of this project here - this is very similar to the original 'transpose' MIDI Effect where I started.

Summary

This pair of MIDI Effects are very much a work in progress. They are not finished, they may well glitch, the transposition is crude and limited musically, and they are definitely not 'production-ready' in any sense.

As usual, they can be downloaded from http://MaxForLive.com . Enjoy!


Monday 12 January 2015

Making noise

I needed some noise, and whilst there are many ways to create noise of various colours, none of them quite met my need (I wanted '11' and the noise I got only went up to '10'!). Instead of exploring the available resources further, I decided to think about my ideal noise source...

In the past, I've been guilty of using the very predictable 'noise with LFO'd filtering' patches that are often used to make surf and train noises. In my defence, whilst some of the synths in question were obvious examples like a MiniMoog and 'white-top' ARP Odyssey, I've also done much the same on slightly more unusual examples like the Oberheim OB-1, Synton Syrinx, Korg PS-3300, even a Yamaha GX-1 (I also repaired it) and others. But enough of the past...

Adding a phaser and some panning and you get a pretty versatile surf, wind, rain generator. As with Comber V0.3, I had the intention to make some sort of complex multi-filter section, and maybe add this to the phaser in Comber.
But then I stumbled upon fffb~ in a quiet backwater of the Max Help pages, and I realised that with a bit of tweaking, it could make a pretty useful dynamic filter bank. The Max Help pages tauntingly say: 'This object is more efficient than using a number of reson~ objects, but for the sake of speed does not accept signals for parameter changes.'. Well that was it, it looked like I'd found my versatile filter and I just needed to find a way round the control limitation.
fffb~ is quite a monster of a filter. You get 8 resonant filters by default, but you can go up to 50 if you want to, and I decided that 16 was probably enough for a first attempt. You can control the centre frequency of the lowest frequency filter (F in the diagram above), and then the spacing between the other filters as you go along the frequency axis (I've called this 'Spread', S in the diagram above). The Q of the filters is global, but still a useful control, and the F, S and Q all duly got separate LFOs to control them. The individual Gains (G) of each filter can be set individually - so I used a conventional multi-slider controller for that. Although you can't drive everything directly with signals, you can update the parameters in real-time, and this has much the same effect.

The Q control has some problems at low values, and whilst the jerkiness that this produces in the output audio can surprise you the first time, it can also be used to provide exactly the sort of chaotic uncertainty that you get with wind sounds. There's a red indicator to warn you as you go into this mode.

The Spread control is best left near the middle (= '1') at first. This keeps the filter stable - and NOTE the 'Reset' button for when things get out of control!

Because two noise sources are better for doing wind and rain, or surf and wind, or rustling leaves and howling wind, then I doubled everything, and added LFO-modulated panning too (that's 8 LFOs in total). There are colour-coded White/Pink noise selection buttons as well.

The three LFOs provide lots of control over the filtering, and you can make lots of wind, rain and surf effects - use a phaser after it ini the chain for better surf sounds. I recommend that you use the excellent built-in 'Spectrum' display to see the output of the filter, and turn it off when you don't need it to save processing power. I've included the Spectrum display in the screenshot below as a 'serving suggestion'.


So that's the mundanely named 'Noise Generator mr 0v01'. As usual, you can download it for free from MaxForLive.com. Enjoy!

Related articles

Refined Combing...

Things don't always go the way you intend. I had an idea for a phaser effect that was driven from a filtered noise source, and the end result was something rather different. Here's the story...

'Phasers' are just comb filters where the notch frequencies are modulated up and down in frequency by an LFO. (My previous Comber effect was nothing more than a few of these in one place.)
The audible effect for typical 'vibrato/tremolo' LFO rates sounds a bit like detuned oscillators, and so can be used as a simple 'chorus' effect (there are other ways of doing chorus effects as well). At slow LFO rates then the effect is more like several resonant filters sweeping up and down, which is exactly what is going on!

But whilst sine wave shaped LFOs are all very nice, there are many other possible alternative waveforms, and repetition can get a bit boring. So my idea was to got most of the way to the opposite extreme from the pure predictability of a boring sine wave and use noise instead. Filtered noise seemed like the right thing, and so I envisaged an array of resonant high-pass, band-pass and low-pass filters, and perhaps some sort of neat GUI control to create a final 'noisy' modulation for the comb filter.
Unfortunately, the end result was not as interesting as I hoped. High-pass filtered noise just gave a rapid tremolo effect, and not a particularly nice or useful one. Band-pass filtered noise was still too busy. The only really useful noise was heavily low-pass filtered noise, containing exactly the sort of frequencies that you would use for tremolo, vibrato or a phaser! After a bit of experimentation, it turned out that I didn't need any conventional filtering at all, and that just a bit of sample averaging (OK, primitive filtering) produced nice random wobbling that sounded ok - but it wasn't anywhere near as impressive as I'd been hoping.

So I wondered if something combining the LFO and the noise was a better idea, and I added a DJ cross-fade type control to mix between the LFO sine wave and the noise waveform. This seemed to liven up the result and make it a bit more interesting and unpredictable...
But then I realised that I had an alternative source of variation, and so I added a second LFO to drive a Sample/Hold circuit that sampled the original sine wave LFO. Sample/Hold circuits have always fascinated me, right from the days when you put high-input impedance op-amps on Teflon PCBs with polycarbonate capacitors and used reed-relays as input sampling switches, all in the analogue quest for long-term voltage storage (and you still got droop over time!). In the digital domain, things are different (and you add imperfections if you want to model the real world) and so a quick bit of M4L'ing later, I had an LFO with sine waves for high sample rates, and repeated complex patterns for lower sample rates. (The S/H samples when the indicator lights up yellow, btw.)
The DJ slider became a 'Randomness' control, and I added a red indicator to provide visual feedback for when the 'Freq' and 'Depth' controls needed to be adjusted (up and down respectively), and Comber V0.3 was born! I hope you find it a more versatile and inspirational effect for your music. 


Comber V0.3 is available, as always, for download from MaxForLive.com.

Related articles