Friday 17 April 2020

Different Two - dual channel 'old school' step sequencer for parameter control sinking and sourcing

Sometimes you just don't see the wood for the trees. It happened to me when there was a question on the Facebook Max For Live Users group about a step sequencer. from Johan Wallen The OP wanted to control the slider values in a step sequencer with an external MIDI Controller. As it happens, one of the side effects of having a ready-made maxforlive object that does just about everything you might ever want in a step sequencer means that MaxForLive.com has many, many 'live.step'-based step sequencers available on it. But 'live.step' has limits (everything does!), and the question made me think - could you even do what was being asked for with live.step?

Bait taken. I was quickly in Max and testing out live.step, and it was true - you couldn't Apple/Cntrl-M map a MIDI controller to the sliders that control the pitch, velocity, etc. in live.step. Note that the intended usage for live.step is that you use the mouse to set the sliders, and then map the output to a parameter in another device. This was different - controlling the sliders themselves in live.step with a MIDI Controller. Challenge accepted.

Not using live.step was going to be interesting. Back to first principles...


The result is MIDIdifferentTWO, which is, of course, different to MIDI differentONE! TWO is deliberately 'old-school' in design, with rotary controls and big lights for each step, and is built without using live.step. So there's a classic 'counter' object to generate the steps, the rotary controls are scanned using an 8-way 'gate' object, and the lights are the standard 'blink' / 'bang' buttons. driven by a 'switch 8'object.  To complicate matters, the 'gate' object allows values to pass through it, but you have to send the value, and a rotary control only outputs a value when you change it (or bang it). My attempt at a solution was to use a 'message' object as a buffer between the rotary control and the 'gate' object, and this seems to work quite well, at the cost of quite a bit of wiring up of bangs...


I was wondering if I should use the buffer contents to replace the parameter value of the rotary controls, but decided in the end that this wasn't required. I also rejected the idea of using the buffer as the map target for the Ableton 'remote control' system 'control voltages', so that I could have the rotary controls set as 'hidden', but I'm leaving this as an option depending on feedback. The Ableton M4L Guidelines for hiding objects so that they don't overwhelm the Undo history seems to be incompatible with making controls map targets, so this design has some flexibility in terms of possible mitigations.

The Max For Live code above is simplified, and there's a missing connection! The step clock output from the counter should be connected to the left-hand input of the 'gate 8' object - but you can always look at the real code if you download the amxd from MaxForLive.com.

The initial design was just a rapid response to a Facebook 'Max For Live Users' group query, and so was me trying to see if I could make do without live.step. The result then went through several drafts to the latest release (so far) of 0.06, adding direction to the steps (the counter object makes this easy, shuffling of the order of the steps (via a look-up table), skipping of steps (using the pack object to remove/restore numbers in the look-up table, and adding a second channel synchronised to Live's transport. Having two channels, where one can be free-running (or driven by MIDI events in a clip, which probably counts as user-controlled-sync!) and the other is locked to the DAW transport gives two very different, contrasting sources of 'control voltages', plus it also looks good. For a single channel 8 step, un-synced step sequencer, then I might have been tempted to put the rotary controls in two rows to reduce the width of the device (M4L Guidelines again!), and I might even have thrown away the 'old school' look and used sliders, but two channels means that the width is going to be wide anyway, and stacking two sliders vertically doesn't work for me. 

Implementing the 'Skipping' of steps required additional map targets for each step, and I was thinking of a Novation Launch Control (or XL) when I was doing this, but there are lots of other MIDI Controllers available. The solution was to just use a toggle text object as the map target...  One complication in the Max For Live coding was how to deal with the number of steps when you could skip or un-skip steps, but once again, the 'counter' object makes changing the count maximum easy, and so I just used the look-up table length as the counter maximum, and it was sorted! I'm always intrigued by how some problems loom ahead as being major, maybe insurmountable  challenges, but when you actually start to code them, they kind of shrink and aren't as impossible as you anticipated. There again sometimes apparently simple things can take ages to figure out, so there's no certainties!

The blinking lights proved to be one of the most challenging things to get right... The 'button' object has a parameter called 'blinktime', which controls how long the light stays on once it gets a 'bang' signal. Unfortunately, when the rate at which you scan across the steps changes, then blinktime needs to change as well - ideally so that there is no overlap with other steps so two lights are both lit at once, and without any gaps where no light is lit at all. This turns out to be difficult! Now if the 'button' object would just light up for the whole of the time that a step was active, like an LED or even a bulb, then it would be easy. But initially I didn't want to mess about making a custom graphic object like that, although eventually I decided that I had to, and here's what I did...


I wrote a special object just to decode the step number to drive scrolling lights! As often happens with these things, (and as noted above!) when you sit down to do it, then it isn't as difficult as you expected. It turned out to be nothing more than a set of compares, but instead of using the 'button' object as the indicator, I used the live.toggle object, which shows one colour when you send it a one, and another colour when you send it a zero. So now the steps are shown by an indicator that lights up for the whole of that step, and is off the rest of the time. Neat and much better than my previous default indicator: the 'button' object. Sometimes being forced into a change is good for you...

Notice that this time the missing connection is missing no longer! So what do the comparisons look like inside the scroll_mr package?


As I said, all a bit obvious really. But it works very nicely!

Using MIDIdifferentTWO

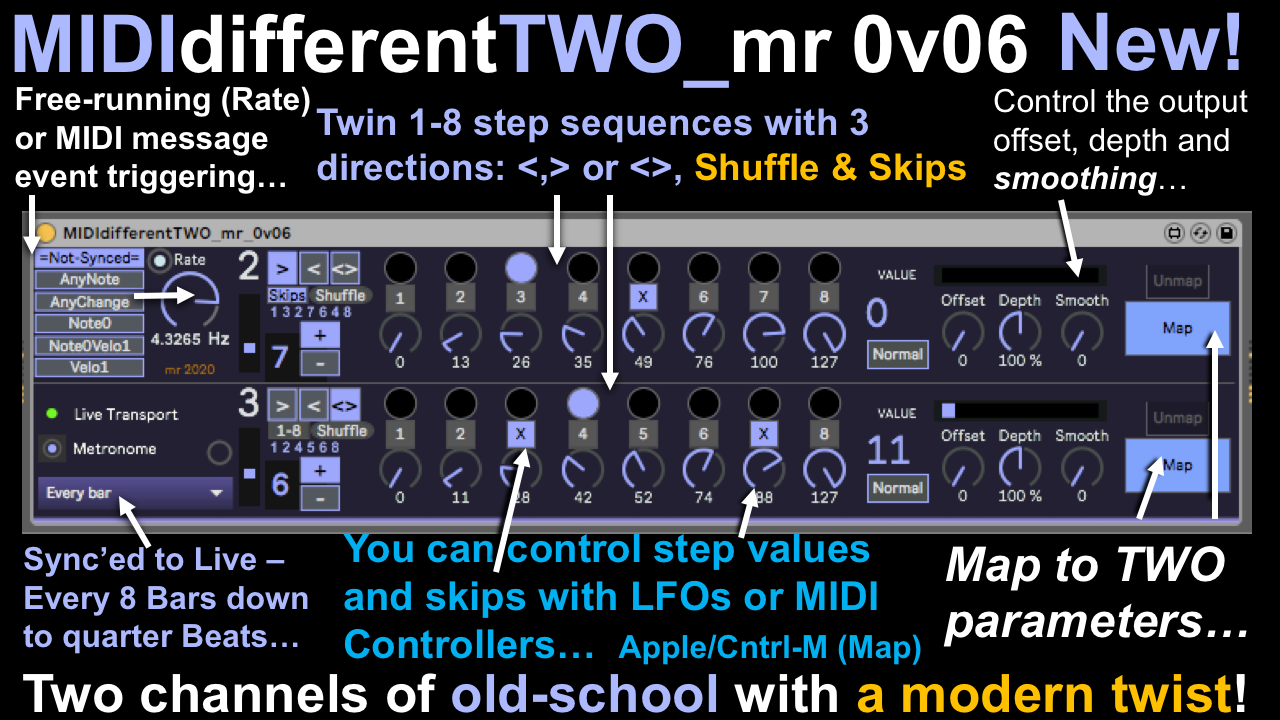
For something that started out as about half an hour's coding in response to a Facebook query, the final result (so far) has quite a lot going on! So, as usual, here's a side-to-side detailed descriptoon of all of the controls and what they do:

First, notice that there are two separate step sequencers. The top one can be either free-running (with its own clock running at the 'Rate' speed when the 'Mode' selector is set to '=Not Synced=' (I'm never sure if there should be an 'h' in synced/synched...), or else triggered by one of five different MIDI Events from the clip in Ableton Live: Any MIDI Note, Any change of MIDI Note Number (so repeated notes trigger the step advance the first time, but not after that), Note number 0 (very low frequency!), Note Zero with a MIDI Velocity of zero (the lowest, quietest note in MIDI 1.0!), or any note with a MIDI Velocity of 1 (the quietest note in MIDI 1.0). Because these MIDI Events are in the clip on the track in Ableton Live, then they are synced to Live's transport, but there's nothing to stop you having all sorts of weird timing of those notes, and don't forget the 'ignore repeated note' mode. The lower step sequencer is always synced to Live's transport, but you can choose anything from the step advancing every 8 bars to every quarter beat, which is quite a big range.

Both sequencers have the same controls after the speed/sync section. After the step number and a little count-up indicator, downwards there is the Direction control, which allows selection of left-right (ascending through the numbered steps), right-to-left (descending), and back & forth (palindrome mode, as some say). Underneath are two tiny toggle buttons. '1-8' and 'Skips' forces the full 8 steps when it is showing '1-8', whilst in 'Skips' mode the step numbers can be clicked so that they turn into 'X's, and then that step will not happen (and the length of the sequence will be shorter). Sequences that are one step long are okay, but they aren't very interesting! As you click on the step numbers to change them to the 'X's, then you will see that a row of tiny numbers will change to show the missing number. The 'Shuffle' button changes the order that the sequencer plays the steps - and again the row of tiny numbers will change to reflect the new order. Each time you get the 'Shuffle' button then the order will change. The lowest controls are nudge '+/-' buttons for the sequence length, shown as a small blue number on the left side. The step length automatically changes when you set up skips.

The central section is 'old-school': rotary controls for setting the step values, and big indicators to show which step is playing. The modern twist here is that the step numbers (in the grey squares) can be used to skip steps, but there's another hidden twist - you can control the rotary controls and the skip buttons with Ableton Live's 'remote control' 'control voltage' system. To do this, you either use the Map button in an LFO or other device, and then click on the rotary control of the grey step number square in MIDIdifferentTWO, or you put Ableton Live into MIDI Learn mode (Apple/Control-M to get into the 'blue' mode), then click on a rotary control or a grey step number square and move a slider or press a button on an external MIDI Controller. If you did this is the right order then the rotary control or step number will show an indication of the note number of MIDI controller that you have mapped to that control in a small grey box, and a line will appear in the 'Mapping' table at the upper left of Ableton's screen.

For testing, I used a Novation Launch Control to control the skips:


In the photo above you can see that the four lit buttons on the Novation Launch Control have turned steps 5,6,7, and 8 on the upper sequence into 'X's, and so those steps will be skipped. Also note that the sequence length has changed to 4 steps (the little number on the left). When I took the phot I was just about to map the rotary controls on the Launch Control to the rotary controls for the step values in MIDIdifferentTwo, so that I could control the sequence from the external MIDI Controller. You could, of course, use just about any MIDI Controller to control the sequencers inside MIDIdifferentTWO... Using an external MIDI Controller like this crosses the line from DAWless to 'DAWed', of course, but using a MIDI Controller definitely looks 'DAWless'!

After the eight sets of step  controls, the section on the right hand side deals with the output values of the step sequencers. The large blue numbers are the current output value - there's a label that says so! Underneath this is a 'Normal/Invert' toggle button, which inverts the value (so 127 becomes zero, and zero becomes 127). Next on the right are three rotary controls. 'Offset' adds to the value of each step, and can be used as a way to shift all of the values at once. If you are controlling a filter with the step sequencer, then this would behave just like the cut-off frequency control in the filter, for example. The 'Depth' rotary control scales the step values. At zero it scales the values down to nothing, so you won't hear any effect. At 100% the output is the values shown on the rotary controls. At 200%, the output is scaled to twice the values shown on the rotary controls - which means that the output value may well 'max out' at 127! The final rotary control is the 'Smooth' control, which is like the 'Slew' control on modular synths, and it turns abrupt jumps of value into more gentle slower 'slides' - it 'smoothes' the output!

Finally, there are two 'Map' buttons and their inverses, 'Unmap' buttons. You use these to map the output values of the two step sequences to other instruments, effects, or utilities inside Ableton Live. Controls that are being controlled generally go grey to indicate that they are being controlled from somewhere else (LFO, MIDI Controller, etc.), and their value moves on its own! To unmap and select another control, you use the 'Unmap' button.

Sinking and sourcing?

These are electronics terms for outputs and inputs respectively. In lots of electronic interfaces, an output is a source of current flow (it 'sources' current is the colloquial phrase), and an input is a sink of current flow (it 'sinks' it is the colloquial phrase). So for the MIDIdifferentTWO device, the step rotary controls and the grey step number squares are sinks, and an LFO or MIDI Controller that is controlling it via Ableton's 'remote control' control voltage' system would be a source. At the output of MIDIdifferentTWO, the two big 'Map' buttons are sources, and whatever they control would be sinks. Jargon, that's all.

In use


One thing to try is to change the cut-off frequency of a filter (a well-worn cliche that you can also do with the stock/factory 'Auto Filter' effect), or change the time delay of Delay (there isn't a stock/factory effect that does this!), or change the Depth in the Saturator effect to give an interesting rhythmic 'bite' variation. Basically, whatever your favourite 'control to tweak' is, you can now apply a shimmering, rhythmic version of it automatically, and free up that hand for something else, like pitch bend, or a mod wheel, or mousing, or adjusting knobs on outboard gear, or anything else. Now I know that I already have a device called '3rd Hand' (look it up on MaxForLive.com), but this is a bit like having a third hand!

Getting MIDIdifferentTWO_mr

You can get MIDIdifferentTWO_mr here:

     https://maxforlive.com/library/device/6160/mididifferenttwo

Here are the instructions for what to do with the .amxd file that you download from MaxforLive.com:

     https://synthesizerwriter.blogspot.co.uk/2017/12/where-do-i-put-downloaded-amxd.html

(In Live 10, you can also just double-click on the .amxd file, but this puts the device in the same folder as all of the factory devices...)

Oh, yes, and sometimes last-minute fixes do get added, which is why sometimes a blog post is behind the version number of MaxForLive.com...

Modular Equivalents

In terms of basic modular equivalents, then implementing MIDIdifferentTWO_mr is just two step sequencers, giving an ME of 2. The ability to control step values and skips may vary with the specific sequencer, but if implemented, then it is just more patch cables. Perhaps MEs should also include some sort of measure for the number of patch cables that are required?

---

If you find my writing helpful, informative or entertaining, then please consider visiting this link:


Thursday 9 April 2020

Completing the 'Smooth' Suite - Max For Live plug-ins for Ableton Live

It started with MIDIrandomA, which provided several different type of 'constrained randomness' triggered by either MIDI events or a built-in LFO, and then allowed it to control parameters in other Ableton Live devices using what they call 'remote control' but most people associate with the 'Map' button. Blog reader hems suggested that it would be good if this could produce more than one mappable output, which is how MIDIrandomABC was conceived. But then, after further reflection,  the smoothing function that happens in MIDIrandomA seemed to be useful in a broader context, and so I produced MIDIsmoothR, where you can input any 'control voltage' rather than solely random noise, and so smooth/process any LFO or MIDI Controller...


However, MIDIrandomA and MIDIsmoothR are big, complex, flexible, versatile Max For Live devices. They can be daunting for a new user because there's a lot to tweak! So although MIDIsmoothRRR with three mappable outputs was an obvious follow-up, it seemed like this was a good time to also release the opposite: simple, minimalistic utility devices that just do the 'smoothing' function, plus offsetting and scaling. And so, the 'Smooth' Suite was born:

- MIDIsmoothR - single mappable output, sophisticated 'control voltage' smoothing and processing.

- MIDIsmoothRRR - three mappable outputs of sophisticated 'control voltage' smoothing and processing.

- MIDIsmoothY - single mappable output, smoothing only.

- MIDIsmoothD - just a scrolling display of the 'control voltage'.

- MIDIsmoothYD - single mappable output, with the scrolling display in the background.

These last four devices complete the Suite. MIDIsmoothD allows any 'remote control' 'control voltage' to be viewed graphically, and MIDIsmoothY is small and easy to use. For those people who like stuff to look cool, then there is MIDIsmoothYD's scrolling background.


In the (imperfect!) screen capture above, the LFO waveform is sent to the three 'Smooth' Suite devices: first MIDIsmoothY, then MIDIsmoothYD, and finally MIDIsmoothD.

MIDIsmoothRRR

MIDIsmoothRRR doesn't just add two extra mappable outputs. The B and C processing channels are augmented as well, so there's quite a bit of divergence from the MIDIrandomA original.


The B channel now has separate 'Thin' power-law controls for the Up and Down segments of the waveform, unlike the 'affects both segments' 'Thin' rotary control in channel A. You should explore the way that the Up and Down smoothing controls and the associated Thin rotary controls affect the output waveshape - note that the two pairs of controls work (mostly) independently.

The C channel now has a 'Thin' power-law rotary control added after the 'Delta' rotary control. The Delta control removes any samples in the waveform that are less than the set value, which isn't immediately obvious if you use a triangle or sawtooth input waveform, so it is very different to the A and B channels - the scrolling doesn't happen at the same rate because of the missing samples, for instance.

The design of the processing in the three channels is deliberately very different. As with the original MIDIrandomA, I wanted to provide three very different outputs with as little overlap as possible. As a bonus, you also get two new variations on random-ness in channels B and C when you replace the 'Input' with 'Random'.

Map

Here's a simple infographic showing all of the members of the 'Smooth Suite':


In use


The screen capture and diagram above shows a LFO controlling the 'CV in' rotary control of MIDIsmoothRRR via 'remote control' mapping. The triangle wave is turned into a rather nice 'shimmery flame' waveshape by the B channel, and this is then sent to the MIDIsmoothD device to display it.

There's an additional 'hidden in plain sight' function in R, RRR, Y and YD: if you don't map the 'CV in' rotary control, then you can use it as a controller to produce processed outputs to control othr devices. Just click on it and move it!

Documentation

There was one previous blog post covering the first device in the 'Smooth Suite' - MIDIsmoothR. But this was a variant of an earlier series of devices: the 'Random' series.

MIDIsmoothR

MIDIrandomABC

MIDIrandomA

Downloads

In the past, I produced a 'dark' and 'light'-themed UI version of a delay effect, just to see which was more popular. The downloads so far (to 10th April 2020) are:

                   Dark       Light
KeyMon              400         348
Field Echo         1293         870
Sine3Generator      941         629
SpecD/PanEcho      1371        1225

For the 'shim' 'Smooth Suite' utility devices, the initial downloads indicate that the 'bare-bones' MIDIsmoothY is the most popular, then the 'background display' MIDIsmoothYD, and the 'display only' MIDIsmoothD has had the fewest downloads. Of course, none of these come close to one of my devices, which has had no downloads at all, ever!

Getting the devices in the 'Smooth' Suite.

You can get MIDIsmoothR_mr02 here:

     https://maxforlive.com/library/device/6116/midismoothr

You can get MIDIsmoothRRR_mr02 here:

    https://maxforlive.com/library/device/6127/midismoothrrr

You can get MIDIsmoothY_mr01 here:

    https://maxforlive.com/library/device/6129/midismoothy

You can get MIDIsmoothYD_mr01 here:

    https://maxforlive.com/library/device/6132/midismoothyd

You can get MIDIsmoothD_mr01 (the display only) here:

    https://maxforlive.com/library/device/6130/midismoothd

Here are the instructions for what to do with the .amxd file that you download from MaxforLive.com:

     https://synthesizerwriter.blogspot.co.uk/2017/12/where-do-i-put-downloaded-amxd.html

(In Live 10, you can also just double-click on the .amxd file, but this puts the device in the same folder as all of the factory devices...)

Oh, yes, and sometimes last-minute fixes do get added, which is why sometimes a blog post is behind the version number of MaxForLive.com...

Modular Equivalents

In terms of basic modular equivalents, then implementing MIDIsmoothR_mr02 requires some quite sophisticated processing of a random noise source, so it probably isn't straightforward to do from off-the-shelf analogue modules, and is probably easier to do digitally. Assuming that a maths/data processing module can do the required computation, then there's one noise generator, one processing module, some triggering logic, an LFO for the free-running version, and a sequencer for parameter storage, giving an ME of 4 or 5!

MIDIsmoothRRR is just additional CV scaling and offsetting, plus two more patch cables! So an ME of 7.

MIDIsmoothY, MIDIsmoothD, and MIDIsmoothYD require only three modules: a slew rate limiter, a CV scaler and offset processor module, and an oscilloscope module. So the ME is 3.

---

If you find my writing helpful, informative or entertaining, then please consider visiting this link:


Tuesday 7 April 2020

Sound Design: Ping-Pong sound in Ableton Live

In a complete break from the traditional content on this blog, here's a quick bit of sound design.

How to make a sound that works well to accompany a ping-pong video where a bat hits a ball... 

Piano roll a G3 and then a G4, a bar apart. For some reason, octave intervals work well for this type of sound... Try changing the intervals and see! I think it is something to do with the two different pitches being perceived as being at different distances or positions, but I've never managed to find any published research on this topic. (Which doesn't mean there isn't any, of course - one of the fascinating things about the InterWeb is that you can't always find things... Searches are not perfect, or deterministic...)


Generation


Take a sine wave, give it a fast attack, 80 ms decay, sustain zero, no release, and use a pitch envelope to pull it up from about 6 semitones down at the start of the note, pretty quickly.

The sine wave is used purely because many real world objects have a tendency to oscillate with the simplest possible waveform (and arguably the most efficient: the sine wave uses the least energy to wobble!)

The fast attack is because the transfer of energy from a hard (-ish) bat to a (hard) ball happens quickly. Compare and contrast the sound made by the strings on a tennis racket when it hits a fluffy tennis ball.

The slightly slower decay is just long enough that you can hear it (80ms is about ten times the shortest sound that you seem to be able to perceive, which is why a 'fast' 5ms attack time seems like it is fast!) and not long enough so that you become too distracted by the pitch.

The rising pitch envelope at the start of the sound adds to the natural-ness of the sound. Real-world sounds often seem to take time to get into a stable oscillation, and so this is a way of sign-posting that this is a sound that is meant to be used in a naturalisic context.

(Of course, for a true 'real' sound, then a recording of the actual sound would appear to be the best one to use... But this assumes that the actual sound is what people expect and is effective! I'm reminded of the sound of a soft drinks can being opened and the frothy liquid being poured into a glass that was synthesized by Suzanne Ciani many years ago...)

Which produces:


You might have noticed that the Noise generator is turned on, but with a very low cut-off on the 'Color' low-pass colour filter. This is very 'red' noise, and is used to add a bit of extra 'bat hits ba;;' randomness to the start of the sound. A more sophisticated implementation would use two synthesizer sound sources: one for the sine wave, and another for the noise burst (probably with a faster decay). For this simple example, I have just added in a bit of noise to the sine wave.

This 'tone plus noise' technique is usually credited to the French composer Jean-Claude Risset, and some drum synthesizer methods are often referred to as 'Risset' drums (For example: there's a 'Risset Drum' plug-in included in the Audacity audio editor software.). This works very well - using band-pass or resonant low-pass filters to filter noise so that it adds uncertainty to a low frequency tone is very good for emulating many drum sounds, and is used on some classic 70s (and 80s, even though samples were becoming increasingly popular) drum machines.

So that's the 'generation' part of the sound done. Note that the filter is wide open - using a resonant low-pass filter on a sine wave is usually spectacularly unimpressive. Now to the 'processing' part.

Processing


Next, apply a bit of hard saturation with soft clipping, followed by compression to tighten it up. Finally, wet reverb in high quality mode with early reflections, reflect and diffuse full on, and sized to taste.

The saturation-based waveshape 'distortion' is to add a bit of non-linearity to the louder parts of the sound. A pure sine wave sounds boring, and so adding a bit of 'over-drive' makes it sounds more 'real'. Imperfections are often what turns a synthetic sound into one that is more interesting and less 'synthetic'. The compression enhances the decay, and it also sounds like a compressor - which is another interesting imperfection: your ear knows what a compressor sounds like, and so putting a compressor in the sound tells your ear that you are hearing a sound that has been recorded. Adding in an artificial noise floor might be another method of adding fake cues for 'reality'.

(The real experts in using subtle cues to make audio sound real are the people who add sounds to movies and TV. For animations in particular, there are no sounds with the pictures, and so everything needs to be added: rustles, bangs, knocks, footsteps, soft drinks cans being opened, kissing, cutting bread, slurping coffee and more. This process if called 'Foley', named after Jack Foley, who was one of the people who used a wide variety of props to add sounds to moving pictures. Of course, a Foley artist would probably use a bat and ball for this particular piece of sound design...)

The reverb is really two things: the early reflections and the 'space'. The rapid echoes known as reflections accentuate the sharpness of the attack, and they emphasise that energy has been transferred. Blockbuster movies use a variety of busy, wobbly or low, growly sounds to indicate the movement of power, and these are so ingrained in what people expect that it feels wrong when you don't get them in real life. Spaceships in space don't make sounds, and yet you 'know' (and expect) that all of that pent-up energy required to thrust them into hyper-space just has to make a sound! Without the sound, it would feel 'fake'...). The 'space' part of the reverb is to give the listener a sense that the focus of their attention should be the bat hitting the ball - everything else goes 'out of focus', but it also imposes an artificial spacial environment that isn't present in reality. The apparent big reverberant space gives the sound gravitas, importance, significance - it screams (gently): 'Watch me!'

Which all looks like this in Ableton Live stock audio effects:


Results

The resulting sounds are available on SoundCloud. The demo track contains just two notes: a G3 and a G4. (using the Ableton 'C3=60' note naming convention) The result is not perfect (and what is?), but imho a good starting point for this type of sound... You should use this tutorial as a starting point to exploring with your own personal variations - just copying what I've done will only get you part of the way along the lifetime quest that is sound design. For further study, you could compare and contrast my sound to commercial examples in music tracks and sound libraries...

---

If you find my writing helpful, informative or entertaining, then please consider visiting this link:


Max For Live 'Control Voltage' Smoothing device for Ableton Live...

I admit here and now that I don't know what to call the signals that go from an LFO to a mapped parameter in Ableton Live. If they weren't inside a Digital Audio Workstation (DAW) but were transferred by patch cables in a modular synth, then I would call them 'control voltages'. Ableton call the process 'remote control', but they don't seem to say what the signals are called. So in the absence of any authoritative guidance, I'm going to call them 'control voltages' but in quotes - that way I'm trying to indicate that they aren't voltages, but that I'm hijacking the phrase because I don't know what they should really be called...


But I do know the name of the subject of this blog post: MIDIsmoothR! A combination 'control voltage' smoothing / slew rate limiter, plus a random 'control voltage' source. Here's the story of how it came to be:

The story


When I published MIDIrandomA and MIDIrandomABC, they were intended to be interesting alternatives to the LFOs that are often used as sources for 'remote control' of parameters in Ableton Live. Particularly the 'random' 'noise' waveforms that old-school synthesists like me call 'Sample & Hold' or 'S&H', even though there's a whole unspoken abbreviation in there - we mean: 'the jerky segmented waveform that you get when you apply a Sample & Hold device to a Noise generator' and the source of the resonant filter cut-off sound cliche.

In a world where there seems to be an assumption that noise comes in only three flavours: 'white', 'pink' and 'coloured' (The terminology is derived from the same spectrum-based descriptions as for light. So 'white' light contains all of the visible wavelengths, just as white noise has the same intensity at every audible frequency. Pink light contains more lower wavelengths (at the 'red' end of the spectrum) and so pink noise contains more lower frequencies.) Anyway, just as there are lots of different colours of light, so there are many, many different types of noise - from rumbles to hisses, with wind and 'waves breaking onto the sand' somewhere in there as well.

MIDI effect devices with names containing 'LFO' almost always provide a 'Random' waveform. Sometimes there are two different versions: a pure noise waveform, plus a flat segmented 'Sample & Hold' version. The problem is that having just a single jerky segmented 'Sample & Hold' waveform assumes that the distribution of values is right for your application, and it might be that you do not want each possible level to happen with the same probability. Which is where MIDIrandomA and MIDIrandomABC's remit comes from - lots of different varieties of random, noisy 'control voltages'.


But sometimes that S&H waveform is too jerky, and you need something more rounded, which is where MIDIsmoothR is used. It allows the 'control voltage' 'remote control' of any LFO or other MaxForLive device to be smoothed with a three different processing options. Just map the LFO or other device so that it is 'remote controlling' the 'CV in' rotary control in MIDIsmoothR, and set the 'input/Random' selector switch to 'Input' so that the 'control voltage' will be processed inside MIDIsmoothR.

The 3 processing channels? A allows waveform quantisation and power-law distortion. B allows separate smoothing to be applied to the rising and falling parts of the incoming waveform (plus global smoothing as well). C allows you to remove rapid changes (below the limit set by the 'Delta' rotary control), and then allows that to be smoothed. You can choose which of these smoothing/processing options is sent to the output with the A/B/C switch, and then offset or scale the value that is sent to the parameter which has been selected by the 'Map' button. (Click on 'map' and then click on the parameter that you want to control...).

If you switch the 'Input/Random' selector to 'Random', then MIDIsmoothR behaves very similarly to MIDIrandomA, although the A, B and C channel processing/smoothing is slightly different. As the name suggests, MIDIsmoothR is designed for smoothing!

The big selection box on the upper left hand side chooses how the input is sampled. The 'Not synced' top option uses the LFO clock set by the 'Rate' control to grab the input value. The other options on this selector allow various MIDI messages to trigger the sampling:

- Any MIDI Note,
- Any change of MIDI Note number (so repeated notes will not trigger the sampling),
- MIDI note number 0 (the lowest MIDI note),
- MIDI note number 0 with a velocity of 1 (the lowest note and the quietest velocity value), or
- Any MIDI note with  velocity of one (the quietest velocity).

Three in One

It isn't immediately obvious when you first look at MIDIsmoothR, but it actually allows you to do three different things:

- Process 'remote control' 'control voltages' in various ways, including smoothing (sometimes called 'slew rate limiting' on modular synths)
- Generate random 'control voltages' and map them to controls in other devices (Ignoring the 'CV in' rotary control)
- Sample & Hold 'control voltages' from other devices (LFOs, MIDI Controllers, etc.) using MIDI event triggers and use that to control other devices

If I can think of anything else that I can squeeze in there, it will be in a future update... And on that topic:

Version 0.01 had a bug in channel B, which caused a fixed value to be output. This is fixed in version 0.02.

'Remote control' processing...

MIDIsmoothR is quite unusual - there aren't many 'remote control' 'control voltage' processing devices written in MaxForLive for Ableton Live (or indeed, native devices from Ableton!). Normally, you use the 'Map' button to send 'control voltages' over the 'remote control' system from a device that produces 'control voltages' (like an LFO, or MIDIrandomA!) to a control parameter in a device that you want to control (just about any parameter (rotary controls, sliders, buttons... in just about any device). But MIDIsmoothR goes in-between those two devices, modifying/processing the 'control voltages'. (For a while, I did wonder if I should call it PROCsmoothR...)


Above is a diagram of a 'remote control' connection from an LFO to a Delay device. The LFO 'Map' button would show that it was controlling (for example) the time delay buttons in the Delay device.

Adding MIDIsmoothR to process the 'control voltage' looks like this in Ableton Live:


On the left side, the LFO 'Map' button shows that it is controlling the 'CV in' rotary control in MIDIsmoothR (and note that the input selector in MIDIsmoothR is set to 'Input'). On the right side, the MIDIsmoothR 'Map' button shows that it is controlling the time buttons in the Delay device.

(The 'L' is because this is where the mapping was set up - to the Left channel time delay buttons in Delay. But the 'sync' button is active in Delay, and so the right time delays are the same as the left buttons. You can see two channels of random 'control voltages' mapped to the left and right time delay buttons separately (sync is off) in the blog post about MIDIrandomABC... and you can hear the effect in this SoundCloud demo...) 

So the 'remote control' connections diagram now looks like this:


The LFO controls the CV In rotary control of MIDIsmoothR, which processes the LFO waveform and then controls the time delay buttons in the Delay device. Although you can't see the connections explicitly in Ableton Live, the text that replaces the 'Map' in the 'Map' button gives slightly cryptic clues...

In use

You could apply different random delay times to different notes in a sequence, which sounds really unusual.

Or you can randomise the detune of a two oscillator synth...

Or you can use a smoothed 'control voltage' to change the Size or Decay Time parameters of a Reverb, which can sound a bit like granular synthesis. Randomly changing the 'Diffuse' parameter in a Reverb sounds like a more sophisticated version of the classic 1980s 'gated reverb' effect...

Getting MIDIsmoothR_mr02

You can get MIDIsmoothR_mr02 here:

     https://maxforlive.com/library/device/6116/midismoothr

Here are the instructions for what to do with the .amxd file that you download from MaxforLive.com:

     https://synthesizerwriter.blogspot.co.uk/2017/12/where-do-i-put-downloaded-amxd.html

(In Live 10, you can also just double-click on the .amxd file, but this puts the device in the same folder as all of the factory devices...)

Oh, yes, and sometimes last-minute fixes do get added, which is why sometimes a blog post is behind the version number of MaxForLive.com...

Modular Equivalents

In terms of basic modular equivalents, then implementing MIDIsmoothR_mr02 requires some quite sophisticated processing of a random noise source, so it probably isn't straightforward to do from off-the-shelf analogue modules, and is probably easier to do digitally. Assuming that a maths/data processing module can do the required computation, then there's one noise generator, one processing module, some triggering logic, an LFO for the free-running version, and a sequencer for parameter storage, giving an ME of 4 or 5!

---

If you find my writing helpful, informative or entertaining, then please consider visiting this link:


Sunday 5 April 2020

Three Mappable outputs of controllable Random-ness in Max For Live for Ableton Live

Comments are always interesting - once you've filtered the spam and adverts out, of course! So when blog reader hems reminded me in a comment that having just one mappable output in RandomA was quite limiting, it nudged me into a new variant of MIDIrandomA...


MIDIrandomABC has three separate mappable outputs that can each be assigned to any of the three built-in types of randomness: called A, B, and C for brevity. So you can now control three parameters in Ableton Live with the same value, or an inverted version, or a scaled and offset version, etc. This enables lots more control over what you randomise and how!


One application that I've been playing with (I've watched too much Ricky Tinez videos on YouTube) is to control the delay time for left and right channels separately in the stock Ableton Live 'Delay' plug-in (other delays are available) as well as the feedback amount. Using the 'Any Note' mode, then the random vlues change for each note event in a clip, and so you get 'per note' changes to delay times and feedback. This sounds really rather nice - the sort of variability that tends to be more associated with modulars than DAWs... I can see that I will have to do a SoundCloud track and YouTube video when I have a moment...

Getting MIDIrandomABCmr02

You can get MIDIrandomABCmr02 here:

     https://maxforlive.com/library/device/6110/midirandomabcmr02

Here are the instructions for what to do with the .amxd file that you download from MaxforLive.com:

     https://synthesizerwriter.blogspot.co.uk/2017/12/where-do-i-put-downloaded-amxd.html

(In Live 10, you can also just double-click on the .amxd file, but this puts the device in the same folder as all of the factory devices...)

Oh, yes, and sometimes last-minute fixes do get added, which is why sometimes a blog post is behind the version number of MaxForLive.com...

Modular Equivalents

In terms of basic modular equivalents, then implementing MIDIrandomABCmr02 requires some quite sophisticated processing of a random noise source, so it probably isn't straightforward to do from off-the-shelf analogue modules, and is probably easier to do digitally. Assuming that a couple of maths/data processing modules can do the required computation, then there's one noise generator, two processing modules, some triggering logic, an LFO for the free-running version, and a sequencer for parameter storage, giving an ME of 6 or 7!

---

If you find my writing helpful, informative or entertaining, then please consider visiting this link: