Some
time ago, I looked at the 'factory' Ableton Live MaxForLive device called '
Scale', and in particular the '
Inverted and Useless' preset, which is both a good and a bad description. Behind the scenes, I was working on my own 'scale' device, and this has recently been updated to the point at which it is probably releasable. Yes, I know that I often seem to release things too early, but sometimes things that I don't release go through slow and tortuous development behind the scenes (Waverne 2 is one example), and there are also devices where the beta testing takes longer than expected. Anyway, NoteScalery is now at the point where I think it is ready for people to play with, and it will be followed by a number of other related devices that depend on having some way of controlling the mode/scale of the notes that they produce. All of the data spreadsheets that I produced in order to create NoteScalery will be made freely available for download.
Scales
So what's a scale (in the genre of conventional 'Western' music that MIDI 1.n kind of assumes)? For MIDI notes then it can be thought of as a mapping between all of the possible notes (128 of them, numbered from 0-127) and a smaller set of notes that follow a (normally) musical rule. So example rules might be along these lines: 'All of the white notes', or 'The notes in the key of C Major', or All notes except sharps or flats'...
Now because of the way that notes have an interesting property related to multiples of pitch, then, if you go up in semitones from a given note, after 12 semitones, you end up at the same note, but one octave higher, and this note has double the pitch or frequency of the note where you started. Octaves are very special intervals because of this doubling (or halving if you go down in pitch), and when you combine this with the equal intervals between the semitones (in equal temperament), then this hugely influences the way that people think about the way that notes work together. 12 notes in a familiar black and white pattern, and it repeats every octave, so everything must repeat every octave, yes?
Unfortunately, it isn't quite as simple as this. You can see this when a piano tuner 'tunes' a piano. Actually, whilst they do 'tune' the piano, they also have to make compromises because those 12 neat semitone notes are only an approximation that sounds reasonable in most key signatures - and the piano tuner is adjusting the notes so that various intervals sound okay 'overall'...
You can also see a problem when you have minor scales that are different when they are ascending or descending, and when you start to invert the notes in a scale then things
can go very weird. So the idea that a scale applies to an octave of notes is a nice tidy approximation that works in a lot of cases, but it isn't perfect for all cases.
In musical terminology, the correct word for the mapping of notes is a 'mode', but scale is often used synonymously...
Implementation
So how are MIDI Scale devices typically implemented? Well, they use octaves - they show which notes are in the scale for an octave, and just apply this across the whole the note range. Simple.
And sometimes things really are that simple. If you look inside the MaxForLive PitchScaler device that comes with the M4L examples in Live 9, then you get code that fundamentally exploits octaves:

On the left is the raw Max code. In the middle I have marked up the main sections, and on the right is the block diagram of what is happening. So after the decoding of the incoming MIDI messages, then there is the split into two sets of numbers: Note numbers, and Octave numbers. Note numbers go from 0-11 and indicate which note in the octave has been received. To extract this from the raw MIDI Note Number you just do a modulo 12, which is what the '%12' object does - it just repeatedly subtracts 12 until the result is less than twelve. You probably know this as a 'remainder' - the number that is left when you do a division. The Octave number is interesting, because when you 'repeatedly subtract' in the modulo function to get the remainder, then the number of times that you repeat is the Octave number. So if the MIDI Note number that was received was 25 then subtracting 12 gives 13, and subtracting 12 from that gives 1, so we know that the Note number is 1 (if C=0, then 1 will be C#), and the Octave number is 2, because we had to subtract 12 twice to get a remainder which was less than 12. So the MIDI Note was a C# in the third octave.
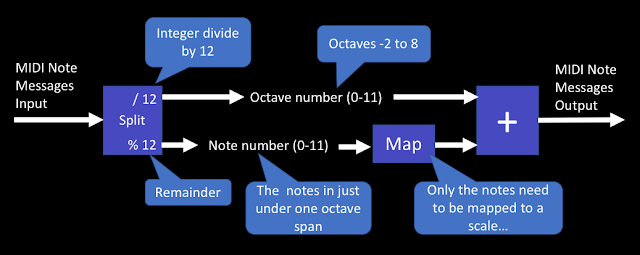
Now that there is only one octave's worth of Note numbers, then mapping which input numbers produce which output numbers requires just a 12x12 table. Nothing needs to happen to the Octave numbers - they just pass through to the output. The output stage is shown as an addition with a '+' symbol, but actually there's two extra refinements in the code. First notice that the output of the map table has another modulo function, so if there is any unexpected value in the table, then the only Note numbers we can get out will be less than 12. Second, the Octave number is multiplied by 12, so that we undo all of the repeated subtractions. When we add together the mapped Note number and the multiplied Octave number, then we get the MIDI Note number for the mapped note on the scale - as defined in the map table.
So that's how Ableton's own example does it, and you might be forgiven for thinking that we are at the end. We have a working Scale device!
If you look at the standard 'Scale' device that is included with Live, then you can see the mapping table because Ableton made it part of the user interface (it is all those light grey, dark grey and orange squares!), and it is12x12 squares. So it seems likely that this is coded similarly to the PitchScaler MaxForLive example - and the 'Fold' function limits the output to just one octave, which is exactly what happens if the Octave number is not allowed to the output...
Unfortunately, this 'Split' approach is not perfect. As I have mentioned before, the behaviour of this type of scale mapping device breaks down if you want to invert MIDI notes, so that the high notes play low notes, and vice-versa. It is well worth going back and seeing how things
can go very weird... But the main problem is those two 'modulo' functions that are cairned out on the MIDI Note numbers. You remember that these are just repeatedly subtracting 12 until they get a remainder of less than 12? Well, this requires a loop that repeatedly subtracts 12, and inside that loop is a check to see if the remainder is less than 12. For a typical MIDI Note number of say 60, then this is going to require quite a lot of operations to be carried out, and it turns out that whilst a '+' operation can be very quick, the 'modulo' function can be a lot slower. If we think what is happening here, then we have two slow operations being carried out on each and every MIDI Note message, and this is going to delay the start of the note being played by the instrument (synth, sampler...) in that channel inside the Live DAW. Unwanted delay is not good.
To remove the delay, then one method is to remove the modulo functions. This can be achieved by using a larger table - and to cover all of the MIDI Note range then we would need a table of 128x128.
Here's a conceptual diagram that shows the 12x12 tables from the Scale device, mosaic'ed together to produce a 128x128 table, so that we can map any incoming MIDI Note number to any outgoing MIDI Note number, and the only operation that is required is to look up the MIDI Note number and see what the output should be - easy to do, and fast!
Actually, most of the time, the inputs and outputs are going to be quite similar, and so if we look at a 'Chromatic' scale, where each input note maps to the same output note, then actually, most of those 'Scale' tables will not have any orange squares in them at all - the only orange squares are gong to be on the lower left to upper right diagonal. So the 'copy and paste'd Scale tables in the diagram are not a fair reflection of reality.
For an 'Inverse and Useful' mapping, then the diagonal just goes the other way. Unlike the 'Scale' device, this mapping works perfectly - it produces low MIDI note outputs for high MIDI input notes, and vice-verse, and with low delay time. In this screenshot the 'Scale' tables are not shown, and you can see that most of the table is empty. In this case, there will be just 128 orange squares along that diagonal: one for each input note (mapping it to the inverted output).
MIDINoteScalery
And that's what is inside my
MIDINoteScalery device - a 128x128 table (mostly empty), plus a few utilities and an interesting way of visualising the scale and the way it maps the input notes to the output notes.
The 'zl lookup' object replaces the 'mapping' object in the previous example, and the inversion, transposing and folding are handled slightly differently, but the 128x128 table does all of the scale mapping with a single look-up operation - there are no modulo arithmetic or integer divisions required any longer... Well, as long as you don't use the 'Fold' feature, but I'm working on removing them from that as well - watch for a future release...)

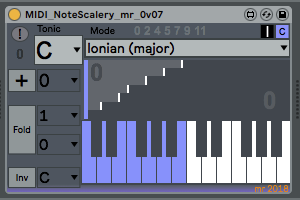
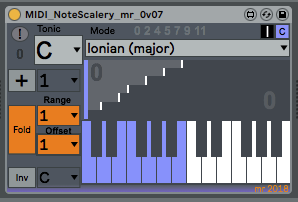
Ableton's Scale device has the incoming MIDI notes going vertically, and the outputs horizontally. This isn't how MaxForLive normally shows keyboards, and so the table needs to be rotated along the diagonal - the input notes now match to the horizontal axis of the table. The orange squares have been replaced with a 'staircase' diagram that makes it easy to see if the interval between output notes is one semitone, two semitones, three, etc. For the 'C Major' scale shown here, the C# isn't present in the output, and so the interval between the C and the D is 2 semitones, so the 'tread' of the staircase is 2 semitones wide. The next interval is from D to E, which is 2 semitones again, and so the tread is 2 semitones wide. The next interval is from the E to the F, which is only 1 semitone, so the tread is only 1 semitone wide, and you can see this in the 'staircase' diagram.
So how do you make a mapping table? In this post I'm going to show you how to create the table, and all of the spreadsheets that I show will be available to download for free, so you can make your own custom tables, and your own scale/mode mapping devices if you want to.
Types of scale
There are lots of scales, and so I chose two sets: scales starting with capital letters are basic scales, whilst scales starting with lower case letters are more unusual. The scales are deliberately organised in this order, with 'invert' as the final scale.
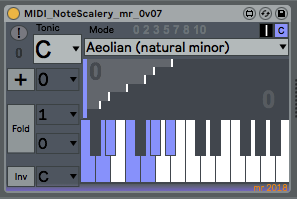
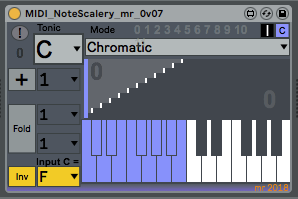
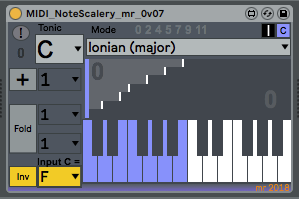
The basic scales (or more correctly, modes) are shown above with a base key (or Tonic) of C. The 'Chromatic' mode is a 1:1 mapping - the output is the same as the input! The Ionian mode shown here only outputs the white notes; C, D, E, F, G, A, and B.
To be able to create the mapping table, then the notes need to be in a form where MaxForLive can work with them. Here is the same table, converted to numbers instead of note names. When I did the conversion, I didn't subtract 1 from the numbers, and so you need to do this to get them into the form that is used to represent the notes in the octave: so C is 0, C# is 1, D is 2, etc.
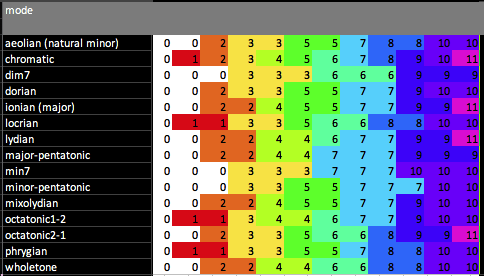
In this table, then the numbers from the previous table have been converted again - this time into a form where the output note number is shown, and so there are always 12 outputs for the 12 note inputs in an octave. So, reading across the 'Chromatic' mode, the outputs are '0 1 2 3 4 5 6 7 8 9 10 and 11'. Reading across the 'Ionian (C Major) mode, the outputs are '0 0 2 2 4 5 5 7 7 9 9 and 11' - which means that and C# inputs will only produce a C output (the '0'), D and D# will only produce a D output (the '2'), and so on. Note that some of the modes only have a small number of output notes - the minor 7th has only 0, 3, 7 and 10, for instance.
Now this table is almost useful! If you use the 'Ionian C Major' mode, then the numbers indicate what the output should be for each input. So the numbers are '0 0 2 2 4 5 5 7 7 9 9 and 11', and this means that if the input is a C or C# (note numbers 0 and 1), then the output will be 0 (C). For the next two note inputs, D and D# (2 and 3) then the output is 2 (D), and so on. These numbers are a simple lookup table where you move horizontally for the input note number, and the number in the mapping table is the output note number.
To read this type of table into a MaxForLive 'coll' object, so that the numbers can be fed into a mapping 'zl lookup' object, then additional formatting is required. This is just a case of concatenating columns in the spreadsheet, as shown above.
The tables so far have only shown a single octave. Using a spreadsheet, it is easy to extend the table to higher numbers - all the way to 128 for all of the possible MIDI Note numbers that can be input and output. All you do is add 12 to each of the values in the first octave to get the values for this second octaves, then ad 12 to those for the third octave, and so on. This gives rows with 128 values: one for each MIDI input note number, and each number in the mapping table is the MIDI note number that will be output:
This table has entries from outputs of 0-127 for each of the 128 MIDI Note input numbers. The full table is in the downloadable spreadsheet, and contains complete tables for all of the basic and unusual modes. Note that there isn't any magic or deep maths in the mapping table - it literally is just horizontal rows of numbers that specify what the output number is for a given input number.
Utilities
The default setting for the MIDI NoteScalery device is a straight-forward mapping of input notes to output notes. The output notes are shown as colour (blue or orange - selectable), and when an accidental (black) note is output then that is shown in colour.
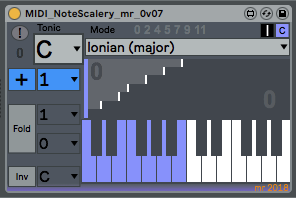
The '+' button (blue) allows the output notes to be transposed. If the transposition goes outside of the MIDI note range then the notes will be folded back into range.
The 'Fold' button (orange) allows the output notes to be restricted to a range of 1, 2, 3... octaves, with an offset. So if you want the output notes to be only in the range of 1 octave, then set the range to 1 and the offset to 0. As I mentioned earlier, the 'Fold' function still uses the modulo function internally, but this should be removed in a future version...
The 'Inv' button (yellow) allows the keyboard to be inverted - perfectly. High input MIDI notes will produce low MIDI note outputs, and vice-versa. This can be done for any of the modes, and it is recommended that the 'Chromatic' mode is used initially. inversion can be set to happen around any note - in the examples shown, a C input will be output as an F.
Summary
MIDI NoteScalery is one of a family of utilities intended for exploring scales and modes. All of the devices will be available from MaxForLive.com for free (and in fact, some of them are already available!).
The two devices that are included by Ableton in Live are 'Scale' and 'PitchScaler'.
Getting MIDINoteScalery
You can download MIDNoteScalery for free from MaxForLive.com.
Here are the instructions for what to do with the .amxd file that you download from MaxforLive.com:
https://synthesizerwriter.blogspot.co.uk/2017/12/where-do-i-put-downloaded-amxd.html
(In Live 10, you can also just double-click on the .amxd file, but this puts the device in the same folder as all of the factory devices...)
Getting the 'Scales and Modes' spreadsheet...
You can download the 'Scales and Modes' spreadsheet from
here. It is stored in various formats to try and maximise availability. Whilst it starts out with just music theory turned into notes, the numbers rapidly become somewhat MAX-oriented, so this isn't a general-purpose 'scale development tool', although the mapping should be reasonably easy to apply to other environments. Note that there are three tabs - people often seem to overlook tabs on spreadsheets...
'Basic' - the first tab contains just the basic scales in a 'coll'-friendly format. Just a 'cover'-screen, really.
'One Octave' - the second tab has all of the data for a single octave for the basic and extended/extra scales, and contains just about all of the notes and numbers that should be useful for making your own scales and mapping tables. The data goes quite a long way across the the right... You can use this tab for developing and testing your own scales (and getting used to the 'CONCATENATE' function that is used all over this spreadsheet, and which is indispensable for assembling data into arcane formats...) and reformatting to suit your own development environment.
'Full Range' - the third tab is the 'One Octave' extended to cover all 128 MIDI Notes. This time the spreadsheet goes a very long way over to the right, and it then continues downwards. The final 'big table' actually starts at row 58, so don't miss it. This tab is where you will produce your final 'big table'...
If you are interested in how to use the Excel 'CONCATENATE' function, then you may find this spreadsheet useful - it is used everywhere to assemble numbers into the format that objects like 'coll' expect.
If/when I get around to recoding the 'fold' code so that it doesn't use the modulo function, then the table development spreadsheets will be made available for free as well.
Modular Equivalents
In terms of modular equivalents, then it depends if you count a 'Scale' module as a 'basic' module, and once again you rapidly get to the point where you want to step outside of the 'basic modules only' rule and go into more specialist modules. I'm going to add a 'Scale' module to the 'basic' set, and so my estimate is that full functionality is going to require a scale module plus some additional CV processing (for invert and fold) and so this gives a grand total of 3 ME.