Thursday 31 December 2020

Thoughts on Asynchronous Loops in MaxForLive for Ableton Live...

I ruthlessly prune comments. There are some people who think that every blog is a place where they can advertise for free, and so they add automatically generated comments with a clickable link somewhere and hope that people will click on it. I just delete these 'chancer' comments. But, sometimes, a genuine and interesting comment arrives...

ElDepleto wrote a comment recently at the end of the 'Non Euclidean...' blog post:

Hello. I have been reading your blog for a while and I really enjoy your devices. I am hoping you can help. I am looking for a m4l device that can play 4 asynchronous loops not tied to Ableton’s tempo or any tempo really. Thinking Discreet Music by Eno. I’d also like to be able do Reich style phasing with it. I am hoping you know of something that exists. Drag and drop would be ideal. Anyway, I hope you have a happy holiday and keep up the great work! -Brian

This one caught my attention, and I thought that it would be a good opportunity to do a one-off 'Adam Neely'-style 'Q&A' blog post, and you are reading it!

Asynchronous loops...

The blog post that the comment was attached to was was for my Non-Euclidean, Non-Linear Sequencer Toolkit, and this can be thought of as being close to the opposite end of a spectrum of approaches that has the 'I'm looking for...' 'Asynchronous Loops' at the other end. My Non-U, Non-L sequencer produces MIDI notes where the timing can be phased/slipped relative to each other, and you can have up to four sets of sequences running plesiochronously at once. The 'Plesio' prefix is a description of the case where two systems are not asynchronous, but they are not synchronous either. It turns out that async and sync are just extreme cases, an there are lots of 'partially synchronous' cases in between, hence 'plesio' meaning 'partly'. In this case, the minimum time interval is a 64th note, and so the phasing is coarse and quantised to Live's timing clock, but it can still give some interesting outputs. 

The 'other end' is multiple loops (samples that repeat with some degree of seamlessness) where the ultimate 'analogue' form would be four separate tape loops, with the minimum time interval between them being down to an atom of iron on the magnetic tape. The digital equivalent could be implemented in a number of ways: fractions of a cent of pitch shifts, perhaps, or just four different length loops played back at the same rate (although the sample rate imposes a 'quantisation' limit of time for this method), or different playback clocks... Of all of these, the analogue tape is probably my favourite - because it is simple and mechanical. So, not for the first time, digital technology has turned easy accessible DIY into something more like arcane complexity...

Database?

There's an easy answer, of course. Just search the MaxForLive.com repository of M4L devices. Unfortunately, whilst there are a lot of M4L devices on MaxForLive.com, the sheer number of them can make it hard to find a specific instance (or instances). It isn't an accident that it took several different attempts at Internet Search Engines (Alta Vista, for example) before we got the current giants of search, and it took a lot of thinking, invention, and several reworks of business models before we got where we are now. MaxForLive.com is a wonderful resource, but asking the developers of devices to describe their work isn't a guarantee of unbiased, accurate and consistent classification. 

Databases are interesting pieces of software. Shoehorning data into a spreadsheet and expecting it to be usable as a powerful relational database is unlikely to pay dividends, and actually, that's the point - for a database to have value, then it needs to have money spent on compiling it, on verifying the data in it, on making it accessible, on keeping it up-to-date, and more. Sometimes you can get people to do this themselves: Google Earth is an astonishing example of how ordinary people freely provide hugely valuable data updates. But it normally requires money up-front, and with payback later. The scale gets big very quickly. On the opposite end of the scale, you have Pianobook.co.uk, where in just over a year or so, over 400 sample-based virtual instruments have been freely donated as a common resource (looked after by volunteers), and there's already a problem of finding stuff, just like on MaxForLive.com. 

400 is an interesting number. If you were asked to sort 10 numbers into order, then you would probably have no hesitation in doing it without any planning. For 100 numbers, then you would probably spend a bit longer planning out your approach. 400 is getting big enough to think about asking a few other people. 1,000 would be quite daunting. 10,000 and you would be thinking about having to do a lot pf planning and setup to achieve the task. 100,000 and most people would probably go to a specialist company to do it. So 400 looks like it might be close to the number where it starts to turn into something non-trivial and requiring real effort - and money. 

MaxForLive.com has almost 5,000 devices...

5,000 devices is a lot. If it takes you an hour or so to get thoroughly familiar with how something works and what it does, then you might do 5 or maybe 8 devices in a working day... This means that it will take you something like 2 years to get a good level of familiarity will all the devices, and this isn't taking into account updates and new device releases. I would be surprised if there are many people who have a good grasp of all of the devices on MaxForLive.com.

Back Catalogue...

My first thought was to look in my own back catalogue! I have about 100 M4L devices on MaxForLive, and there are some that get close to what is required. (And if not, then the temptation to make one of my own would be enormous!)

I didn't find exactly what was required, but they were related and still interesting...

26 November 2017 - dFreez

dFreez is the 'drone-performance-oriented' version of sFreez, a 4-channel sample player that uses a 4-phase LFO to cyclically fade between the four samples. It makes creating atmospheric washes of sounds (drones, etc.) very easy - just drag and drop four samples and off you go! The addition was a slow 'Fade Up/Fade Down' control that can take a long time to fade up or down...

https://blog.synthesizerwriter.com/2017/11/dfreezmr-m4l-live-performance-utility.html

20 October 2017 - sFreez

This is the original 4-channel sample player with a 4-phase LFO that fades cyclically between 4 dragged and dropped samples to create continually changing washes of sound. 

https://blog.synthesizerwriter.com/2017/10/sfreezmr-4-phase-lfo-looped-sample-live.html

24 January 2016 - Saw4Generator

4 channels, but Sawtooth oscillators, not samples. But I learnt a lot about how tricky it can be to control 4 channels of sound at once...

https://blog.synthesizerwriter.com/2016/01/generating-audio-soundscapes.html

9 February 2019 - INSTsineATMOSPHERE

INSTsineATMOSPHERE uses 3 channels of FM oscillators and is another attempt to provide a simple user interface to a complex sound generator.  

https://blog.synthesizerwriter.com/2019/02/modulated-sine-waves-two-ways-recipe-in.html

30 August 2016 - gFreez

This is the ancestor of sFreez and dFreez, and uses granular 'frozen' spectra as the source material. So you capture a spectrum from an incoming instrument or recording, and then that is replayed as a looped 'grain'. More slowly changing washes of sound...

https://blog.synthesizerwriter.com/2016/08/audio-environments-from-frozen-spectral.html

So looking back through previous MaxForLive devices had some 'close approaches', but no direct hits.  

So I thought about it from an oblique angle...

Go local!

I realised that Ableton Live itself was originally designed as a MIDI sequencer, but that when sample replay was added to the 'Clip Launching' (Session) view, then something very different was the result. Live's Session View doesn't have any link to time in the upper part of the window - just a matrix of clips. It isn't at all like the 'Piano Roll' or 'Tape Recorder' views that had time on the horizontal axis, and pitch or tracks on the vertical axis. 

Clips in Live can do a lot. I've always been a fan of the slightly obscure 'Clip Envelope' functionality, which many people overlook. But when you have a sample as a Clip, and you loop it, then you get a lot of ability to do interesting things, all from when the Session view first appeared and Ableton let people play around with samples without any dependence on a time axis.

So if you create a Clip in Ableton Live, and set the 'Warp' and 'Loop' buttons on, then it will play as a continuous loop. The length of the sample determines the length of the loop, so it isn't tied to Ableton's transport clock. Activating the 'Warp' button but not using any warping functions means that the clip plays asynchronously to Live's transport, but it also means that if your loop is seamless, then there is only one length that you can use - the one where it is seamless! So as long as your sample has silence at the end, then you can reduce the length of the sample, and it will loop that reduced length sample. (More about warping later).

I'm sure that this is well-known, but I hope that my rediscovery may be useful to some people. 

Here's a Clip on a Track, set up as I have outlined:


The sample that I'm using is just one of the factory samples that comes in Live Suite, I think. This is just the raw 'dragged and dropped' sample. There are several things to note in the screenshot. First, the sample is not a whole bar in length - you can see the 1.1.2 marker just after the middle of the sample, but this is a view of the whole sample, as you can see in the tiny preview box at the lower edge of the screenshot. Secondly, the 'quantisation' is shown as 1/512 in the lower right hand corner, which is equivalent to 'no quantisation' in Live. Finally, there's no yellow 'Warp' marker in the grey 'warp' bar on the right hand side. In the purple bar you can see the end triangle, and in the light grey bar under that you can see the repeat triangle (or is it the other way round?), but the next bar down, the 'warp' bar, doesn't have any marker at all. All three of these signs indicate that this sample isn't tied to Live's transport. 

Track 2 has the same sample, but this time the length of the sample in the Clip has been adjusted:


The upper red ellipse on the far side shows that the length of the clip has been shortened - the purple and light grey bars now end, and there's a light grey area to the right of them. The darker grey 'warp' bar still doesn't have a yellow 'Warp' handle in it (this is good for this application!). When you change the length of a sample by dragging the end triangles, then they jump to specific places, so you don't have complete control over the length, and those places are related to the bar and beat positions. (But remember that the sample in Track 1 is NOT linked to bar or beat positions at all...)

Track 3 is just a slightly shorter sample:


The white triangle has now gone black, which indicates something related to warping, but note that there isn't any yellow warp handle, so this is just a shorter sample. Playing all three tracks at once gives exactly the asynchronousity that ElDepleto wanted! (You just need to add a fourth track and tweak it, of course!). Using the same sample makes it very easy to hear hat is happening, but you can get very good results by transposing samples down or up, and by using the /2 and *2 halve/doubling buttons to change the length. Detuning samples gives asynchronicity at a finer level of detail, if you want. 

Warping

If you want, you can use/activate the Warp facilities and see how this changes things. Here's Track 2 with modifications in Tempo applied to the sample:

If you click on the far right hand side, in the darker grey warp bar, where the yellow 'Warp' handle would be if it was there, then you will find that it appears and you can move it so that the sample changes tempo to match the loop length. This does mean that it is now synched to Live's transport, but the loop length need not be whole bars, and so is 'plesiochronous'. You can see that the quantisation has now changed to 1/32, and the length is a whole number of beats. 

If we do the same with Track 3, then we get this:


Yes, a broader light grey region to the right hand side, and a shorter, tempo-tweaked clip...

You might like to try out both variants to see which gives the asynchronicity that you want. I have to apologise for not delivering a MaxForLive device that does this, hut having the native functionality in Live is very useful. If you want to have seamless samples, but which are slightly different lengths, then the technique that I use is to overlap copies of the start and end of the sample and do a cross fade, then merge and trim back to the original sample. This means that the sample fades out its end as it fades in its beginning. I wish that audio editing tools would automate this type of editing function (Audacity, for example), but once you've got your head around it, it isn't difficult to do. 

I have done a video which shows the 'no warp' asynchronicity in action, and this is available on my YouTube channel: 

If I can find time, I may see what a stand-alone MaxForLive version would look like...

And thanks to ElDepleto for the comment! Much appreciated!

 ---

If you find my writing helpful, informative or entertaining, then please consider visiting this link:

Buy me a coffeeBuy me a coffee (Encourage me to write more posts like this one!)


Synthesizerwriter's Store
 (New 'Modular thinking' designs now available!)


Wednesday 30 December 2020

MIDI Distribution Processor - a different approach to making a sequencer

Step sequencers tend to follow a very well-defined blueprint, and getting away from fixed step timings, deterministic playback, fixed swing, limited probability controls, boring repeated velocity and other immutable articulations can be difficult. If you look back through my MaxForLive devices then you will find a few of my attempts to break free of the constraints, and this blog post aims to highlight my latest version.

When I created a tee-shirt design featuring a fictional modular synthesizer module with controls in the shape of a Christmas Tree, the plan was not to trigger the creative process. But my mind is strange, and that triangle shape got me thinking, and before I knew it, my brain had produced an idea for a very different type of sequencer - and it was different again from the Non-Euclidean, Non-Linear sequencer that I released only a few weeks ago.

The Christmas Tree looked like one of those marble-based binary decision trees that ends up with a Gaussian distribution of outputs, where the outermost 'bins' are the least likely to end up with a marble in them, whilst the innermost on are the most likely, and there is the familiar bell-shaped curve connecting them. What struck me was that the 'tree' of decisions was allowing control over the distribution of the outputs, and it was like a light coming on inside my head: I couldn't think of any sequencer that allowed control over the distribution of notes, not even any of mine!

MIDIdistPROC

So I did some exploratory programming, then tidied it up through a couple of iterations, and finally smoothed a few rough edges. The result is MIDIdistPROC, a MIDI note distribution processor that allows you to explore what happens when you choose a set of notes, and can then control the frequency of occurrence of those notes. It is kind of like a sequencer where the concept of 'notes in a specific order' doesn't exist. 

So if you give it C, E and G (as MIDI Note Numbers!), then the simplest (and the default) distribution would be for each note to be equally likely, so you would get outputs like CEG, CGE, GEC, GCE, ECG...  If you increase the likelihood of the C, then you might get CGC, CEC, GCC, ECC...  Ultimately, if you raise the likelihood of C to the max, then you might just get CCC, CCC, CCC... That struck me as being too much like current pop song melodies, so the design deliberately doesn't allow you to go quite that far, and you will always get a few other notes sprinkled here and there. If you want to use it to generate pop song melodies then you will just have to edit those 'other' notes out. Sorry.

Velocity uses the same principle: a 'pool' of velocity values where you control the distribution, but not the order. Over time, the values will fit the specified distribution, but without requiring a fixed sequence to happen.

Previously, I have looked at different 'flavours' of randomness, and a bit of experimentation resulted in another design decision: to provide a simple 'structured' source of notes where the user controls the amount of order or disorder. So there's a 'Mix' slider which has Random notes on one extreme (the left, of course), and a rising sequence of notes on the other extreme (the right), and so you can choose how much chaos you want to inject into the notes or velocities.

Following on from the many asynchronous clocks that I've been incorporating in designs for some time, I split the clocks for the notes and the velocities, which allows you to have different rates for notes and velocities, as well as different distributions and different mixes of random or ascending values. The note clock is the master clock for generating the MIDI notes, but isn't synched to Live's transport at all, so I should probably call this a 'toolkit' - because it is intended for exploration and experimentation.

From left to right, you have two sections: notes (light purple) and velocities (light grey). Apart from a few minor details, the two sections are very similar. At the top left hand side is the Rate rotary control (shown as BPM and Hz) for the beats. This is not synched to Live's transport clock. Directly underneath is a slider with 'MIX' in the centre. This mixes between a Random source of values and an Ordered source of values (from a rising sawtooth waveform), allowing you to choose between chaos on the left and order on the right, or any mix in between. As guitar pedal manufacturers like to say: We have designed it so that all settings will produce good results!' Underneath the Mix slider is a graphical representation of the past, which fades away into oblivion as it scrolls to the right. 

Most of the section is occupied by seven slider controls. These are arranged as a binary decision tree: the values from the Mix slider are sent to the left or right of the top-most slider (the little white lights show which way the values go...), and then go to one of the two slider underneath that, where they are again sent either left or right depending on their value, and thy finally end up at the lowest set of four sliders, where they are again divided into 8 outputs, an these output s can then be mapped to MIDI Note Numbers (or Velocities) in the number boxes at the lowest edge of the device. So, depending on the value that is produced by the Mix slider, a given value will end up at one of those 8 output boxes. And those 8 boxes can be set to either MIDI Note Numbers (light purple boxes) or MIDI Velocity values (light grey boxes).

The seven sliders are used to set how the values are distributed. If you press the 'Centre' button, then th sliders will be set to their default positions. The top slider will be at 63, which means that a value of 63 or less will go left, whilst any higher value will go right. This is why it is called a 'binary' decision tree: there are only two outputs at each layer, but the three layers results in a total of 8 final outputs. (Two for the first layer, then four for the middle layer, and then eight for the third/final layer). 


Yep, the velocity section is very similar! (But greyer...)

But note that the timing, amount of randomness, and distributions are totally separate for notes and velocity values...  This means that a specific note might have very different velocity values each time it happens (or you could set all the velocities in the 'pool' of values to be the same, but that would be boring!). 

Workflow

You will need to follow MIDIdistPROC with an instrument to make sounds... I used a Collision-based Marimba sound a lot during development. Remember that the 'Centre' button resets the sliders to their mid positions, which is usually a good place to start. You will find that the sliders tend to interact, so the best approach is to start at the top slider and work downwards. Extreme slider positions may give a single output value on one side or the other, or even a single value either way if the slider above is also at an extreme value. The Note 'RateN' rotary control sets the speed at which MIDI notes are generated, whilst the Velocity 'RateV' rotary control sets the speed at which the velocity values are generated, and so changes the volume or timbre of the notes, but not their timing... The rates can be varied between 30 and 300 BPM... (Beats Per Minute, which I show as 'bpm' on the UI because I think it looks cooler! It turns out that both 'BPM' and 'bpm' can be used, although BPM is often used to mean 'Business Process Management', which is very corporate-speak and not very musical...)

This is a toolkit, which means that further processing of the outputs will probably be required, so be prepared to capture the MIDI notes and change their timing. At one stage, I did contemplate including timing distribution as well, but that quickly got very complex and it seemed better to leave it to you - plus I'm not in Plaid's league when it come to amazing uses for unusual time signatures!

Max For Live...

'Slider interactions' probably sounded interesting, so here's how the sliders are interconnected so that the upper ones affect the ones lower down. Only one layer is shown...

The upper slider has a range of 0-127 - the full range of MIDI notes from the Mix slider. The output is 63 when the default position is set by the 'Centre' button. The two sliders in the next layer down have different setups. The one on the left is going to need to have a range from 0 to the output of the upper slider, which is called 'n' in the diagram above. Sending a 'size $1' message to the slider will set its range to '0 to n' (where $1 has the value of 'n'). The slider on the right is slightly more complex. The slider needs to start at 'n' rather than zero (set by the 'min $1' message), and the range needs to be set to 128-n (so that the highest value is 127 on the far right hand side). So the 'size' message just needs to be 'size (!- 128)' to set the range correctly. 

I'm not perfect. The red 'X' shows how I made an error in logic and used the range to set the slider value - not a good idea. I located the problem and fixed it - after I did the screenshot composite shown above. So I ended up editing the M4L and the diagram! (The red cross is NOT a new MaxForLive object, of course!)

 The Asynchronous Clock is pretty straight-forward, and is included here because it shows the conversions to get the BPM and Hz values, which aren't as tricky as you might expect... The 'cycle~' object is very easy to use in this case!


 Using it

The sliders don't necessarily work the way you might expect. The more you move them across to the right, the more values will be sent to the LEFT, and vice-versa. You can watch the white indicator lights to verify this. Now that you know this, you should be okay, but you may find yourself accidentally moving the sliders the wrong way when your conscious brain hands over mousing to your subconscious brain. 

The three 'Preset' buttons for Notes and Velocities provide starting points for setting the 'pools' of output values. Feel free to use your own values! Note that the 'Octaves' preset illustrates very nicely that you do not need to have different values for all of the outputs, which is something that people tend to assume is the case. The presets also show why I didn't include any other 'Ordered' waveforms that the SawUp - you don't need them! You can change the output values to give the equivalent of any source waveform with 8 vertices. (This is more waveform choices than you get with most analogue monosynths (The MiniMoog, for example, has a mere six.) If the concept of waveforms being an emergent property at the end of a processing chain doesn't bother you, then you are in the right place!

I'm going to mention it again, because people are used to M4L sequencers that look a lot like MIDIdistPROC: This is NOT a conventional sequencer! There isn't any of the timing variation you might expect (all the notes are the same length), the notes and velocities aren't linked, and it isn't very good at repeating the same boring sequence over and over again. However, if you are interested in getting inspiration and breaking out of melodic cliches, then you may find it useful. (If you just realised why I have been referring to the output values as a 'pool' of values, then you are ready to exploit this device fully!)

One very useful piece of additional processing is the factory Ableton Live device called 'Scale', which is very good at transposing and constraining the output to a given range or scale. There are commercial plug-ins (like Scaler 2) that do similar things and more... You could also try my scale utility or my 'one control' to process the output of MIDIdistPROC. 

Getting MIDIdistPROC

You can get MIDIdistPROC here:

    https://maxforlive.com/library/device/6829/mididistproc-mr

Here are the instructions for what to do with the .amxd file that you download from MaxforLive.com:

     https://synthesizerwriter.blogspot.co.uk/2017/12/where-do-i-put-downloaded-amxd.html

(In Live 10, you can also just double-click on the .amxd file, but this puts the device in the same folder as all of the factory devices...)

Oh, yes, and sometimes last-minute fixes do get added, which is why sometimes a blog post is behind the version number of MaxForLive.com...

Modular Equivalents

In terms of basic modular equivalents, then implementing MIDIdistPROC seems like it will be quite challenging - there are not many binary tree implementations that I'm aware of, but there are so many modules out there that I could easily have overlooked some. Worse, it may well be a hidden feature of a well-known module, so I may be completely wrong and it is a doddle to implement. 

Alternatively, then there are various utility processing modules that could be used to produce an eight segment transfer function, which would achieve the same end-result. So this might be only 1 or 2 ME. (Revised after I realised that this compresses all the layers into one!)

In reality, I suspect that MIDIdistPROC would probably be implemented in a very different way, by a super smart modular guru, by looking at the requirement from a totally different viewpoint. I would love to hear about it, by the way...

Links

Non-Euclidean, Non-Linear sequencer     - MIDInonU

'one control'                                               - MIDIchronatixONE

'flavours' of randomness                            - MIDIrandomABC

my scale utility                                          - MIDINoteScalery

---

If you find my writing helpful, informative or entertaining, then please consider visiting this link:

Buy me a coffeeBuy me a coffee (Encourage me to write more posts like this one!)


Synthesizerwriter's Store
 (New 'Modular thinking' designs now available!)


Wednesday 9 December 2020

Seasonal and Almost On-Topic!

It is the time of year when some people celebrate by sending other people greetings or gifts, when some people contemplate what they bought in the annual 'Black Friday' ever-expanding sales, when some people suddenly play a very specific genre of music (on-topic!), when some people anticipate the end of one year and the beginning of another year (with various emotions), and when some people do none of these things. 2020 seems to have been a year of extremes, of change, of polarisation and increased uncertainty. I hope the coming year is different!

Apparently, putting people in lockdown has resulted in huge sales of musical instruments... To kind of reflect this, I have added a seasonal design to the Tee-shirts in my online store: Synthesizerwriter's Store. If you wanted a 'Christmas Tree'-themed tee-shirt with a modular synthesizer bias, then you might be in luck! And if you wanted something that says 'Synthesis' in other ways then there are alternative designs and items - there are even cushions! 

Genre-specific music...

Here's an example of some seasonal genre-specific music, less most of the repeats and lacking a huge production budget...

A link to the music...

One of the main instruments that I used is a Kontakt virtual instrument that has the dubious honour of being a submission to Pianobook.co.uk that has been 'lost in the system' - it IS there, but the only way to find it on the site is if you know the URL! (or you do a search...)

https://www.pianobook.co.uk/library/29-bagpipes-synthesizerwriter/

---

If you find my writing helpful, informative or entertaining, then please consider visiting this link:

Buy me a coffeeBuy me a coffee (Encourage me to write more posts like this one!)


Synthesizerwriter's StoreSynthesizerwriter's Store
 (New ''Xmas Modular' design now available!)


Friday 4 December 2020

Non-Euclidean, Non-Linear Sequencer/Toolkit = NonU in MaxForLive for Ableton Live

I always try to explore the edges of things. When pre-11 Ableton Live wasn't into probability, I published lots of MaxForLive devices showing some ways of adding probability, and Ableton seem to have taken the hint in Live 11! One other thing that I have always been interested in is unusual timing - my Probably sequencer includes probabilistic micro-timing per note, which is kind of tricky to get your head around. But recently, I've been playing with the opposite of the many Euclidean sequencers that are available in MaxForLive circles. So here's a non-Euclidean, Non-Linear, 4-section step sequencer/toolkit for you to explore elastic time and polyrhythms. I say 'toolkit' very deliberately here, because this isn't an M4L device that you just drop into a track and make cool drum sounds or 'bleepy' sequencer riffs, - rather it requires experimentation, recording of the output, retiming, and more. Once again, it is giving you 'modular'-style functionality in a DAW - although I don't know of any direct hardware equivalent modules for Eurorack et al...

MIDInonU

Above are the 'headlines' about MIDInonU, whilst below is the 'in use' shot where it is followed by a drum Rack (note that it is very wide!):


From left to right, there is the clock part, where you can choose between a free-running 'Asynchronous' clock, and Ableton Live's own internal 'Synchronous' transport clock. Then there are two 4-step sequencers, then a 3-step, and finally a 5-step sequencer.


The 'Resync' button forces all the internal counters inside MIDInonU back to zero, and so resets all the timing. You will find that changing the Time rotary controls can cause a section to get 'out of sync' with the other sections - which can be avoided by only making changes when the 'Sync' clock is selected but Live's transport is not running (a red light in the 'Live Transport' indicator... But stopping every time is not ideal, and tweaking timings live is good, so the 'Resync' button is there to get everything back on track. Unfortunately, there is a short delay whilst all those counters reset, though...

Euclidean...

Euclidean sequencers distribute steps as evenly as possible over the looped time: 4 beats on the beat being a familiar example that often gets overlooked! MIDInonU takes this as the starting point and then allows you to subvert it. So if you look at section A (there are 4 sections: A-D), then MIDInonU takes even time spacing as the starting point - so each of the 'Time' rotary controls is set half-way through the range, where the triangle is, at a value of 16. You can change the time between 2 and 30, which allows you to move the steps backwards and forwards in time by changing the 'Time' value away from the default value of 16 (where the triangle points to). 

The loop time is on the right hand side (underneath the section character), and is 64 (and green) when the looped time is a 4/4 bar. When the value is NOT 64 then it goes grey, because it is now longer or shorter in time that the 4/4 bar length. You can hear this by using section B to set up a 65 length sequence (as shown above), and you will hear the two sections drift out of time and back in again. (Read on to find out how to make this happen!)

The screenshot above shows a simple starting position. It plays a single note (MIDI 36) from step 1 of section A, 1 note per bar. 

The blocks of control buttons to the right of the Velocity indicators are used to control the note velocities. 'Off' mutes that step output. 'Manual' allows you to use the Velocity sliders on the left hand side to control the velocity directly. 


You can only adjust the velocity sliders when the 'Manual' buttons are lit with light purple. For the rest of the time, the sliders show the algorithmically-generated velocity values...


There are two algorithmic controls, which both use the 'Count' rotary controls: 'Split' just outputs two velocity values - max and off, and it does this based on a counter that increments for each repeat and resets when it reaches the 'Count' number. So for a Count value of 1, then every step will have high velocity, whereas for a Count of 3, there will be one high velocity and two low velocity steps. The 'Count' button just provides a scaled 0-127 velocity value, derived from the counter. This means that a Count value of 4 will step through four descending values of velocity. Try adjusting the count values and the buttons to see what the effect is on the velocity sliders.

In section A in the screenshot above, the Time3 and Time4 rotary controls are set to 15 and 17, but the loop time is still showing 64 (16+16+15+17=64). This means that step 3 is slightly ahead of where a pure 4 beats per bar step would be, whilst step 4 is slightly later. You can move the steps ahead or behind in time, and you do not need to have the total add up to 64 - as long as you are okay with the loop length not matching the bar length in Live.  


One important thing is hidden at the lowest part of the window - the small boxes there allow MIDI note numbers to be assigned to each step, so the 36 in section A is a bass kick drum, for example. You can set a different note number to each step, as well as assign the same note number in different sections - so you could have a '36' kick in sections A, B C, and D if you want. On the far right hand side of each section, in the 'All' column, are buttons labelled '=' that control all the buttons in that row. So the button to the right of the 'Off' row, sets all the buttons to 'Off'. Similarly, the small box on the right of the note number buttons sets all of the note numbers to the same value (and the same for the 'Count' rotary controls). You might find the following useful at this point:

"Just because you can, it doesn't mean you have to!"

That should give you some of the flavour of MIDInonU. Yep. Quirky. Not your average step sequencer, and not the usual controls or the usual way of working. 

Sections C and D


Section C has only three steps, and so doesn't start out with 64 micro-steps. You can set it so that there are 64 steps by increasing the time between each step - you can think of the steps as being connected by elastic, if you increase the time between two steps then you will need to reduce it between some others to keep the overall length of 64. Unless you don't want 4/4 bars, of course. Each of the sections can have different lengths. 

Section D has five steps. This makes any nicely-equally-spaced timing difficult, which, in this context, is definitely good! It is probably a good idea to start out with section A first, then add section B, and get very used to how they work with or against each other before jumping into using sections C and D.

Delays


Sections B, C and D can each have their timing delayed (individually) from section A. This can be surprisingly musical! When you have discovered that playing a 64/64 loop against a 65/64 loop just sounds like a drum pattern gradually going out of time and then back again, then it can be very  gratifying to discover that changing the delay can often immediately give a good-sounding output! 

Explore

The quick introduction above only scratches the surface of what you can do with MIDInonU. Note that you get two clock sources: an Asynchronous clock where the rate is not tied to Live's transport, and a Synchronous clock where the clock is the same rate as Live's transport. This means that you can explore timings that are not synced to Live if you wish, and if you are brave, you can change the timing source dynamically by mapping an LFO to the clock selector switch... Instead of using a drum instrument, try a synth instrument, for instance - and remember that you can assign a note number to any step in any section, or multiples of either. Try moving steps in pairs: increase the time on one, and reduce it on another - this keeps the loop length the same. Alternatively, deliberately have different loop lengths! Explore the 'Split' and 'Count' algorithms - the velocity accenting can change the feel of the sequence hugely. Basically, MIDInonU gives you the freedom to change a lot of things which conventional thinking normally stops you from changing. Enjoy! 

16 rotary controls...


A previous blog post featured my visual reminder accessory for my DJ Tech Tools MIDI Fighter Twister, which has 4 banks of 16 rotary controls, just like the 4 4 3 5 Time controls in MIDInonU. This is not a coincidence, and actually there are 16 'Count' controls as well, which could be mapped to a different bank in the Twister...


Getting MIDInonU

You can get MIDInonU here:

     https://maxforlive.com/library/device/6758/midinonu

Here are the instructions for what to do with the .amxd file that you download from MaxforLive.com:

     https://synthesizerwriter.blogspot.co.uk/2017/12/where-do-i-put-downloaded-amxd.html

(In Live 10, you can also just double-click on the .amxd file, but this puts the device in the same folder as all of the factory devices...)

Oh, yes, and sometimes last-minute fixes do get added, which is why sometimes a blog post is behind the version number of MaxForLive.com...

Modular Equivalents

In terms of basic modular equivalents, then implementing MIDInonU is interesting - there are many 3,4, and 5 step sequencers that you could use, but the micro-timing is less common, and might be easier to do by processing the clocks for the step sequencers, probably using another sequencer. The velocity algorithms are going to require a quite sophisticated processing module because of those counters. One brute force method might be to use more sequencers to do the counting, but this is probably not going to be straight-forward. You could use a descending sawtooth LFO to replace the counters, or course, and then use a threshold gate for the 'Split' function.

One possible alternative would just be to use a sophisticated digital sequencer module, but then this is closer to a DAW and not quite in the spirit of DAWless 'analogue' modular... Tricky!

Overall, I reckon that MIDInonU would require an ME of about 20 minimum, which is quite high. I haven't tested this out myself, but I would be very interested to hear about it if anyone manages to get something like this functionality (or better!). 

Links

Probably   A step sequencer that does a lot, and then some...

DJ Tech Tools MIDI Fighter Twister   One of my all time favourite MIDI Controllers!

Euclidean  Let's go to the source...

---

If you find my writing helpful, informative or entertaining, then please consider visiting this link:

Buy me a coffeeBuy me a coffee (Encourage me to write more posts like this one!)


Synthesizerwriter's StoreSynthesizerwriter's Store
 (New 'Modular thinking' designs now available!)


Tuesday 24 November 2020

DJ Tech Tools MIDI Fighter Twister - Showing Bank Titles and Labels via Max For Live in Ableton Live

In the run-up to Black Friday, lots of companies now do previews of prices, and so I recently visited my usual 'go to' source of coloured cables and knobs: DJ Tech Tools, to see what they had. I ended up buying some neon orange 'Chroma Caps' replacement knob caps, plus a MIDI Fighter Twister to join my MIDI Fighter 3D that I bought at a previous preview. (Dangerous things, previews!).

Now if I didn't already have a 'button masher' MIDI Fighter 3D (and wanted to have a 'matching pair'!), then my fallback solution for 'lots of rotary MIDI controllers in a box' would have been the Faderfox EC4. The EC4 is more expensive, but has little OLED displays for each control, so that you can label them. Which set me thinking...

After a bit of programming, I produced a new Max For Live plug-in, with the snappy title of 'MIDImftLABELSfloat' that provides a floating window in Ableton Live which gives you named banks and named labels for each rotary control, plus a way to set the colour of the little colour-bars in the window. (- and ONLY the window. I didn't manage to decode the colour mapping that the MIDI Fighter Twister uses, and so sending the commands to set the colours in the MIDI Fighter Twister will have to be a future enhancement, if I ever find the time...). 

To set the colours LOCALLY in the plug-in, you use the little grey number next to the coloured rounded box under each almost-square box (with the user-editable text inside!). Select it and use the cursor keys to change the colour, or drag it up and down with the mouse (as you can do with all Ableton values...). What I do is set them to more or less the same colours as on the Twister itself, and this also serves as a useful indicator of which rotary controls are active. The mapping of colours to numbers is not obvious, and although I'm sure there is a simple algorithm that drives it, I haven't been able to find out what it is, so this version gives you the default mapping... Sorry.

As a not-very-well-hidden additional control, the little grey number on the left hand side, nestled at the end of, and in-between the second and third rows of boxes, is a 'global colour' control. Select it and use the cursor keys, or drag it up and down with the mouse, and all of the 16 colour boxes will change. Now, if I was Pioneer DJ (okay, now kind of Toraiz as well), then I would take a cue from the SP-16 and make these boxes really big and bright...

In the course of developing this plug-in, I discovered something that I didn't know about how Ableton Live handles MIDI messages, and had to solve some interesting problems in Max For Live. 

MIDI Routing...

I tend to be an experimentalist rather than a documentation reader, probably as a result of many years of discovering that hardware data sheets often have errors. So the first thing I did was decode the MIDI messages that the MFT (henceforth abbreviated to MIDI Fighter Twister in this post) sends when you move between banks using the little middle buttons on the sides of the MFT. The documentation says that the MFT sends a MIDI Controller 0 off message, followed by a MIDI Controller 1 On message when you switch from Bank 1 to Bank 2, etc. So I initially unpacked the MIDI Controller Output of a 'MIDIparse' object, and then tried to figure out how to detect pairs of numbers like the 0 0, 1 127 sequence that I mentioned previously. Eventually I realised that automatically unpacking the pairs of numbers wasn't the best approach, and I removed the 'unpack' object and used my new favourite object, the 'zl compare' string comparison object. one thing that I don't like about the 'zl compare' object is the need to send a bang to message boxes to get an output from the zl, and so I over-use 'button' indicator objects as usual. 

The final patch is shown above, although it is encapsulated in the real thing. Showing everything in one place makes it easier to see what is happening. The 'sel 1' object converts the 'zl compare' output into a bang which forces a '1' out of the message object and this goes into another message box that is usdto display the Bank number. The middle part (around the 'zl compare') is repeated four times to detect 0 127, or 1 127, or 2 127 or 3 127 for the four bank switches. I know that I should have detected the full Off and On sequence of messages, but this worked okay. Actually it doesn't work perfectly because Ableton Live rechannelises all incoming MIDI to Channel 1, and so if you do too much rotary controls twisting in Bank 1, then you can confuse the plug-in. I tired in vain to figure out how to detect the full 0 0, 1 127 sequence, but didn't have any success. I may drop Cycling '74 a support question about how to do this, because I couldn't get it to work...

I also decoded the 16 rotary control MIDI Controller messages so that I could indicate which rotary control was being twisted... I used '% 16' modulo arithmetic to decode all four banks, but then I ran into my standard 'display' problem. I've talked about this before with the dual step sequencer, but in this case I needed a variation: something that would highlight a 'panel' object border when that rotary control was being twisted, and that would un-highlight it when any other rotary control was twisted. The standard technique to achieve this is to have two different message objects that send the highlight and un-highlight commands to the 'panel' object. So here's the essential parts of the encapsulation that I produced:


As before, I'm only showing two of the 16 sections. As I've rediscovered many times, there's a 'trap' in the 'sel' object - the left hand output sends a bang when the input matches the number following the 'sel', but the right hand output is the number that doesn't match, not a bang! I know with absolute certainty that I will forget this again, because I keep doing it! So that's why I use a 'button' indicator object to convert the number into a bang so that it triggers the message output. As it turns out, for many applications, having the number as the 'doesn't match' right output is very useful, and actually that's what some of the 'zl' comparison objects do... 

With the bank selection and control decoding done, I then mapped a few of the rotary controls to some parameters, and the decoding of the controls stopped working - just for the mapped controls. Now I have never looked at the Ableton M4L documentation in great detail, so I did some confirmation, and realised that when a MIDI Controller is not mapped to a parameter, then it appears in Max For Live, but when it IS mapped, then it does't appear in Max For Live. I bet this is in the documentation! Anyway, here's some diagrams that explain it in pictures (I like pictures!):


 Above is what I was doing when I first tested the decode patch. The MIDI Controller messages go into Ableton Live, and then into Max For Live...


 Above is what seems to happen when a parameter is mapped to the MIDI Controller - it no longer gets sent to Max For Live (or at least, it doesn't for me!). 

Doesn't Do Anything!

Yep, that's more or less correct. Apart from the Bank select tracking, the colour indicators, and the rotary control decoding, the MIDImftLABELSfloat plug-in doesn't do anything other than show a floating window with some user-editable text in it. In terms of MIDI or audio functionality, it is probably the least functional M4L plug-in that I have made, but I find it useful, because I'm always forgetting what I have mapped to what with all of my MIDI Controllers when I come back to a project some time later. I may make more versions of it for my other MIDI Controllers... 

Plus, whenever my mind spends time with something, it tends to come up with something different, and that's exactly what has happened here. So expect something eventually... I'm struggling with an M4L project at the moment - it is much harder than I thought, and I've been trying to find ways to do stuff in M4L that I haven't done before... But that's another story and another blog post, and there's part 4 of the 'Single Cycle Waveforms' series to finish as well...

Getting MIDImftLABELSfloat

You can get MIDImftLABELSfloat here:

     https://maxforlive.com/library/device/6726/midimftlabelsfloat

Here are the instructions for what to do with the .amxd file that you download from MaxforLive.com:

     https://synthesizerwriter.blogspot.co.uk/2017/12/where-do-i-put-downloaded-amxd.html

(In Live 10, you can also just double-click on the .amxd file, but this puts the device in the same folder as all of the factory devices...)

Oh, yes, and sometimes last-minute fixes do get added, which is why sometimes a blog post is behind the version number of MaxForLive.com...

Modular Equivalents

In terms of basic modular equivalents, then implementing MIDImftLABELSfloat is quite tricky - there's very little applicable functionality to translate across. You could use a MIDI processor to detect the Bank Select or rotary control messages, but I'm not aware of any obvious ways to store general text messages. So I'm going to declare this as an ME of zero. Pencil and paper storage is probably the way to go for modular, (and definitely 'analog' as well!) or maybe a mobile phone photo as 'instant documentation'.  

---

If you find my writing helpful, informative or entertaining, then please consider visiting this link:


Synthesizerwriter's StoreSynthesizerwriter's Store
 (New 'Modular thinking' designs now available!)


Saturday 31 October 2020

When is a single-cycle waveform not a single-cycle waveform? - [Single Cycle 3]

The first part of this series of posts was about waveforms - and the 30dB rule applies to both analogue or digital waveforms (although a high resolution LCD might get you to 40dB!). The second part was the same - all of the terminology applies to any way of storing the waveform. This part looks at digital storage of single cycle waveforms. 

[As an aside: There have been several synthesizers with analogue oscillators that provided 'waveform drawing' controls (and I designed and built one of my own many decades ago), but they tend to use very small numbers of points to represent the waveform. I have always had a design rule of not having more than 8 sliders in a group on a synthesizer - and in fact, the 'rule of 5' probably over-rides that. (Once you get beyond five user controls closely packed together, then people find it harder and harder to locate a specific control... Take a look at modern synth UI designs, and you will see 'Rule of 5' everywhere...) So 16 (or more) sliders is cumbersome, expensive, slow to adjust, suffers badly from 'The 30dB Rule', and isn't enough points to get good waveforms when compared to a single rotary 'preset waveform' selection switch! (It also looks too much like a third octave graphic equaliser!) In these days where 'vintage' and 'analogue' seem to have huge customer appeal, then I wouldn't be at all surprised to see a synth with lots of sliders to set a waveform, maybe doubling up as additive synthesis controls.]

WAVs

One of the common ways to use digital single cycle waveforms is via .WAV files. WAVs are tagged file format files that are used to store and exchange digital audio, and are examples of a RIFF file (Resource Interchange File Format) which was defined by IBM and Microsoft (and is the native audio file format in Microsoft Windows (and is actually closely related to the AIFF files that you find on Apple products as well...) WAV is actually shorthand for Waveform Audio File Format, which ought to mean that it should be WAFF (I can't help imagining an alternative universe where table tennis is colloquially called Wiff-Waff instead of Ping-Pong, and where WAAF files have nothing to do with the Women's Auxiliary Air Force from WW2...). There's plenty of detail on the WAV file format on Wikipedia (Disclosure: I'm a donator to Wikipedia.)

Aside from all this tech-talk, WAV files are in very widespread use for exchanging uncompressed audio between computers and sample players, grooveboxes, other computers, drum machines, etc. Note that although WAVs can contain compressed audio, you are much more likely to find compressed audio in a format that builds on MP3, like AAC, but it is quite rare to find any support for this in drum machines, grooveboxes etc. The 'higher-end' BWF multi-channel version is widely used in the broadcast and pro-audio industry, but again has limited support in drum machines, grooveboxes, etc. But at the opposite end of things, WAVs are very often used for storing and transferring single cycle waveforms, and support for WAVs is pretty close to obligatory in a groovebox, drum machine... As always, there's bound to be some exceptions so that people can look smart by saying: 'Ah, but'. 

A Google search for 'single cycle waveforms' will probably get you lots of references to the Adventure Kid web-site and the Elektron 'Elektronauts' forum site (both recommended for getting single cycle waveforms), plus many commercial offerings. As with various projects to create all possible MIDI melodies, various people have tried to exhaustively create all possible single cycle waveforms within specific limitations, although the copyright and other legal systems seem to not like any type of mechanistic/algorithmic brute-force approach that intends to try and acquire ownership of creative activities.   

The obvious...

As you might expect, the first single cycle waveforms you will find are probably going to be the 'classic' synthesizer waveforms: sine, triangle, square, sawtooth, and various pulse widths. I'm going to show them here for reference, complete with their harmonic content or spectra (spectrums, if you prefer), although, as the next blog post shows, just having the spectrum for a waveform may not be as useful as you might think. For now, I will just describe what the spectra shows about the basic harmonic content of the waveshape, and you will be forewarned that there is just a little bit more to it...

One of the first things that people tend to do with digital storage of audio is to turn classic analogue synthesizer waveforms into a digital form, so let's start there...

Sine

The sine is a beautifully smooth and curvy looking, simple and pure sounding waveform. It contains (it is!) just a single frequency (called the fundamental, and 100Hz in this example), and so has no harmonics in it. (multiples of the fundamental frequency) For LFOs, sine waves are very useful because they smoothly modulate, or pan, or filter, or... 

However, using only a few samples to represent the waveform isn't a good way to get the best fidelity. I have seen single cycle waveforms of sine waves that only have 37 samples. Which takes us neatly into why particular numbers of samples are used for single cycle waveforms.

There is a lot of variation in the numbers of samples that are used to represent a single cycle waveform. In Max (and MaxForLive), the ~cycle object originally defaulted to using 512 samples of a single cycle of a cosine wave. But it wasn't fixed - you could replace the default waveform by using any other set of 512 samples, or you could change the number of samples: more recent versions of Max use 16,000 64-bit samples. A lot of the single cycle waveforms that you find on the InterWeb are 337 samples long, whilst others have 256, 1024, 2048 or 4096. 

You may be confused by these numbers, but remember that these are not sample rates: like 44.1kHz, 48kHz, or 96kHz. These big numbers are the rate at which samples are taken. If a mono audio signal is recorded for 1 second at 44.1kHz, then there will be 44,100 samples that represent that one second of audio. One Hertz is one cycle per second, and so if that one second contained a 1Hz sine wave, then there would be 44,100 samples being used to represent that sine wave. 10Hz would be 10 cycles in one second, and so a single cycle of a 10Hz sine wave would only require 4,410 samples. 100Hz would be 441 samples, which is pretty close to the 512 that Max used to have as the default. However, 1,000Hz would require 44.1 samples, which is tricky. It is a small number (just above 37!), and it isn't a whole number of samples... What does 0.1 of a sample look like, or is it just impossible?

Rather than get involved in strange philosophical questions about fractions of samples, it is easier to arrange things so that a single cycle waveform is exactly the right frequency to fill a given number of samples with one complete cycle. No more. No less. In the case of the 100Hz sine wave, sampled at 44.1kHz, we now know that 441 samples is exactly the right length. (Or we could say that 441 samples will hold a single cycle of a 100Hz sine wave when the sampling rate is 44.1kHz.) Unfortunately, 441 isn't 512, or 337, or 4096, or 16,000! 

What we need to do is turn this round, so that we can work out the frequency of the waveform that will fill a given number of samples for a specific sample rate (like 44.1kHz!). If we take 512 as an example, then the frequency of a single cycle that will fill 512 samples is 86.1328125. Now frequencies that are not whole numbers are fine - so we avoid any problems with 0.1 of a sample! But how did we work that out? 

If you divide the sample rate (44,100) by the number of samples (512) that you want to use in your single cycle waveform, and you get exactly 86.1328125. But it is actually easier to understand what is happening here by turning the equation over. In other words, what does 512 divided by 44,100 represent? Well, the number of samples divided by rate that samples are being taken is going to give us what fraction 512 is of 44,100. It turns out that this is 0.01158371. So 512 is just over one hundredth part of 44,100. In fact, if you think about it, then 441 would be exactly one hundredth of 44,100. So what does the fraction represent? It is samples (512) over the sample rate (44,100) and so it is just 1/rate. And to get to the rate (which is the frequency) then all we need to do is find the value of 1 divided by the fraction. 1/0.01158371 is 86.1328125, which is the rate that we need to use to fill that fraction of 512/44,1000.   

So the formula is:

Frequency for a single cycle = Sample Rate / Number of samples for one cycle

Using this, we can now look at some of those common numbers of samples and see what frequency they give for a 44.1kHz sampling rate:


Table 1. Sample Rate, Number of Samples and Required Frequency.

At this point, many people look at the numbers, with all the digits after the decimal point, and just accept them. But it turns out that the 'Popular on the InterWeb' value, 337, gives a frequency which might be familiar... Maybe doubling it will help? 261.721068? 

What is the frequency of Middle C? 261.625565Hz. Aha! 337 is chosen because it is very close to Middle C, and so simplifies the transposition of oscillators using 337 sample waveforms (i.e., you don't need to transpose them!). It turns out that a lot of the single cycle waveforms that you find on the internet have a frequency of one octave below Middle C. 

Triangle

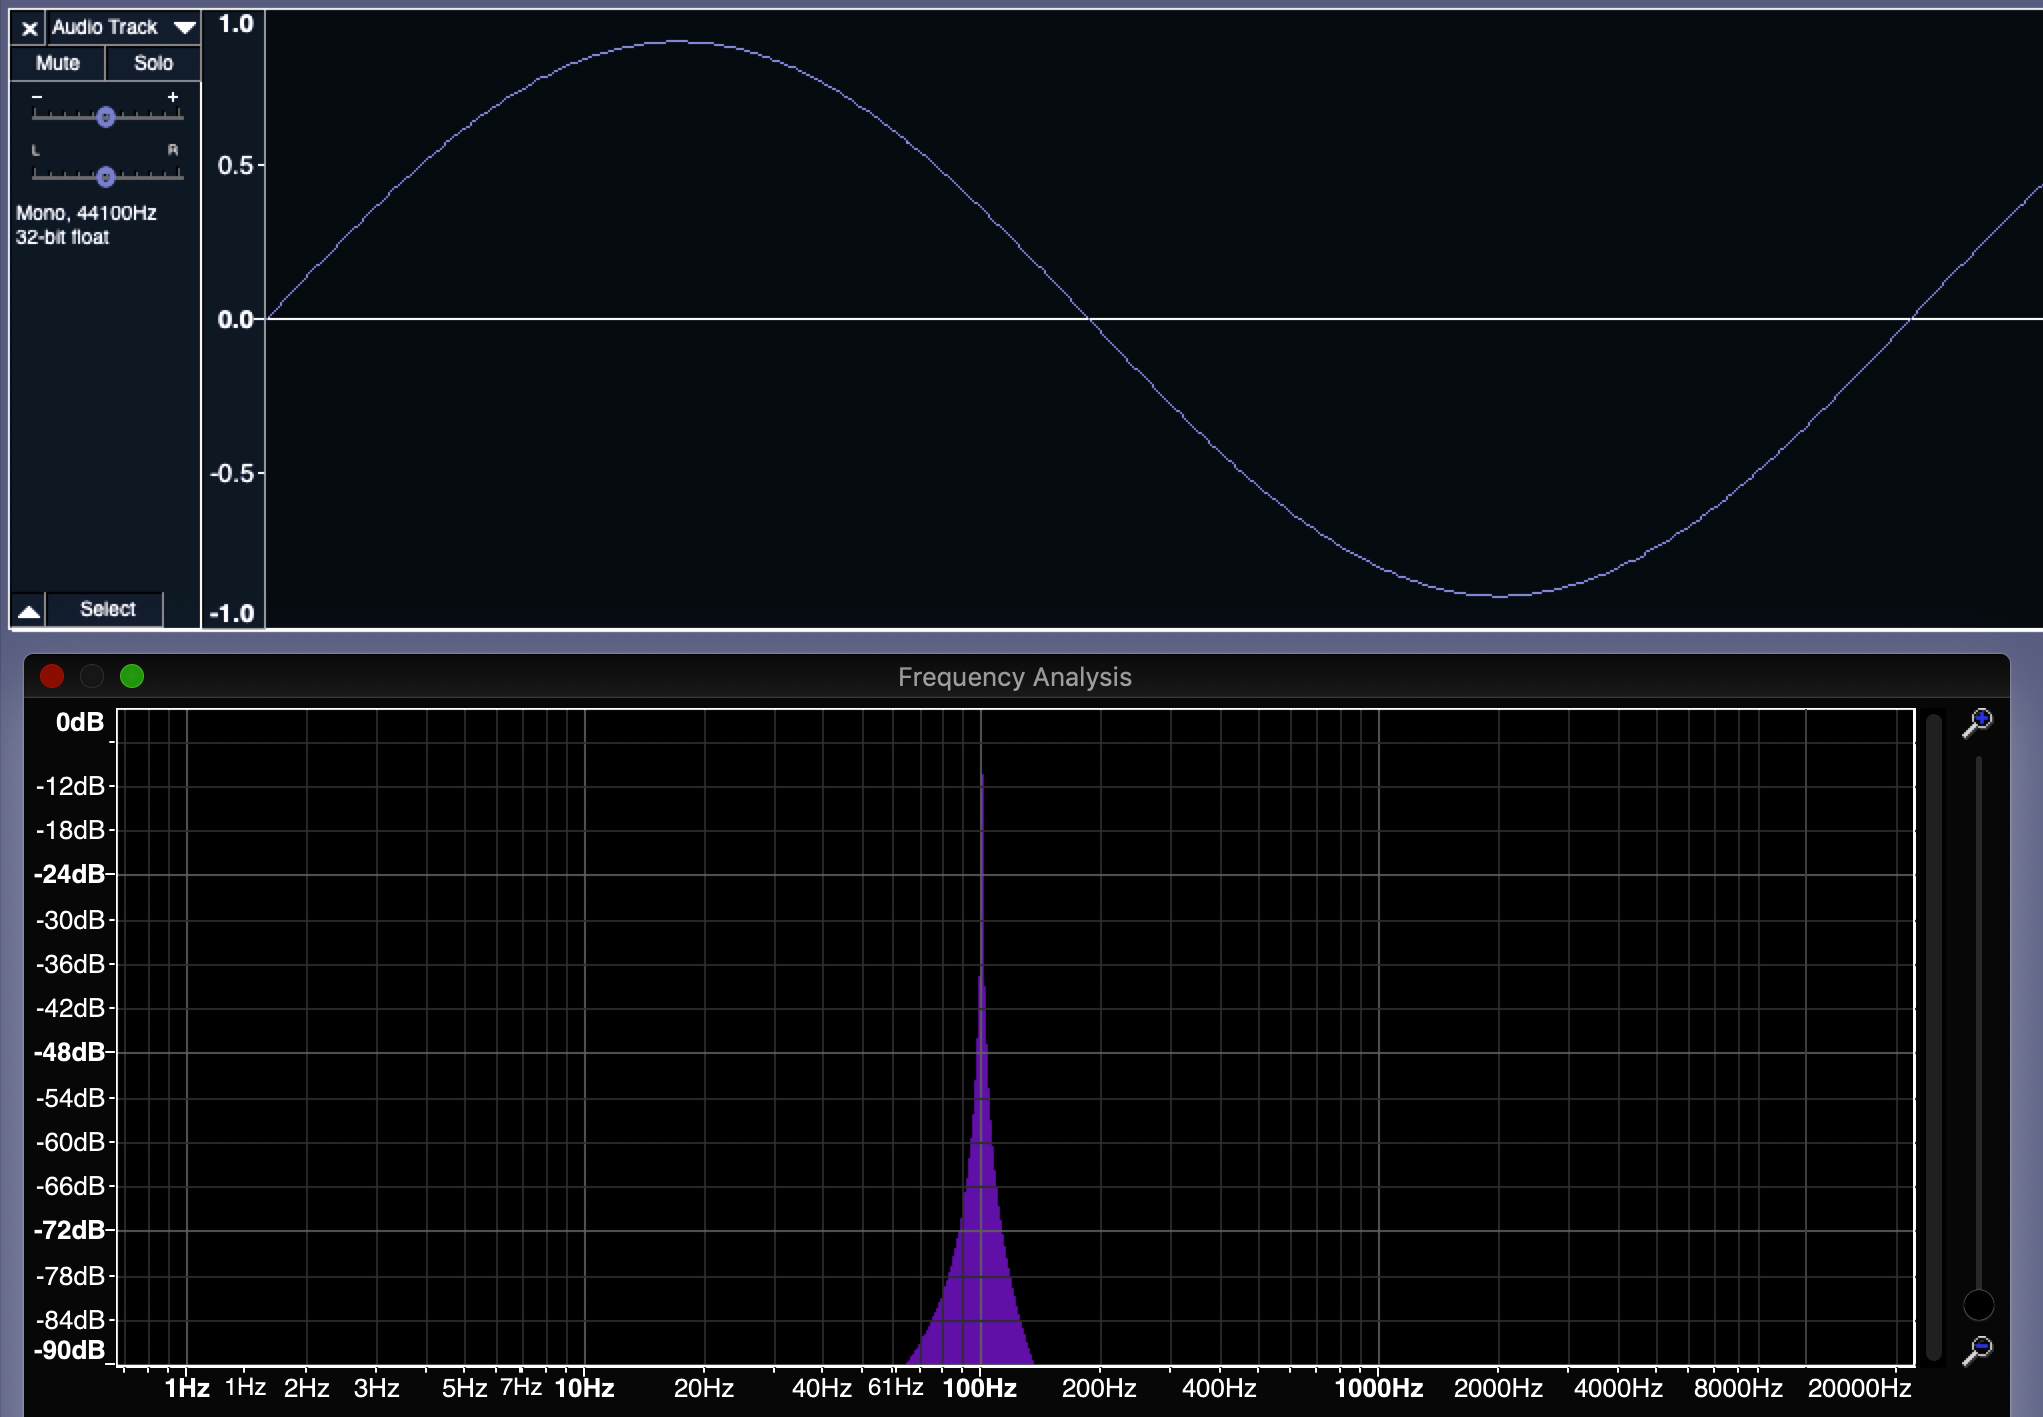
This is kind of like a sine wave drawn by someone who prefers straight lines to curves. It contains only a few odd harmonics that are are quite low amplitudes - so with a fundamental at 172.265625Hz, the 3x  harmonic is at -25dB, and is at 516.796875Hz. What is fascinating about generating and analysing real waveforms instead of the ones that you find in text-books is that they can be very different because of all sorts of imperfections in the generation, capture and analysis processes. 600 samples is not going to give perfect results for a start...

I'm not really a triangle waveform fan. Triangle waves are not very useful because a little bit of low-pass filtering reveals the sine wave at their core, and opening up the low pass filter only adds a little bit of extra harmonic content. For LFOs, triangle waves spend almost all their time linearly going up or down, but then suddenly (and very abruptly) change direction. So whereas a sine wave is all about smoothly getting to the point where it reverses direction, a triangle wave rather boringly goes straight to the point, immediately changes direction, and then goes straight towards the next reversal. A bit too jerky in many cases for me, and I often prefer the smooth almost asymptotic sine wave. (Asymptotic means that it never quite gets there...)

Square

The square wave, despite what the shape might suggest, is actually exactly the same harmonics as the triangle waveform, but with slightly higher amplitudes. As you can see, the 3x harmonic of the 73.5Hz fundamental, at 220.5Hz, is only at about -10dB, and then the 4x harmonic (which isn't odd, and shouldn't be there) is at 294Hz and is at about -15dB. For the full story, you are just going to have to see the next blog post... For LFOs, then the square couldn't be more different than the triangle or the sine wave - it stays at the same level for half the time, then suddenly jumps to the other level, and then stays there for the other half of the time, then jumps again.  

Sawtooth


There are two ways of showing a sawtooth. The one shown here starts at the gently sloped zero crossing and goes up, then suddenly plummets down, and then rises again. The other way starts with the zero crossing on the steep sloe, then has a single long upwards slope, finishing with the sudden downwards plunge. Unlike all of the waveforms so far, there are two different sawtooth waveforms: one where the gentle slope is upwards (a rising sawtooth, or a saw up) and another where the gentle slope is downwards (a falling sawtooth or a saw down). Showing the rising sawtooth like this kind of follows the other waveforms nicely. This time, the harmonics are the expected ones: odd and even harmonics gradually dropping off in amplitude. 

For LFOs, then the two sawtooth waveforms can have very different effects: a rising sawtooth used for pitch modulation gives rising frequencies, for example, whilst a falling sawtooth would give descending frequencies. On modulars, I have always been a fan of using a sawtooth and its inversion (if you invert a falling sawtooth it becomes a rising sawtooth (and vice-versa)!) for controlling things in opposite ways. 

At audio frequencies, then Up/Rising and Down/Falling sawtooth waveforms sound exactly the same, and they have the same harmonics at the same levels. 

If the sine wave is the ultimate in smoothness, and the square wave the ultimate in jerkiness, the sawtooth is pretty much the exact opposite of smooth - as a control and as a timbre.

Pulse

There are lots of pulse waveforms - anything that just jumps between the upper and lower limits that doesn't split the time 50:50 is, by definition, a pulse waveform. Some people say that a square wave is nothing more than a special case of a pulse. Many oscillators aren't very happy doing very short pulse widths, and so I won't be doing 1% or 99% waveforms here (again, like sawtooths, you have two opposite wave shapes, but not as good looking! And again, pulse waveforms with the same time split sound the same...).

Pulse waveforms are described in various ways: as ratios (1:1 is a square wave), as percentages (50% is a square wave) , and sometimes the ratio/percentage is called a duty cycle, which is an obscuring piece of jargon that seems to be used less and less.

First, something like a 22% pulse waveform:


The big blob on the left hand side is the DC offset, by the way. Pulse waveforms have them because they are not symmetrical around the zero axis. (The area under the positive part of the waveform is not the same as the area bounded by the negative part of the waveform - which is why the square waveform is 'special': it has no DC offset!) But the harmonics are high in amplitude: the fundamental at 73.5Hz is at -2dB, and the 2x harmonic is only at -6dB, and there are lots of other harmonics that are above the -40dB 'Rule' level, so they definitely will be visible on a waveform display!

In an LFO, then pulse waves are kind of like square wave, but the different time that is spent at the two levels is not to my taste. Once again, like sawtooths, there are two varieties of pulse: each the inverse of the other, and all just as boring. 

For a 10% pulse, then it is just more:


The DC offset is really big now! But look at how the harmonics are very high as well. Compare this with the triangle and square wave to see the differences. 

As was mentioned in part 2 of this series, the more jagged the waveform, the more high frequencies that will be present. A 10% pulse waveform is pretty jagged, in shape and in sound, and the spectrum contains lots of harmonics at high amplitudes. 

In an LFO, a 10% pulse waveform is boring for 90% of the time, then jumps to the other level for 10% of the time, and then is boring again. Not my favourite LFO control waveform. If a sine waveform can be described as being 'smooth' in sound and effect, and a sawtooth waveform is 'jerky', then a pulse waveform is 'boring - except for a very short amount of time'. There is an exception to this, and it is found in a lot of advanced modular setups: if you combine several LFOs with pulse waveforms, then you start to get a control which is good for random percussive or rhythmic sounds, sort of like digital LFO 'noise'. Curiously, having a 'noise-like' 'random-ish' 'difficult to predict' control like this often sounds more interesting that proper random noise, perhaps because human beings are preprogrammed to look for/listen for/find/feel patterns.  

Beyond the obvious...

There are more waveforms!

If you add a sawtooth and a square wave together, then you get a sort of droopy waveform. 


This is a strange waveform, so I have shown more than one cycle of it so that you get a better feel of what it looks like. The spectrum, as you might expect, has elements of the sawtooth and the square spectra. 

In an LFO, this is like a jerky rising or falling sawtooth. It doesn't have the inevitability of the inexorably rising (or falling) sawtooth, or the boring static levels of the square, but it does have the sudden jumps of both. I'm not sure that I've ever used this wave shape in an LFO...

Hyper! 

If you replace the linear slope of a sawtooth with a curve, then you get a hypersawtooth waveform, although this term is also sometimes used for several sawtooth oscillators summed together. 


Once again, I have shown several cycles so that you get a clearer view of the shape. It's a sawtooth where the linear slope is replaced with two curves - and the shape of those curves determines the fine detail of the spectrum. For the first time, the fundamental is not the highest frequency in the spectrum - the 2x harmonic is higher! What this means is that there are lots of high frequencies in a hypersawtooth, and so it sounds brighter than a sawtooth or a narrow pulse. 

In LFOs, the hypersaw shape is a bit like a sine with a wobble in the middle. I have not used it very much.

Transpositions...

Something else which is 'non obvious' is working out what the required transposition should be for those single cycle waveforms that aren't 337 samples long. This seems to give people problems, but all it requires is to convert the ratio of the two frequencies to semitones and cents. Here's a table that extends the previous one:

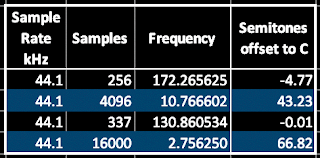
Table 1. Sample Rate, Number of Samples, Required Frequency, and Required Transposition.

So for a 256 sample single cycle waveform, you just transpose it down by 4 semitones and 77 cents.

From the classics...

One type of single cycle waveform that you probably find are based on the shapes of 'classic' analogue synthesizers - not the mathematically perfect waveforms that you find in text-books. The '30dB Rule' probably applies here, plus there is also the assumption that vintage analogue synths repeat exactly the same waveform every cycle. Then there is the problem that a lot of the character and 'sound' of many synthesizers is dynamic: the way that filters distort, or the way that filters go into self-oscillation, DC offsets affecting clipping in output stages, or the way that the oscillator sound bleeds between oscillators, and lots more. Timbre is more than just a static sound, it is how the sound changes over time and under the influence of performance controls like the Pitch Bend Wheel, the Mod Wheel, After-touch, etc., as well as the interactions between various parts of the device itself (beehive noise, for example), and trying to capture this in a single cycle waveform is not always easy. 

You may well find some 'single cycle waveforms from classic synths' that you like, but don't forget to add a bit of noise into the audio, into the filter cut-off and resonance, detune the oscillators, add a bit of chorus and basically 'productionise' it as if it was a real old synth that costs a fortune to maintain and which spends part of each year being serviced. Who knows, you might find that the contribution from the single cycle waveform is not as important as some of the other post-processing...

Not what you expected!

One of the fascinating things about single cycle waveforms is when they catch you out. One standard example is creating a single cycle waveform using noise, so that you get a 'random' wave shape. A lot of people expect that this will create white noise, and are disappointed when they get a buzzy tone. Unfortunately, because each cycle of the waveform derived from random noise repeats every cycle, you get a tone instead of noise. Depending on the source of the noise and how it is captured, then there may well be lots of high frequencies - In general, the more jagged the waveform, the more high frequencies that are produced. So single cycle waveforms made from noise almost always end up giving very thin, bright, nasal, buzzy results. 

In contrast, two programming techniques that can produce excellent results from singe cycle waveforms are Oscillator Sync and FM. The sound of sawtooth wave or square wave sync is very well-known, but if you use two different, unusual single cycle waveforms instead, then you can get some more unusual and distinctive timbres. For FM, then avoid the obvious sine waves, and explore shapes like triangle waves, or sawtooths or filtered noise waveforms (yep, you just knew that those noise waveforms had to be useful somewhere!). FM has an interesting reputation (and there are lots of YouTube videos that try to put you more at ease), and who knows, you may stumble into some of the less-explored backwaters of Chowning's wobbly oceans and find some gems.

No room for innovation...  

So is there any space left for new or novel or unusual singe cycle waveforms? I'm going to share some of my own attempts to be different. Some of them are not very special, but I'm hoping that some of them might be useful to you.

Sine and Square...

The first 'off the wall' approach is to mix waveforms that normally don't go together.  How about a cycle of sine wave followed by a cycle of square wave? Technically, this is a multi cycle waveform, but most oscillators don't care, and you will find that you have a lower frequency in the resulting sound because the square wave is effectively only present half the time, and so you get something a bit like a weird sub oscillator, plus something that isn't a sine or a square. Once again I have included a little bit more after the end of the cycle, so that you can see the repeat - yes, the 'single cycle' is the sine wave cycle plus the square wave cycle!

The spectrum tells us a lot about what this is going to sound like, there's a slightly lower fundamental and a big 2x harmonic frequency, and then strong clusters of higher frequencies. Despite being just two cycles of very simple wave shapes, this is a very strident timbre - more square wave than sine!

Si(ne)+(squ)are...


Going even further 'off the wall', if you splice half a sine wave with half a square wave, then that gives a different result. There's a bit more square to this one, and slightly less high frequency 'stuff', but it sounds unusual. There's also lots of DC offset because of the asymmetry in the wave shape.

Gapped sines...

Replacing the square wave cycle with nothing gives a result which sounds nothing like the fragments of sine waves that makes up all of it (plus the nothing!). There are two and a half cycles shown in the example, above: each 'single cycle' is just the sine wave plus a cycle's worth of nothing. The missing sine wave cycles add a lot of harmonics. So is this a single cycle wave, or a three cycle multi cycle with some gaps? The spectrum suggests that it is lots more jagged than it appears...so all of those discontinuities as the sine goes flat obviously mean lots of high frequencies, but we aren't used to discontinuities that hide on the zero axis...

Resonant... 2 cycles in one...


8 cycles in one...


16 cycles in one...


A different approach is to take several cycles of a waveform, and then to give that a very short envelope. In the examples shown, I start with the full size waveform and taper it down to almost zero. This gives sounds which have an intriguing 'resonant' nature to them, and don't forget to try them with sync and FM as well.

When you first see these waveforms, they look like multi cycle waveforms, but the repetition is of the whole of the waveform you see, from the big wave at the start, to the small wave at the end, so it is a single cycle, but it contains multiple cycles.

Chirps


Chirps change the frequency of the cycles within a multi-cycle waveform, and can produce timbres which sound very complex and which can't possibly be coming from a single oscillator playing a tiny fragment of audio (but they are!). In the example above then the frequency doubles over the single cycle. I didn't tweak the ends and so there's a discontinuity when the next cycle starts. This sharp feature in the waveform causes lots of high frequencies, and so this sounds more like a pulse wave than a (mostly) smooth sine-ish waveform. 

I know that using multi-cycle waveforms is seen as cheating by some people, and you can find that some oscillators don't have quite the range that they normally do when you need to transpose them a lot (the 16 cycle enveloped 'resonant' waveforms, for example). But I prefer to think of them as single cycle waveforms with unusual frequency content. 

One problem which you will encounter very quickly with chirps and some other multi cycle waveforms is tuning. if you thought that tuning FM on analogue subtractive synthesizers was difficult, then the wilder multi cycle waveforms can be even trickier to tune sometimes. I use a guitar tuner pedal to help me tune the oscillator transpose, and the flashing multi-coloured very bright LEDs intended to help guitarists can prove to be a very mysterious distraction to spectators. I'm not sure that there's always enough 'danger' and living on the edge' in many DAWless performances. Pressing buttons on little black boxes isn't very good to watch, but a few guitar tuner pedals can give just a hint of the edgy feel that Keith Emerson used to get with his Moog Modular on stage, or the rotating piano, or...  

But how do you make them?

All of this messing about with multi cycle waveforms might have you wondering what esoteric and specialist software tools I use to create them. It isn't actually that unusual - my main tool is Audacity 2.4.2. 


Yes, the free, open source audio editor software that you get free (or they get you to download it) with many domestic 'Transfer your old vinyl albums to MP3s!' devices. Audacity is much better than this use case suggests, and is actually very good zoomed in until you can see the individual samples:


All of the waveforms that you see in this blog post were created using Audacity, and without any fancy plug-ins (although I have written a few plug-ins in Nyquist, which is an 'interesting' programming language!). 

Where is the 'End'?

The display of digital samples (from Audacity) shown above has a circle at the top of a vertical line - often called a 'ball and stick' symbol. If you want to exercise your brain then you might like to consider what I said in part 2 about the start and end of a waveform being at the same level....


Let's start by looking at a sampled square wave with only16 samples per cycle. I've shown it as starting with a sample at time zero - the first sample. The last sample of the cycle happens just before the end of the cycle (and the end of the waveform) and is highlighted in light blue. The next sample is the first sample of the next cycle, and is highlighted in orange. The red line highlights the final part of the cycle between the last sample and the first sample of the next cycle. 

I would say that the last sample is not at the 'end' of the cycle - it is definitely earlier in time than the 'end' because there is a red line showing the time between the last sample and the start of the next cycle - and the red line is needed to make the period correct (the time between the start and the end). The 'end' of the cycle, for me, is just before the start of the next cycle - which I would say is at the right hand end of the red line. So, for me, the end of the cycle is not the last sample (the blue one), but a tiny bit of time before the first sample of the next cycle - the orange one. And what is the level immediately before the orange sample? Well, it has to to very close to the level of the orange sample. doesn't it? This is what I mean when I say that a waveform begins and ends at the same level. And yes, I'm kind of splitting the first sample into two pieces and saying that it is the start and vanishingly close to the end. 

Suppose it was suggested that the zero axis is obviously the start and the end level? (Since the average of the high and low samples is zero) Well, then, the first sample would not be at the start, but would be slightly later. So now the start and the end are somewhere in between the first and last sample - and if you think about it, then the level of 'somewhere between the first and last sample' has to be the same if the start and the end are infinitely close together. So even though the first and last samples are different, the waveform has the same level at the start and the end.

Luckily, you don't need to think about the start or ends of samples in this depth very often! 

Audacity 'Single Cycle' Tip Number 1

Audacity makes it very quick and easy to do some tasks that often defeat people - like changing the number of samples in a single cycle waveform. Here's how to do that:


First, select your single cycle in a track. Then go to the 'Effect' drop-down menu. Select 'Change Speed'. (Not any of the other Change options like Pitch or Tempo...). 


Then go to the 'New Length' field and type in the number of samples. Don't type in any of the time formats!

Audacity 'Single Cycle' Tip Number 2

Generating single cycles on wave shapes isn't completely obvious. Here's what you do: Go to the 'Generate' drop-down menu and choose 'Tone'. Enter the frequency (as in table1 above) and the number of samples you want, and press 'OK'


The key to entering samples and not times into those fields is the tiny arrow on the right hand side of the 'Duration' field. When you click on it, you get a drop-down menu that lets you select 'Samples'. This works in the 'Change Speed' dialogue box as well.


Examples

You can download .WAV files of many of the single cycle waveforms in this blog, plus a few more from here. [Not all waveforms are available in every format. I'm not good enough at batching! Think of it as a challenge to find the missing ones and recreate them in the correct format yourself...]

The waveforms were all produced at 44.1 kHz in two sample sizes: 256 and 600, and in three formats: 16 bit, 24 bit and 32 bit float. The user manual for your synthesizer, sampler or drum machine should tell you what format your oscillators prefer. 

Next!

In part 4 I will go more into how important spectrums are...

Links

the WAV file format on Wikipedia

Audacity

---

If you find my writing helpful, informative or entertaining, then please consider visiting this link:


Synthesizerwriter's StoreSynthesizerwriter's Store
 (New 'Modular thinking' designs now available!)