So why would you want to do this? My best answer is in two articles published by Mode Audio: purveyors of excellent sounds for Ableton Live and many other DAWs:
Saturday 31 December 2016
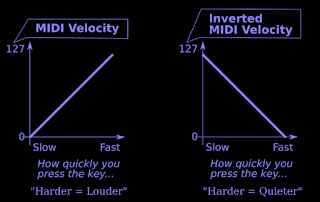
Why would I want to invert MIDI Velocity?
My MIDIf(x)_mr MaxForLive MIDI effect allows MIDI velocity to be inverted.
So why would you want to do this? My best answer is in two articles published by Mode Audio: purveyors of excellent sounds for Ableton Live and many other DAWs:
The articles also contain the link to a neat M4L MIDI display utility for Velocity described here.
So why would you want to do this? My best answer is in two articles published by Mode Audio: purveyors of excellent sounds for Ableton Live and many other DAWs:
Sunday 27 November 2016
Tools to make tools...
One layer down...
Making audio effects in Max For Live (M4L) requires minimal setup in Ableton Live: put an instrument and the audio effect template into a track, and edit the template in Max, using the 'ASDF...' keys on the keyboard to hear what the result sounds like.
Developing a MIDI 'effect' utility like my recent MIDIf(x)_mr requires a bit more work, because the environment that Ableton Live provides lacks some features that ease and speed up working with the MIDI protocol and its fascinating quirks. Of course, M4L makes it easy to add things that compensate, but I realised recently that I have a personal toolbox of M4L 'tools' that I use a lot, but which I have never shared, because they have all been made just for the purpose of making something else - and at the time, that 'something else' was the focus of my attention and so was much more interesting.
Developing a MIDI 'effect' utility like my recent MIDIf(x)_mr requires a bit more work, because the environment that Ableton Live provides lacks some features that ease and speed up working with the MIDI protocol and its fascinating quirks. Of course, M4L makes it easy to add things that compensate, but I realised recently that I have a personal toolbox of M4L 'tools' that I use a lot, but which I have never shared, because they have all been made just for the purpose of making something else - and at the time, that 'something else' was the focus of my attention and so was much more interesting.
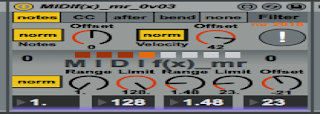 |
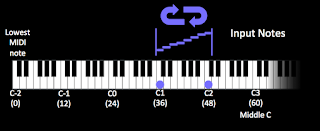
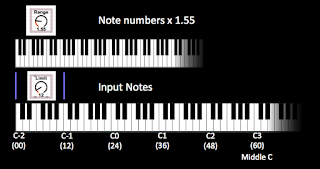
| A graphical representation of just one of the things that 'MIDIf(x)_mr' can do to MIDI Note numbers... |
Here is the basic MIDI processing environment in Ableton Live:
MIDI messages (from the MIDI In, the Virtual keyboard (the 'ASDF...' keys..., the piano roll... ) come from Live and passes through the MIDI Effect (shown here as 'MIDIf(x)_mr', and is then sent to the Instrument, where the MIDI messages are turned into sound.
Live allows MIDI Effects to be chained in just the same way as audio effects, and so there can be several effects in the processing chain.
Above we see one way that uses two of the built-in MIDI Effects inside Live: Pitch and Random. Pitch might be used to shift the incoming MIDI note numbers to check if the MIDIf(x)_mr 'Offset' rotary control is working properly, or maybe check if the 'Clip 0 127' Max command is working by setting very high values for note numbers. Putting 'Random' at the end of the processing chain turns the fixed, 'deterministic (predictable, the same every time)' output of MIDIf(x)_mr into just random notes. It is worth pointing out that this is the major difference between Random an MIDIf(x)_mr:
- Random is not predictable - the output is different every time
- MIDIf(x)_mr is just maths - the output is exactly the same every time
When you first start using MIDIf(x)_mr this difference may not be what you think is happening, of course! MIDIf(x)_mr does strange things to how you think a keyboard affects pitch...
To develop MIDIf(x)_mr, most of the time, I used this environment:
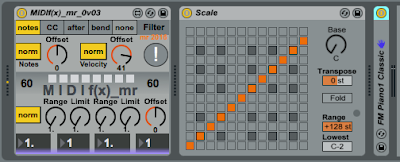
Here the two MIDI Effects are M4L tools that I have written, but they could be any M4L tools from the MaxForLive web-site (and there are lots of useful tools on there). So the actual screenshot looks like this:
Before the MIDIf(x)_mr processing tool, I have used my keyboard 'monitor' called 'KeyMon' to show what the notes that are played on the external MIDI keyboard are, or what the piano roll is producing. MIDIf(x)_mr is set to scale pitch by 2, so an octave is twice as wide at the output as it is at the input. You can see this in the second keyboard monitor: the minor chord has been stretched so that the D# has moved up to an F#, and the G has moved up to a D (overall, the C minor chord has been changed to something where the flattened third has become a flattened fifth, and the fifth has become a 9th). MIDIf(x)_mr understands mathematics but not music, and so the built-in 'Scale' effect is added at the end of the chain so that I can constrain things harmonically if I want to. (and 'choice' is a key part of creativity!)
The other thing that KeyMon helps with is when MIDIf(x)_mr outputs very high or low notes. The input KeyMon hows that the input note root is middle C, which is MIDI note number 60. Doubling this inside MIDF(x)_mr is going to mean that the output is going to start at MIDI note number 120, which is way to the right on a keyboard. One 'hidden' feature of MIDIf(x)_mr is that the note 'Offset' rotary control at the top also affects the input of the 'Warp' processor section, and so in the screenshot above this is set so that the input is transposed down by one octave, so the input to MIDIf(x)_mr is only note number 48, and the output 'Offset' rotary control in the 'Warp' section is set to -48 (down by 4 octaves) so that the output starts an octave below middle C. By using two KeyMon effects around the MIDIf(x)_mr processor, setting all of these offsets is much easier - you just set the offsets so that the output is on the keyboard display where you want it.
Choosing different values of limit will change the output notes again, of course. Here are two other outputs where the scale has been fixed to C major, and a third KeyMon shows the output visually:
 |
| A limit of 19... |
 |
| A limit of 20... |
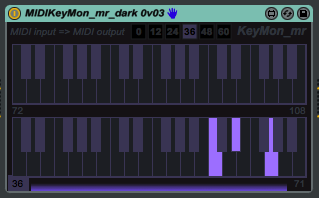 |
| The dark version of KeyMon. |
Monday 21 November 2016
What is MIDIf(x)_mr actually doing to the notes?
THE QUESTION
OK, so you looked at the previous blog entry and you need to know more. You aren't the first, and I'm sure that you won't be the last, to ask:What is MIDIf(x)_mr actually doing to the notes?
It's a good question, and here's some of the answer!
THE ANSWER
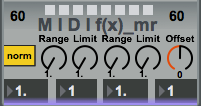
Firstly, we need to look at what the 'Limit' rotary control is doing.
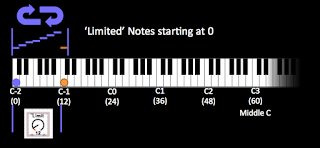
When you set the Limit rotary control to '12', then it does two things: it shifts the notes down to the bottom of the MIDI range of note numbers, and it restricts the range of 'allowed' note numbers to 0 to 11 (That's 12 different values). So the notes that you would hear now are from C-2 (MIDI note number 00) to B-1 (MIDI note number 11). Unfortunately, these notes are very low in pitch, and many instruments won't make much of a useful sound. Also note that the highest note, the C-1, is too high, and so it gets 'folded around and sounds as a C-2.
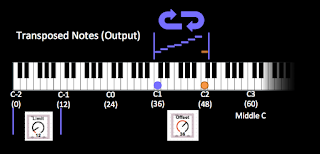
This is where the 'Offset' rotary control is used. (note that this is different to the 'Offset' rotary control near to the top left of the MIDIf(x)_mr window) This works on the output of the 'warp' processor. By setting it to 36 (to the right, -36 would be to the left), then the notes are shifted up by 3 octaves, and will now play in the C1 to B2 range.
The important thing here is that this is not just a shift downwards in pitch, and then adding an offset to restore the same pitch. The 'Limit ' rotary control sets the range of notes that will be played, and the 8 white notes between C1 and C2 stretch across a range of 13 notes, so when the Limit is set to 12, then that 13th note will be transposed downwards because it is outside of the allowed 12 values.
If we set the 'Limit to '1', then the range would be a single note, and so the loop would be from C-2 to C-2, and when we transpose this up 3 octaves, it will result in C1 playing 8 times per loop. If we set the Limit to 2, then we would get 2 notes, the C-2 and the Csharp-2, which would be transposed by the Offset to C1 and Csharp1. A Limit of 3 would give 3 notes, and so on. The Limit rotary control just 'limits' the range of notes which are produced.
If we set the 'Limit to '1', then the range would be a single note, and so the loop would be from C-2 to C-2, and when we transpose this up 3 octaves, it will result in C1 playing 8 times per loop. If we set the Limit to 2, then we would get 2 notes, the C-2 and the Csharp-2, which would be transposed by the Offset to C1 and Csharp1. A Limit of 3 would give 3 notes, and so on. The Limit rotary control just 'limits' the range of notes which are produced.
If the Limit is larger than the range of notes, 24 for instance, then you would not hear any effect - the loop would play all of the white notes from C1 to C2. The reason why this is important depends on the 'Range rotary control.
The other thing that happens when the range is set to 1 and the limit is set to 12 is that the notes are repeated across the keyboard exactly as you are used to them being...
When the Range rotary control is set to a value higher than 1, then the note numbers are multiplied, which is a bit like changing the width of the keyboard. An octave is now a span of less keys, and this changes how the Limit rotary control affects things.
Here's what happens when the Range rotary control is set to a value like 1.55. The C-2 to B-1 white notes are stretched so that they fill just over one and a half octaves: about 18 notes. But 18 notes is bigger than the range of 12 which the Limit has imposed, so what happens?
The 18 notes get limited just as before, and so note numbers outside of the 0-11 range get 'folded' downwards into that range. But because the width of an octave has changed, the pitch change is not an octave. You can see this in the diagram: the orange notes are the first time that new notes occur in the output as we move from the left to the right. Unlike the repeated pattern of notes the happened when the Range was 1, the pattern no longer repeats. The repeats happen at the Limit value divided by the Range value, which is 12 / 1.55, which is between 7 and 8 notes. If we plot the input note against the output note then we get this table (which is just the diagram above showing the purple and orange notes, but expressed as note numbers.):
0
|
0
|
1
|
1
|
2
|
3
|
3
|
4
|
4
|
6
|
5
|
7
|
6
|
9
|
7
|
10
|
8
|
0
|
9
|
1
|
10
|
3
|
11
|
5
|
12
|
6
|
13
|
8
|
14
|
9
|
15
|
11
|
16
|
0
|
17
|
2
|
18
|
3
|
19
|
5
|
20
|
7
|
21
|
8
|
22
|
10
|
23
|
11
|
24
|
1
|
25
|
2
|
26
|
4
|
27
|
5
|
28
|
7
|
29
|
8
|
30
|
10
|
31
|
0
|
32
|
1
|
33
|
3
|
34
|
4
|
35
|
6
|
36
|
7
|
37
|
9
|
38
|
10
|
39
|
0
|
40
|
2
|
41
|
3
|
42
|
5
|
43
|
6
|
44
|
8
|
45
|
9
|
46
|
11
|
47
|
0
|
48
|
2
|
Note that each block of 7 or 8 notes across the keyboard maps to the 'Limit'-controlled outputs, and you would normally use the 'Offset' control to transpose them to usable pitches. The numbers also reinforce the non-repeating nature of the 'Warp' processing inside MIDIf(x)_mr. This is just multiplication creating the transformation from one set of note numbers (the inputs) to another (by stretching the width of the keyboard), and not musical theory, and so you do not get a single scale for each octave, or each block, but instead blocks where the scale varies for almost every block. One block is repeated in the example shown - can you find it?
APPLICATIONS
From here onwards, it is up to you to see what the effect of the different Range and Limit settings do to the notes that you input to MIDIf(x)_mr. There are two sets of Range and Limit rotary controls, followed by the Offset rotary control to put the notes back into a usable range, which means that you can do two different stretches of keyboards, each followed by a range limit. The Range control is deliberately restricted in range to 256 values so that it is repeatable. If you set the values in the big boxes again later, then the output will be exactly the same. (Floating point controls do not guarantee this repeatability...)
Because the scale changes for each block, then initially, whilst learning to use MIDIf(x)_mr, it is a good idea to use Scale, Schwarzonator2, or any other 'scale control' MIDI effect to constrain the output to a single scale!
Because the scale changes for each block, then initially, whilst learning to use MIDIf(x)_mr, it is a good idea to use Scale, Schwarzonator2, or any other 'scale control' MIDI effect to constrain the output to a single scale!
The original description gives one hint for a very interesting effect to explore: set a Range, and then select the Range rotary control with the cursor and nudge it up or down with the cursor keys - you will find that the scale changes back and forth as you nudge. If you nudge up and down with Limits where the limit range is smaller than the range of the notes, then you will get the same scale, but arpeggiated in different ways. So MIDIf(x)_mr is actually a real-time scale converter and arpeggiator with a huge number of possibilities to explore. Assuming a useful Limit range of 10 notes (from 8 to 18 notes), then the number of different outputs is approximately 250 x 10 x 250 x 10, which is more than six million.
More information can also be found in this blog entry on one of the tools used to develop MIDIf(x)_mr.
Also see: Inverted MIDI Velocity
More information can also be found in this blog entry on one of the tools used to develop MIDIf(x)_mr.
Also see: Inverted MIDI Velocity
Sunday 20 November 2016
MIDI Processing - MIDI f(x)_mr
MIDI Experimentation
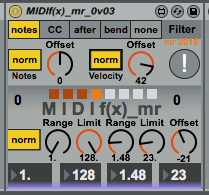
My latest Max For Live MIDI device for Ableton Live is several MIDI processing functions in one! (some of them unusual and/or experimental)- Filtering (ok, so not very experimental),
- Note transpose (er, just a bit ordinary...),
- Velocity shift (quite unusual, and very useful),
- Note Invert (very unusual),
- Velocity invert (experimental, and pretty unusual), and
- a deterministic pitch mapping utility that is based on pitch multiplication and modulo arithmetic (very experimental).
Use at your own risk. (Putting 'Scale' or one of those other 'MIDI scale'-adjusting M4L devices after MIDIf(x)_mr (with appropriate settings in 'Scale'!) is recommended for those people who don't like too many accidentals infesting their music...) And have fun! (Oh, and if you get 'stuck' notes, then click on the '!' button to flush things clean again.)
MIDI f(x)_mr
Here are some details of the processing:MIDI Filtering
The MIDI Filtering allows rapid removal of notes, continuous controllers, after-touch(channel pressure) or pitch-bend, and I often have it set so that it just lets notes through an filters everything else out.Note transpose
Note transpose just transposes the incoming MIDI, and is included here because it is useful to have in a multi-purpose utility, but also because it was very useful during the development process! The rotary control is labelled "Offset' because that's what it is doing: adding an offset to the MIDI note numbers.Velocity shift
Velocity shift (just rotate the 'Offset' control) is useful to compensate for keyboards the require playing hard to get decent amounts of velocity, or for sound modules that require high velocity inputs to produce a sound at a decent volume. The rotary control is labelled 'Offset' because it is adding an offset to the MIDI velocity value for Note On messages.Note Invert
Note Invert is one of those 'fun' utilities that is usable once with someone who has never seen a reversed keyboard, where the high notes are on the left, and the low notes are on the right. Actually, it can also be used to create interesting bass notes that don't just predictably track the root. The 'Offset' rotary control can be used to set the keyboard so that any key you choose is the same on the inverted keyboard. I tend to use middle C (=60 sometimes) as my reference, but you may find it interesting to choose other values and see what happens.Velocity invert
Velocity invert is another 'fun' function that upsets people who expect sounds to be louder when you play harder. But it is also very useful for creating 'velocity layering in layered sounds - use inverted velocity on one of the layers and you can control the two sounds just by playing harder or softer. Once again, the 'Offset' control is merely adding to the MIDI velocity value, and this time can be used to compensate for the bias of your keyboard's velocity calibration, or any bias in your sound generation modules. Also see this blog entry: Inverted MIDI VelocityPitch Mapping...
And finally, there's that weird-sounding deterministic pitch mapping utility that you were going to ignore... As it happens, not exploring it would be a pity because there's lots of scope for exploration here. You get two stages of 'pitch scaling, followed by wrapping round of the notes', which is achieved by multiplying the incoming pitch, and then applying modulo arithmetic to the result - and then doing it all again. Some people will tell you that multiplying MIDI note numbers does not produce useful results, whilst other people will tell you that you need to constrain the resulting interval madness with processing that wraps the result into manageable lumps. I'm with the 'others'.So the 'Range' control lets you adjust from the usual '1 octave in = 1 octave out' scaling, to 1 octave in = 3.55 octaves out' super broad scaling where the two stages let you do this twice, resulting in a single octave spanning 7 octaves (and also meaning that a lot of notes are missing!).
The 'Limit' control can be used to bring that huge span under some sort of control. If you set the limit to 1, then you only get a single note out. if you set it to 12, the you get 12 notes out, and any input you put in just wraps round and round those 12, so the same 12 notes repeat themselves all across the keyboard range. If you set it to 128, then it is the same as if it was not there at all, of course!
The best way to learn how to use it is not to set the Range of one section to 1.10, leave the other Range at 1.00, and set both Limits to 128 - this gives a keyboard which is almost right (emphasis on 'almost'). Much better is to create an 8th note looped sequence (a rising scale is fine), and then to explore just one of the two processing sections. The 1.1 Range with a Limit of 12 is a good stating point - you will need to adjust the Offset control to get the output into a sensible range (watch the left and right numbers to either side of the 'MIDIf(x)_mr' title - I use middle C (=60 sometimes) and tweak the Offset to get 60 at the output). Listen to what happens with the looped sequence, and then try adjusting the Range or the Limit. Just hopping back and forth between a few range settings is pretty cool for starters...
Memories
The small white boxes are the usual 'memory' buttons that M4L provides. You shift-click in a box to save a setting, and just click on a box to recall the stored settings. Empty boxes are white in colour, whilst boxes containing saved settings ae orange. The current setting is bright orange.Scaling
The output of MIDIf(x)_mr is scaled in pitch, and so can contain all sorts of note numbers. Using something to constrain the notes to a scale is a good idea in many applications. You can use Ableton's own 'Scale' utility for this, or search 'Max for Live.com' for 'midi scale' devices, and se what comes up - when I searched there were several different possibilities to try out.Enjoy!
As usual, this is experimental stuff that I'm more than happy for you to play about with, and it may or may not do what you want, or even what I intended it to do. Let me know if you have any problems, and I may be able to find the time to fix it or even improve it...I have added a new blog entry that explains some of what is happening inside the 'Warp' processing part of MIDIf(x)_mr. More information can also be found in this blog entry on one of the tools used to develop MIDIf(x)_mr.
Also see: Inverted MIDI Velocity
Tuesday 30 August 2016
Audio environments from frozen spectral grains...
Atmospheric sounds
You hear them all the time, but mostly they slip under the radar. Environmental sounds are the background 'atmosphere' that pervades spaceships, control rooms, power stations, busy offices, streets, and everywhere else. The classic 'bridge sound' from the original Star Trek is a perfect example: if you hear a few seconds of it you know exactly what it is, and yet most of the time you aren't are of it. Like a lot of audio that underpins moving pictures, your eyes are distracted, and the sound plays a strong supporting role. But remove the sound, and suddenly the pictures aren't as compelling or interesting.
Music uses background sounds too. On stage, the atmosphere built up by the right sound gradually rising from subliminal to noticeable can make the reveal of the musicians all the more an event. Staging isn't just lights... And during a set, the right background sounds can control mood as well as provide links between songs.
Crafting atmospheric sounds requires a lot of knowledge about the way that sounds work on people. It also eats up source material, which is why making background sounds is a challenge, and it explains why some of the most popular plug-in downloads aren't what you might expect. 'Sound Generators' are a key part of the tools that creators use, along with the audio editing software and sound effects library that you were probably expecting.
Grainy spectrums
Granular synthesis is very popular at the moment, and there are a lot of software instruments that are devoted to producing sounds using little fragments of sound. But creating frozen spectrum grabs is only part of the solution, mainly because freezing a sound produces a static spectrum, and that quickly gets boring. Just as movement makes movies engaging, evolution makes sounds interesting. Recently, I've been looking at various ways of capturing spectral fragments, and I've struggled to turn them into something that I can use.So, my latest Max For Live plug-in for Ableton Live is specially designed to turn audio fragments into atmospheric background sounds. It is a sound generator based on grains instead of the longer samples (or FM or feedback algorithms) that are often used. gFreez_mr allows the capture and playback of four separate grains of frozen spectra, and then uses a four-phase LFO and LFO-controlled panning to animate those four components into a constantly shifting atmospheric sound. gFreez_mr is particularly good for synthetic, electronic sounds, and it has a number of functions that are specifically designed for live use.
gFreez_mr
First things first - you need to be able to play the audio samples in Live, and Simpler is perfect for this, although you can use Sampler and any other sample player you like. gFreez_mr is an audio effect, and so goes after the sample player:The 'top slot control buttons should now be set to 'Mute' so that the sound is no longer heard, and the second slot should be set to 'On' and a new spectrum grain grabbed. When you have repeated this for all four slots then gFreez_mr will look like this:
Note that since we have now captured all of the four slots, then the 'Input/Mute' button on the far right has been set to 'Mute' so that we will no longer hear any audio from the sample player. The small row of buttons in the centre of the four slots affect all of the slots, and so clicking in the 'Mute' column will set all of the slots to muted, and so no audio will be heard at the output. You can also just click on the slot control button if you wish.
Playback
The easiest way to set all of the four slots playing at once is to use the small row of buttons in the centre again - this time in the 'LFO' column:This sets gFreez_mr playing all of the slots, an you will se the four volume indicators in the centre right moving back and forth. The larger the block, the louder the volume, and the LFO has four phases, so each slot fades in and out in order. The 'Fade Time' rotary control sets the rate of the LFO, and because the actual time for a complete cycle is important in this type of sound generator, then the time for a cycle is indicated in large numbers - '34 seconds' in the screenshots here.
As well as smoothly fading each slot in and out in sequence, there are pan controls for each slot. The rate controls the rate of auto pan of the left and right channels of the stereo spectrum grains. The 'phase' controls alter the relative phase of the panning LFO for the two stereo channels - so hen they are the same, then you get conventional panning of the stereo grains, but if you set them to '180' degrees apart, then the two channels will be panning in anti-phase, and you will hear the two channels separately (assuming the spectra are different enough!). Setting the pan controls can make the output sound animated and interesting, and can helps to hide the repeats of the main 4-phase LFO cycle. If you set the pan rate to zero, then there is no panning...
Live updating
As an additional way to hide the repetitions, you can update the slots whilst gFreez_mr is playing. The process is as follows:1. Wait for the volume block in your chosen slot to drop to zero, then 'Mute' that slot. You can now 'Grab' a new spectrum, although you won't be able to hear it because the 'Input/Mute' button will be set to 'Mute' to prevent this. (You can always set the 'Input/Mute' switch to 'Input' so you can hear it, but your audience will hear it too!) I tend to go by the spectrum display when I'm doing this live updating, and you should quickly get the hang of assessing kind of what a grain will sound like based on the spectrum.
2. Play the sound you want to grab, and click on the 'GRAB' button. The spectrum display will update with the new grain. (If you don't like th look of th spectrum, then just grab the spectrum of another sound by repeating this step!)
3. Wait for the volume block for that slot to get to zero again, and quickly click on the 'LFO' button. The new slot will then be included in the new cycle.
This process isn't as tricky as it might sound, and it enables much longer sounds to be generated live.
Sounds
Remember that gFreez_mr does not capture samples - it captures the spectrum of a very short piece of audio: a grain. So the sound that you hear from each slot is that spectrum turned back into sound - a very simple resynthesis process. This type of sound generation has limitations, and there is a distinctive character to the sounds, but there is a pretty wide variation of timbres, and mixing in real samples can provide additional variation in an audio editor.This first version of gFreez_mr does not save the spectral grains, and so it is intended for live use. Future versions may add additional functionality, of course. Anyway, have fun with this first version, available as usual from MaxForLive.com.
Audio demo at: https://soundcloud.com/martinruss/gfreez_mr-demo-01-edited
Monday 8 August 2016
Free Max For Live M4L Packs from SynthesizerWriter
Here is a summary of my latest free MaxForLive 'Echo' effects. As usual, these are all available from MaxForLive.com via the 'Download' buttons in each of the boxes below.
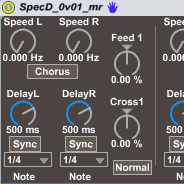
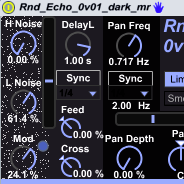
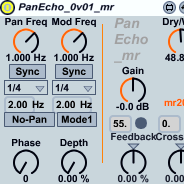
These echo effects provide a snapshot of my MaxForLive programming: Delay Delay Echo is a very early 'learning' project, DDFS adds frequency shifting, and SpecD is an experiment to see if 'dark' effects are more popular (and if using something reminiscent of a 1970s Japan naming scheme makes the effect more appealing!). Pan Echo starts to explore what you can do with auto-panning of echoes, whilst Field Echo explores static stereo fields.
Note that whilst there are four 'dark' and four 'ordinary' effects here, both colour variants are not always available - Rnd Echo and Missing Echo are only available in 'dark'.
Finally, two echoes that explore more unusual areas: Rnd Echo provides random echo delay times, whilst Missing Echo lets an LFO control the feedback inside the delays. The experimental nature of these last two means that they will probably be extended, or a new variant will be added at some stage. Maybe eventually I will produce a dual delay with frequency shifting, auto-pan, stereo field, random delay times and LFO controlled feedback...
|
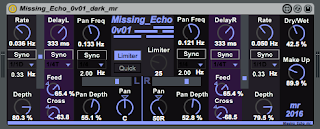
Max for Live Missing Echo dark This echo puts an LFO inside the feedback loop, so the number of echoes changes over time. F R E E
|
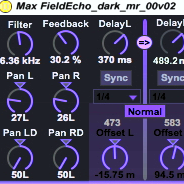
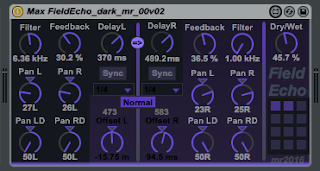
Max for Live Field Echo dark This two-stage echo enables you to place echoes in the stereo image: a very 'musical' echo. F R E E
|
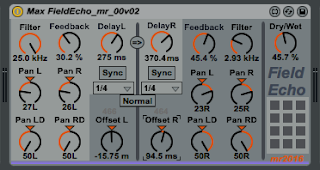
Field Echo This two-stage echo enables you to place echoes in the stereo image: a very 'musical' echo. F R E E
|
Max for Live Delay Delay Echo Delay Delay is a simple echo with two sections. This is the most basic of my echoes, and my first! F R E E
|
|||||||
|
Max for Live SpecD SpecD is a stereo dual-stage pitch-shift/chorus echo, and the 'dark' version of the DDFS echo. F R E E
|
DDFS This echo adds frequency shifting inside the feedback loop, hence: Delay Delay Frequency Shift. F R E E
|
Rnd Echo dark This echo provides echo times controlled by random noise... Not your ordinary echo effect at all! F R E E
|
Pan Echo This echo provides auto-panning of the echo outputs, and so livens up the stereo image. F R E E
|
These echo effects provide a snapshot of my MaxForLive programming: Delay Delay Echo is a very early 'learning' project, DDFS adds frequency shifting, and SpecD is an experiment to see if 'dark' effects are more popular (and if using something reminiscent of a 1970s Japan naming scheme makes the effect more appealing!). Pan Echo starts to explore what you can do with auto-panning of echoes, whilst Field Echo explores static stereo fields.
Note that whilst there are four 'dark' and four 'ordinary' effects here, both colour variants are not always available - Rnd Echo and Missing Echo are only available in 'dark'.
Finally, two echoes that explore more unusual areas: Rnd Echo provides random echo delay times, whilst Missing Echo lets an LFO control the feedback inside the delays. The experimental nature of these last two means that they will probably be extended, or a new variant will be added at some stage. Maybe eventually I will produce a dual delay with frequency shifting, auto-pan, stereo field, random delay times and LFO controlled feedback...
Labels:
Ableton Live,
Echo,
effects,
free,
M4L,
MaxForLive,
Plug-in,
plug-ins,
plugin,
plugins
Sunday 24 July 2016
Altering parameters inside an Echo Effect...
In several of my MaxForLive effects, I have examined what happens if you modulate a parameter that is normally not associated with that type of control. So there's a Limiter with an LFO, an Echo effect where the modulation of time is derived from Random Noise, and my most recent effect, 'Missing Echo' allows the feedback inside a delay line to be altered by an LFO.
You can do this manually, and there's a number of performance techniques based on this general principle. I've covered this before in my 'Dopplator' effect, but that was based on a rounded pulse as the LFO waveform, and didn't have any panning facilities. 'Missing Echo' is much more in the mainstream sequence of my effects, and so has dual syncable independent LFOs for panning, plus a Limiter to keep things under control if you require it, and dual syncable independent delay lines, as well as dual syncable independent LFOs to modulate the feedback. Yes, this is a lot of LFOs, but those always were the modules I ran out of first when I used to play with modular synths...
The LFO modulates the feedback in a slightly different way to the way that you might expect, and I'm still exploring things to find the optimum method. The current version first sweeps from zero feedback to the modulation setting for in-channel feedback and then back, and then sweeps from zero feedback to the modulation setting for the other-channel and then back to zero. So you get one half cycle of ordinary echo, followed by one half cycle of ping-pong echo, with all of the stereo imaging that you would expect from this arrangement. Add in the stereo auto-panning, and there's a lot that can be going on in that stereo image - if you want! As I said, I'm still trying to find the best way of controlling this, and a later version may add more facilities...
'Missing Echo' can be downloaded from MaxForLive.com
Because I have several different variations on the Echo effect available (from www.maxforlive.com) then I'm going to be adding a special easy selection page soon, so that it is easier to browse through the different variants on the echo effect that I have produced.
Labels:
Audio effect,
Echo,
LFO,
M4L,
Max for Live
Sunday 8 May 2016
A different type of echo effect...
I have always liked echo, from my very early 'wannabe Space Echo' days with merely a guitar and a customised Melos 'tape cartridge' echo box, through to the wonderfully bouncy 'Ping Pong Echo' in Ableton Live. But I've also always wanted more from my echoes, and I have done lots of exploring to try and find that itchy place that needs scratching, and I have got close sometimes - look at MaxForLive.com for a host of experiments with echoes. Random time delays was one of my more recent investigations, and the lack of structure was what got me thinking about a very different approach.
Turning an idea into reality sometimes clicks quickly and easily, and sometimes it just turns into treacle and everything goes slow-mo. This one didn't go well, and I spent rather longer than I ever intended getting the details correct. But I eventually got my head around it, and managed to get the Max4Live working more or less as I wanted - although as you will see, the 'Auto' function still needs some work. So what sort of echo is this latest one?
'Field Echo' is named after my intention to do something more with stereo echoes that just bounce them round from channel to channel. Fun though that is, real world echoes work 'inside and as part of' the sound field, and don't have ''channels, and that's why I made this new experimental echo effect.
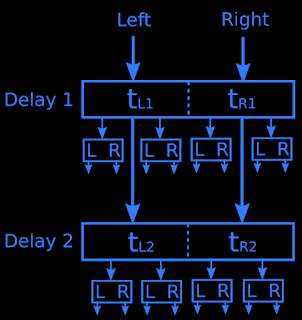
Field echo has two stereo delays in series, but the feedback is separated into 'same channel' feedback and 'other channel' feedback (ping-pong). The two feedback channels also provide two outputs per stereo delay, and these outputs can be panned anywhere in the stereo stage. The layout is exactly as you might expect, and I've mixed the left/right channel metaphor a bit, but I think it works.
The best way to find out about it is to use it, so here are some hints and tips about what to explore.
1. Similar but slightly different times for all the four delays is a good starting point, and panning the L and R 'same channel' outputs mid-way towards left and right, and the 'other channel' LD ping-pong outputs hard left an right. This gives a big, bold stereo echo, and a good starting point for further exploration.
2. Try breaking the rules and distributing the L and R outputs to the Left, and distributing the LD and LR outputs over to the Right (Remember that the intention is to create stereo imagery, not hard left and right walls of echoes). You should find that you get interesting haloes rather than the hard brittle echoes that you might be used to. Try tweaking the delay times, and when you increase the delay in the first section, try reducing the time in the second. You should use extreme caution when using this type of setting with Marimbas or other physical percussion instruments, because you may find that hours slip by without you noticing!
3. Try the 'Auto' control for amy first attempt at making the 'up a it, down a bit to compensate' process a bit faster. I ha problems with the maths inside Max, and so this is isn't perfect, but it is still interesting, and there's now only only delay time control to play with. Note that you can set negative times, but the delay lines don't know what to do with them! In the next version I will window the time delays to real values.
As I now do with all my M4L, there is also a 'dark' version.
I hope you find Field Echo an interesting diversion for a while, and you may even find it useful. As always, you can find it on MaxForLive.com (dark) or MaxForLive.com (light).
Turning an idea into reality sometimes clicks quickly and easily, and sometimes it just turns into treacle and everything goes slow-mo. This one didn't go well, and I spent rather longer than I ever intended getting the details correct. But I eventually got my head around it, and managed to get the Max4Live working more or less as I wanted - although as you will see, the 'Auto' function still needs some work. So what sort of echo is this latest one?
Field Echo
'Field Echo' is named after my intention to do something more with stereo echoes that just bounce them round from channel to channel. Fun though that is, real world echoes work 'inside and as part of' the sound field, and don't have ''channels, and that's why I made this new experimental echo effect.
Field echo has two stereo delays in series, but the feedback is separated into 'same channel' feedback and 'other channel' feedback (ping-pong). The two feedback channels also provide two outputs per stereo delay, and these outputs can be panned anywhere in the stereo stage. The layout is exactly as you might expect, and I've mixed the left/right channel metaphor a bit, but I think it works.
The best way to find out about it is to use it, so here are some hints and tips about what to explore.
1. Similar but slightly different times for all the four delays is a good starting point, and panning the L and R 'same channel' outputs mid-way towards left and right, and the 'other channel' LD ping-pong outputs hard left an right. This gives a big, bold stereo echo, and a good starting point for further exploration.
2. Try breaking the rules and distributing the L and R outputs to the Left, and distributing the LD and LR outputs over to the Right (Remember that the intention is to create stereo imagery, not hard left and right walls of echoes). You should find that you get interesting haloes rather than the hard brittle echoes that you might be used to. Try tweaking the delay times, and when you increase the delay in the first section, try reducing the time in the second. You should use extreme caution when using this type of setting with Marimbas or other physical percussion instruments, because you may find that hours slip by without you noticing!
3. Try the 'Auto' control for amy first attempt at making the 'up a it, down a bit to compensate' process a bit faster. I ha problems with the maths inside Max, and so this is isn't perfect, but it is still interesting, and there's now only only delay time control to play with. Note that you can set negative times, but the delay lines don't know what to do with them! In the next version I will window the time delays to real values.
As I now do with all my M4L, there is also a 'dark' version.
I hope you find Field Echo an interesting diversion for a while, and you may even find it useful. As always, you can find it on MaxForLive.com (dark) or MaxForLive.com (light).
Sunday 24 January 2016
Generating audio soundscapes...
A few weeks back, I revisited my old Reaktor workspace and started reworking some of the ideas in there for M4L. Here's the second output from that project...
Saw4Generator_Dark is a sound generator with preset memories. It does not respond to MIDI inputs - it just sits there and makes noises continually...
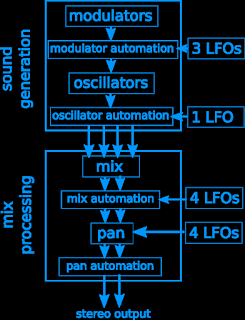
The basic idea is very simple. There are two sections: a sound generator that produces the raw sounds; and a mix processor that controls how those sounds are formed into a stereo sound stage. Both sections have manual controls that can be tweaked, as well as LFOs that allow some changes to be made cyclically over time (although this version does not allow the sound generator modulation settings to be controlled by LFOs, which is something for a future version)
The sound generator section starts with a sawtooth wave oscillator with and and LFO to modulate the pitch and the output is frequency modulated by another similar oscillator, which is modulated by another similar oscillator, and another one on top of that... The result is a simple FM vertical arrangement that is often referred to as a 'stack'. There are a lot of controls!
The mix processor is a flexible output stage with even more controls! The output allows mixing of four deliberately-harmonically-diverse outputs: the final oscillator itself ('Saw'), the ring modulated output of the third and final oscillators ('Ring'), the output of the third oscillator 'sample & hold' processed by the final oscillator ('S&H'), and the output of the second oscillator 'sample & hold' processed by the final oscillator ('H&S'). In other words there are four separate outputs, each with its own unique harmonic content. The output stage has LFO modulation of the mixing, plus LFO panning as well.
There's a lot of power here to control the sound, and a lot of LFOs providing the bulk of that automation. As always with LFOs (and often with VCOs, and especially with digital versions of these building blocks...), the 'never the same twice' rule applies - so don't set all the LFOs to the same rate or the same modulation, instead go for values that won't 'collide' too frequently: ratios that are prime numbers are good. Here's why:
If you think about two LFO were one is twice the speed (rate) of the other, then they will 'collide' or repeat (have the same values at the same time) every cycle of the slowest LFO. In the diagram I've simplified the LFO to show only two output states (0 and 1):
01010101010101 (rate = 1)
00110011001100 (rate = 1/2)
^ ^ ^ ^ (the pattern repeats quickly)
But if the rates (or the ratios between them) are prime numbers, then the collisions take much longer to happen:
00011100011100011100011100011100011 (rate = 1/3)
00000111110000011111000001111100000 (rate = 1/5)
^ ^
(the pattern repeats more slowly)
So by setting values like these:
0.01
0.02
0.03
0.04
You will get lots of places where the LFOs are in sync, and digital systems are pretty precise with timing for LFOs, and so you tend to get short repetitive patterns, which normally isn't what you want when you are controlling a complex sound generator...
Better values for getting long times between repeats would be more like:
0.03
0.05
0.07
0.11
Which takes quite a long time to repeat, and sounds a lot more complex when you hear the controlled output.
Getting Started
A good way to start with Saw4GeneratorDark is to turn all the controls to the leftmost minimum position, and then to select the Saw button, adjust the volume to your preference, and choose the pitch you want in Oscillator 4 (there's just a Pitch control there, so it is easy to find! You will also find the 'preset' store buttons here. 'Shift & Click' to store, Just Click to recall. Saving this 'All leftmost' preset is a good place to start again when you get lost).
Using just one oscillator is a good way to learn the output options: LFO modulation of volume, plus LFO panning. Once you have gt your head around the controls (some ping-pong echo is very often applied to the output of this type of generator...) then there is the LFO modulation of the pitch of the oscillator to try out. Saving a simple sound like this is often a good starting point for further exploration.
When you are comfortable with all of that then you can try moving to the left and try exploring the pitch and modulation controls for Oscillator 3, then the LFO pitch modulation for that oscillator, and so on to the leftmost Oscillator. Because Oscillator 1 is at the top of a stack of FM then it can cause big changes to the oscillators underneath it, so be cautious at first with the pitch and modulation controls. If everything gets too much, then just go back to the 'all leftmost' and start again from Oscillator 3.
Further processing
The screenshot above shows one possible chain of audio processing that you can add after Saw4GeneratorDark. A 'Saturator' is used in the 'wave shaper' mode, followed by an 'Auto Filter' set so that a resonant filter peak scans across the frequency spectrum, then a limiter to avoid problems with a peaky filter on the resulting rich audio material, and then the ubiquitous 'Ping-Pong Delay'.
The thinking behind this type of audio processing chain is straightforward: generate a harmonically-rich sound source, and then dynamically filter it down into a simpler sound. The Saw4GeneratorDark output already has a lot of harmonic content, and so the Saturator doesn't need very much drive in order to get a lot of frequencies, but it can be useful for a little bit of thickening or 'colouring' of the output. The low-pass peaky filter lets some low frequencies through, and so tends to give a stronger sound, but try using a peaky band-pass (or high-pass) and see the difference that it makes to the sound landscape that is produced. You can replace the simple Limiter with a Multiband Compressor if you want more control over the output frequencies, but you might think that there are already enough controls! The final Ping Pong Delay just pushes things together, and could be replaced (or augmented) with some Reverb.
This is just one possible chain of post-generator processing. There are many more possibilities to play with, and when combined with Saw4GeneratorDark, you can create a wide variety of unusual soundscapes. There's a lot to explore in Saw4Generator, and a lot of sounds waiting to be created. Recording the output and processing it further is thoroughly encouraged!
(As always, this is a work in progress, so it may not be perfect, and early versions tend not to have very much help on controls included in the M4L. Please feel free to report bugs via the comments, and I will try to fix them when I can find time.)
Labels:
Ableton Live,
Generator,
M4L,
MaxForLive,
Sound Generator,
Synth,
synthesis,
Synthesiser
Subscribe to:
Posts (Atom)

