Sunday 27 November 2016

Tools to make tools...

One layer down...

Making audio effects in Max For Live (M4L) requires minimal setup in Ableton Live: put an instrument and the audio effect template into a track, and edit the template in Max, using the 'ASDF...' keys on the keyboard to hear what the result sounds like.

Developing a MIDI 'effect' utility like my recent MIDIf(x)_mr requires a bit more work, because the environment that Ableton Live provides lacks some features that ease and speed up working with the MIDI protocol and its fascinating quirks. Of course, M4L makes it easy to add things that compensate, but I realised recently that I have a personal toolbox of M4L 'tools' that I use a lot, but which I have never shared, because they have all been made just for the purpose of making something else - and at the time, that 'something else' was the focus of my attention and so was much more interesting.
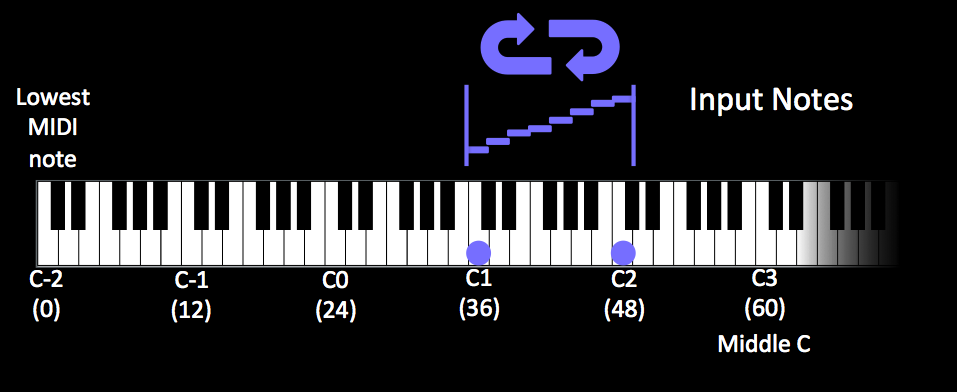
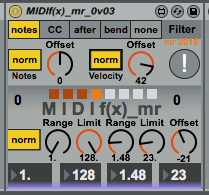
A graphical representation of just one of the things that 'MIDIf(x)_mr' can do to MIDI Note numbers...
A long time ago, I learned that the word 'Never' is one of those key 'danger' words that will catch you unawares. As it happens, there are several new bits of M4L that I'm going to be releasing over the coming few months, and all of them depended on 'unshared' tools for their development. So, post-Loop, this looks like a good time to make those tools available to a wider audience, so that working with M4L is made easier for more people.

Here is the basic MIDI processing environment in Ableton Live:
MIDI messages (from the MIDI In, the Virtual keyboard (the 'ASDF...' keys..., the piano roll... ) come from Live and passes through the MIDI Effect (shown here as 'MIDIf(x)_mr', and is then sent to the Instrument, where the MIDI messages are turned into sound. 
Live allows MIDI Effects to be chained in just the same way as audio effects, and so there can be several effects in the processing chain.
Above we see one way that uses two of the built-in MIDI Effects inside Live: Pitch and Random. Pitch might be used to shift the incoming MIDI note numbers to check if the MIDIf(x)_mr 'Offset' rotary control is working properly, or maybe check if the 'Clip 0 127' Max command is working by setting very high values for note numbers. Putting 'Random' at the end of the processing chain turns the fixed, 'deterministic (predictable, the same every time)' output of MIDIf(x)_mr into just random notes. It is worth pointing out that this is the major difference between Random an MIDIf(x)_mr:
  • Random is not predictable - the output is different every time
  • MIDIf(x)_mr is just maths - the output is exactly the same every time

When you first start using MIDIf(x)_mr this difference may not be what you think is happening, of course! MIDIf(x)_mr does strange things to how you think a keyboard affects pitch...

To develop MIDIf(x)_mr, most of the time, I used this environment:
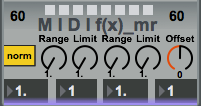
 Here the two MIDI Effects are M4L tools that I have written, but they could be any M4L tools from the MaxForLive web-site (and there are lots of useful tools on there). So the actual screenshot looks like this:
Before the MIDIf(x)_mr processing tool, I have used my keyboard 'monitor' called 'KeyMon' to show what the notes that are played on the external MIDI keyboard are, or what the piano roll is producing. MIDIf(x)_mr is set to scale pitch by 2, so an octave is twice as wide at the output as it is at the input. You can see this in the second keyboard monitor: the minor chord has been stretched so that the D# has moved up to an F#, and the G has moved up to a D (overall, the C minor chord has been changed to something where the flattened third has become a flattened fifth, and the fifth has become a 9th). MIDIf(x)_mr understands mathematics but not music, and so the built-in 'Scale' effect is added at the end of the chain so that I can constrain things harmonically if I want to. (and 'choice' is a key part of creativity!)

The other thing that KeyMon helps with is when MIDIf(x)_mr outputs very high or low notes. The input KeyMon hows that the input note root is middle C, which is MIDI note number 60. Doubling this inside MIDF(x)_mr is going to mean that the output is going to start at MIDI note number 120, which is way to the right on a keyboard. One 'hidden' feature of MIDIf(x)_mr is that the note 'Offset' rotary control at the top also affects the input of the 'Warp' processor section, and so in the screenshot above this is set so that the input is transposed down by one octave, so the input to MIDIf(x)_mr is only note number 48, and the output 'Offset' rotary control in the 'Warp' section is set to -48 (down by 4 octaves) so that the output starts an octave below middle C. By using two KeyMon effects around the MIDIf(x)_mr processor, setting all of these offsets is much easier - you just set the offsets so that the output is on the keyboard display where you want it.
By using the 'Limit' rotary control, the stretching effect can be reversed, and once again the offset rotary control is used in combination with the KeyMon keyboard monitor effect. Notice that when the warping is limited to 17, then the output Offset has been changed to 48 so that the output is pitched in the same octave as before - and the notes have moved around again!

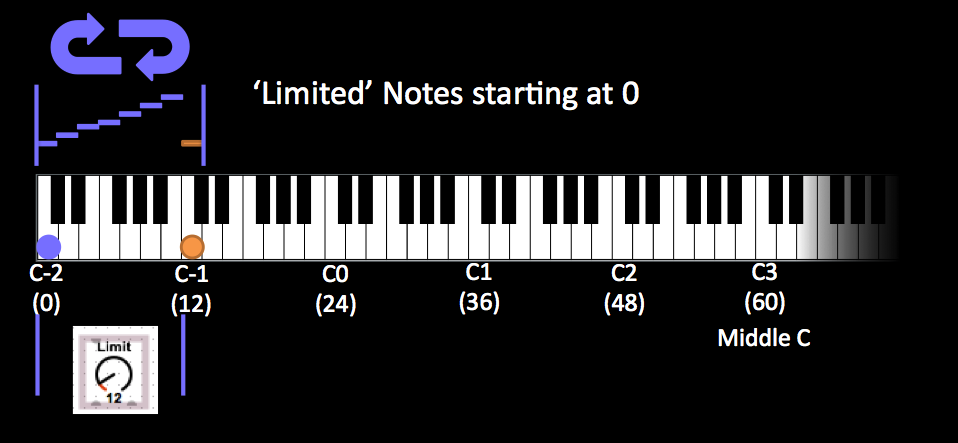
Choosing different values of limit will change the output notes again, of course. Here are two other outputs where the scale has been fixed to C major, and a third KeyMon shows the output visually:
A limit of 19...
(The extra C note was added on the piano roll, and gets limited into the 17 note range set by the limit control.)
A limit of 20...
  The six buttons at the top of the KeyMon MIDI Effect set the lowest note displayed. In all of these diagrams it is set to '36', and so middle C is on the 'lower' keyboard. Note that the two keyboards flow from the lower one to the upper one, and so 6 octaves are shown in total. KeyMon is, as always, available from MaxForLive.com, and also comes in a dark version.
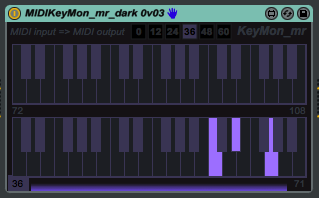
The dark version of KeyMon.
Also see: Inverted MIDI Velocity


Monday 21 November 2016

What is MIDIf(x)_mr actually doing to the notes?

THE QUESTION

OK, so you looked at the previous blog entry and you need to know more. You aren't the first, and I'm sure that you won't be the last, to ask:

        What is MIDIf(x)_mr actually doing to the notes?

It's a good question, and here's some of the answer!

THE ANSWER

Firstly, we need to look at what the 'Limit' rotary control is doing.

This diagram shows an 8th note sequence looping around and around, playing the white notes from C1 to C2, which is MIDI note numbers 36 to 48. 

When you set the Limit rotary control to '12', then it does two things: it shifts the notes down to the bottom of the MIDI range of note numbers, and it restricts the range of 'allowed' note numbers to 0 to 11 (That's 12 different values). So the notes that you would hear now are from C-2 (MIDI note number 00) to B-1 (MIDI note number 11). Unfortunately, these notes are very low in pitch, and many instruments won't make much of a useful sound. Also note that the highest note, the C-1, is too high, and so it gets 'folded around and sounds as a C-2.

This is where the 'Offset' rotary control is used. (note that this is different to the 'Offset' rotary control near to the top left of the MIDIf(x)_mr window) This works on the output of the 'warp' processor. By setting it to 36 (to the right, -36 would be to the left), then the notes are shifted up by 3 octaves, and will now play in the C1 to B2 range. 


The important thing here is that this is not just a shift downwards in pitch, and then adding an offset to restore the same pitch. The 'Limit ' rotary control sets the range of notes that will be played, and the 8 white notes between C1 and C2 stretch across a range of 13 notes, so when the Limit is set to 12, then that 13th note will be transposed downwards because it is outside of the allowed 12 values.

If we set the 'Limit to '1', then the range would be a single note, and so the loop would be from C-2 to C-2, and when we transpose this up 3 octaves, it will result in C1 playing 8 times per loop. If we set the Limit to 2, then we would get 2 notes, the C-2 and the Csharp-2, which would be transposed by the Offset to C1 and Csharp1. A Limit of 3 would give 3 notes, and so on. The Limit rotary control just 'limits' the range of notes which are produced. 

If the Limit is larger than the range of notes, 24 for instance, then you would not hear any effect - the loop would play all of the white notes from C1 to C2. The reason why this is important depends on the 'Range rotary  control.

The other thing that happens when the range is set to 1 and the limit is set to 12 is that the notes are repeated across the keyboard exactly as you are used to them being...


When the Range rotary control is set to a value higher than 1, then the note numbers are multiplied, which is a bit like changing the width of the keyboard. An octave is now a span of less keys, and this changes how the Limit rotary control affects things.

Here's what happens when the Range rotary control is set to a value like 1.55. The C-2 to B-1 white notes are stretched so that they fill just over one and a half octaves: about 18 notes. But 18 notes is bigger than the range of 12 which the Limit has imposed, so what happens?


The 18 notes get limited just as before, and so note numbers outside of the 0-11 range get 'folded' downwards into that range. But because the width of an octave has changed, the pitch change is not an octave. You can see this in the diagram: the orange notes are the first time that new notes occur in the output as we move from the left to the right. Unlike the repeated pattern of notes the happened when the Range was 1, the pattern no longer repeats. The repeats happen at the Limit value divided by the Range value, which is 12 / 1.55, which is between 7 and 8 notes. If we plot the input note against the output note then we get this table (which is just the diagram above showing the purple and orange notes, but expressed as note numbers.):

0
0
1
1
2
3
3
4
4
6
5
7
6
9
7
10
8
0
9
1
10
3
11
5
12
6
13
8
14
9
15
11
16
0
17
2
18
3
19
5
20
7
21
8
22
10
23
11
24
1
25
2
26
4
27
5
28
7
29
8
30
10
31
0
32
1
33
3
34
4
35
6
36
7
37
9
38
10
39
0
40
2
41
3
42
5
43
6
44
8
45
9
46
11
47
0
48
2

Note that each block of 7 or 8 notes across the keyboard maps to the 'Limit'-controlled outputs, and you would normally use the 'Offset' control to transpose them to usable pitches. The numbers also reinforce the non-repeating nature of the 'Warp' processing inside MIDIf(x)_mr. This is just multiplication creating the transformation from one set of note numbers (the inputs) to another (by stretching the width of the keyboard), and not musical theory, and so you do not get a single scale for each octave, or each block, but instead blocks where the scale varies for almost every block. One block is repeated in the example shown - can you find it?

APPLICATIONS

From here onwards, it is up to you to see what the effect of the different Range and Limit settings do to the notes that you input to MIDIf(x)_mr. There are two sets of Range and Limit rotary controls, followed by the Offset rotary control to put the notes back into a usable range, which means that you can do two different stretches of keyboards, each followed by a range limit. The Range control is deliberately restricted in range to 256 values so that it is repeatable. If you set the values in the big boxes again later, then the output will be exactly the same. (Floating point controls do not guarantee this repeatability...)

Because the scale changes for each block, then initially, whilst learning to use MIDIf(x)_mr, it is a good idea to use Scale, Schwarzonator2, or any other 'scale control' MIDI effect to constrain the output to a single scale!

The original description gives one hint for a very interesting effect to explore: set a Range, and then select the Range rotary control with the cursor and nudge it up or down with the cursor keys - you will find that the scale changes back and forth as you nudge. If you nudge up and down with Limits where the limit range is smaller than the range of the notes, then you will get the same scale, but arpeggiated in different ways. So MIDIf(x)_mr is actually a real-time scale converter and arpeggiator with a huge number of possibilities to explore. Assuming a useful Limit range of 10 notes (from 8 to 18 notes), then the number of different outputs is approximately 250 x 10 x 250 x 10, which is more than six million.

More information can also be found in this blog entry on one of the tools used to develop MIDIf(x)_mr.

Also see: Inverted MIDI Velocity


Sunday 20 November 2016

MIDI Processing - MIDI f(x)_mr

MIDI Experimentation

My latest Max For Live MIDI device for Ableton Live is several MIDI processing functions in one! (some of them unusual and/or experimental)
  • Filtering                       (ok, so not very experimental), 
  • Note transpose             (er, just a bit ordinary...), 
  • Velocity shift               (quite unusual, and very useful), 
  • Note Invert                  (very unusual), 
  • Velocity invert             (experimental, and pretty unusual), and 
  • a deterministic pitch mapping utility that is based on pitch multiplication and modulo arithmetic             (very experimental). 
The name 'MIDIf(x)_mr' is intended to let people know that this is a unusual and different MIDI device.

Use at your own risk. (Putting 'Scale' or one of those other 'MIDI scale'-adjusting M4L devices after MIDIf(x)_mr (with appropriate settings in 'Scale'!) is recommended for those people who don't like too many accidentals infesting their music...) And have fun! (Oh, and if you get 'stuck' notes, then click on the '!' button to flush things clean again.)

MIDI f(x)_mr

Here are some details of the processing:

MIDI Filtering

The MIDI Filtering allows rapid removal of notes, continuous controllers, after-touch(channel pressure) or pitch-bend, and I often have it set so that it just lets notes through an filters everything else out.

Note transpose

Note transpose just transposes the incoming MIDI, and is included here because it is useful to have in a multi-purpose utility, but also because it was very useful during the development process! The rotary control is labelled "Offset' because that's what it is doing: adding an offset to the MIDI note numbers.

Velocity shift

Velocity shift (just rotate the 'Offset' control) is useful to compensate for keyboards the require playing hard to get decent amounts of velocity, or for sound modules that require high velocity inputs to produce a sound at a decent volume. The rotary control is labelled 'Offset' because it is adding an offset to the MIDI velocity value for Note On messages.

Note Invert

Note Invert is one of those 'fun' utilities that is usable once with someone who has never seen a reversed keyboard, where the high notes are on the left, and the low notes are on the right. Actually, it can also be used to create interesting bass notes that don't just predictably track the root. The 'Offset' rotary control can be used to set the keyboard so that any key you choose is the same on the inverted keyboard. I tend to use middle C (=60 sometimes) as my reference, but you may find it interesting to choose other values and see what happens.

Velocity invert

Velocity invert is another 'fun' function that upsets people who expect sounds to be louder when you play harder. But it is also very useful for creating 'velocity layering in layered sounds - use inverted velocity on one of the layers and you can control the two sounds just by playing harder or softer. Once again, the 'Offset' control is merely adding to the MIDI velocity value, and this time can be used to compensate for the bias of your keyboard's velocity calibration, or any bias in your sound generation modules. Also see this blog entry: Inverted MIDI Velocity

Pitch Mapping...

And finally, there's that weird-sounding deterministic pitch mapping utility that you were going to ignore... As it happens, not exploring it would be a pity because there's lots of scope for exploration here. You get two stages of 'pitch scaling, followed by wrapping round of the notes', which is achieved by multiplying the incoming pitch, and then applying modulo arithmetic to the result - and then doing it all again. Some people will tell you that multiplying MIDI note numbers does not produce useful results, whilst other people will tell you that you need to constrain the resulting interval madness with processing that wraps the result into manageable lumps. I'm with the 'others'.

So the 'Range' control lets you adjust from the usual '1 octave in = 1 octave out' scaling, to 1 octave in = 3.55 octaves out' super broad scaling where the two stages let you do this twice, resulting in a single octave spanning 7 octaves (and also meaning that a lot of notes are missing!).

The 'Limit' control can be used to bring that huge span under some sort of control. If you set the limit to 1, then you only get a single note out. if you set it to 12, the you get 12 notes out, and any input you put in just wraps round and round those 12, so the same 12 notes repeat themselves all across the keyboard range. If you set it to 128, then it is the same as if it was not there at all, of course!

The best way to learn how to use it is not to set the Range of one section to 1.10, leave the other Range at 1.00, and set both Limits to 128 - this gives a keyboard which is almost right (emphasis on 'almost'). Much better is to create an 8th note looped sequence (a rising scale is fine), and then to explore just one of the two processing sections. The 1.1 Range with a Limit of 12 is a good stating point - you will need to adjust the Offset control to get the output into a sensible range (watch the left and right numbers to either side of the 'MIDIf(x)_mr' title - I use middle C (=60 sometimes) and tweak the Offset to get 60 at the output). Listen to what happens with the looped sequence, and then try adjusting the Range or the Limit. Just hopping back and forth between a few range settings is pretty cool for starters...

Memories

The small white boxes are the usual 'memory' buttons that M4L provides. You shift-click in a box to save a setting, and just click on a box to recall the stored settings. Empty boxes are white in colour, whilst boxes containing saved settings ae orange. The current setting is bright orange.


Scaling

The output of MIDIf(x)_mr is scaled in pitch, and so can contain all sorts of note numbers. Using something to constrain the notes to a scale is a good idea in many applications. You can use Ableton's own 'Scale' utility for this, or search 'Max for Live.com' for 'midi scale' devices, and se what comes up - when I searched there were several different possibilities to try out.

Enjoy!

As usual, this is experimental stuff that I'm more than happy for you to play about with, and it may or may not do what you want, or even what I intended it to do. Let me know if you have any problems, and I may be able to find the time to fix it or even improve it...

I have added a new blog entry that explains some of what is happening inside the 'Warp' processing part of MIDIf(x)_mr. More information can also be found in this blog entry on one of the tools used to develop MIDIf(x)_mr.

Also see: Inverted MIDI Velocity