Sunday 29 August 2021

How do you do a video for people who have just bought a complex piece of technology?

Okay. So you've spent ages reading and watching everything you can about that amazing bit of hi-tech gear that you've wanted for ages. You finally manage to get enough money together to buy it, and you go through the hell of going to the web-site of your favourite supplier, adding it to your basket, filling in all your details, and checking out - very aware this is a lot of your real money. Then there's the awful wait whilst it is travelling to you, and the agonising wait for the courier to deliver it. And then the unboxing...

And here you are. New item on the table. However, unlike those confident reviewers who persuaded you to buy it with all of their amazing knowledge and demos and tips, this is all really and totally new to you. You don't know what to do, how to connect it up, where the web-site is, how you turn it on, what you do first, and it is very SCARY!

What you need is a video that is the exact opposite of the detailed, complex video review that impressed you with how amazing the gear was. What you need now is something that starts simple, and stays simple. Doing the basic things like connections, power up, web-site navigation, and what to do first. Reviewers never show you these things - because to them it is all obvious. But this is your new bit of gear, and you have no idea where to start!

Here is the 'First Time' video that I did for Rebel Technology's Witch polyphonic synthesizer (and more) module:


It is deliberately not a review (although you can see my review here...). it sets out to show you how to make the audio connections, what web-site to visit to use the Witch, how to connect the Witch to a computer, how to use the web-site, how to select a patch, how to change volume, how to control patches, and essentially get you started for that first time.

Hi-tech music gear these days is often very complex, has lots of functionality, requires a computer to get the most out of it, and this can all be overwhelming. What this video aims to do is to be an antidote to all of that mountain of 'stuff', and instead, to provide a simple introduction. Once you've got the hang of the Witch, then you may never watch this video again, but for that first time, when you have no idea where to start at all, then this is the 'first' video. 

---

Whilst this video is very specific to the Rebel Technology Witch, the principles behind what is inside the video are very universal. Lots of hi-tech music gear comes in a box without a manual (you are expected to print that out), and often without any 'Getting Started' sheet, or even a URL so you know what web-site to go to... I have become very aware of this 'minimalist' trend, and this video is my attempt to provide an example of an alternative - a video that helps new users with those first few tentative steps. The idea is that the box just needs to have a small piece of paper with the URL for the video printed on it. 

And that's it. Expensive, complex and deep are all very daunting things to get in a package - and there's a lot of self-imposed (and external) pressure for you to become proficient very quickly and without any obvious effort. The reality is often not quite as easy. Life isn't a movie where a quick montage of shots of you looking and learning will turn you into an expert in a few seconds. Real life can be messier, slower, and definitely requires effort. This type of video aims to reduce some of the stress of that 'First Time', and to ease you into getting proficient with that amazing piece of hi-tech gadgetry that you have bought!

---

https://witch.rebeltech.org/    - THE page to visit!

https://youtu.be/KoLwYPXI31Q   -  The 'First' video (as described here!)

https://www.rebeltech.org/product/witch/ - Product stuff https://youtu.be/ebWkIeXFusg - Unboxing

#rebeltechwitch. - the hashtag

---

If you find my writing helpful, informative or entertaining, then please consider visiting this link:

Synthesizerwriter's Store (New 'Modular thinking' designs now available!)

Buy me a coffeeBuy me a coffee (Encourage me to write more posts like this one!)


Tuesday 3 August 2021

What is 'Bathroom Door'?

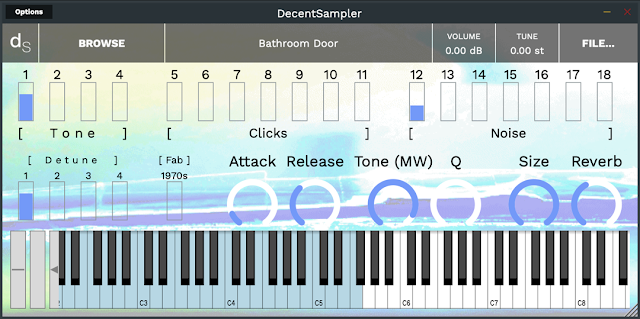
I have gradually been ascending the learning curve for the amazing Decent Sampler, from the multi-talented composer, musician and programmer: Dave Hilowitz ( @dhilowitz ). My most recent Virtual Instrument published on Christian Henson's Pianobook.co.uk is called 'Bathroom Door', and it looks like this:

The 'Bathroom Door' virtual instrument in Decent Sampler

There's quite a lot going on there, so this blog post is effectively going to be the User Manual for it.

Bathroom Door

The name comes from a squeaky handle on the bathroom door, which is probably disappointingly mundane. I captured this (at some stage I really must get a Zoom recorder, but until then I'm using a modified mobile phone to implement a trick that I discovered back in the 1970s...) in stereo and then did some processing in Audacity. Yes, Audacity, and you can see why here - I am rarely impressed by media over-reactions, and the world does seem to now be driven by a huge amount of almost always unwarranted outrage. Also, that computer isn't connected to the InterWeb, and only gets updates of data via USB memory sticks (with some automatic scanning and stuff...).

Processing of audio falls into a small number of types, in my personal categorisation schema. There are the basic tools, like Audacity, then 'Plug-In' hosting tools, like Element (et al) and DAWs, which let you use VSTs and other plug-ins, and then there are the high-end editors, processors, repairers and even mastering tools, like DSP-Quattro, Pro Tools, iZotope RX8 and many more. I have example applications from each of these main categories, and I try to avoid too much duplication of functionality... But Audacity is home to some of my Nyquist plug-ins, and I really must get around to updating them to the latest version of Nyquist...

Anyway, the basic technique that I use for processing samples tends to be noise reduction, followed by Paulstretching or granular processing, looping (usually long cross-fades), and probably too much normalisation.  Actually, a lot of the major 'processing' happens inside Decent Sampler...

The User Interface

I am happy to admit that before I started using Native Instruments' Kontakt, and in particular, the Spitfire Audio sample libraries, I wasn't very familiar with the idea of 'Mic' sliders or mixers. I learned synthesis on real analogue, dual VCO, 'Moog' ladder-type VCF monosynths, where the source mixing was limited to the two VCOs and the noise source. So all of the top row of 'Bathroom Door', and the left hand side of the second row, wouldn't have made much sense to me. I was never a fan of the ARP Pro-Soloist type of UI whert you had a row of switches to select a sound, and I know that it was popular back in the late 70s. 

Now that I have spent more time programming virtual instruments, I'm beginning to see some of the appeal of having direct control over the sounds from many sources. Compared to the usual 'subtractive synth' technique of 'fix it with processing', this is the exact opposite (and more akin to mixing) - 'start with the right sources'. 

The Top Row Mic Sliders 


This is where you mix the main sources of tone and timbre. From left to right, you have Tones, then Clicks in the middle, then Noise on the right. 

[ Tone ]

On the left, the 'Tone' set of mic sliders are the pitched 'melodic' part of the final sound, and the main part of the pitched timbre - Feel free to mix the four sounds - these are not ON/Off buttons for a reason! 

[ Noise ]

On the right, the 'Noise' set of mic sliders are there to provide background 'fill', and this can affect the perceived timbre quite a lot. There's a fascinating psycho-acoustic phenomenon where your ears will assume that noise in a sound must be associated with the pitched portions of it, and will associate the two together. If you add noise to sawtooth 'string' sounds, then the strings sound brighter - and kind of less synthetic / more realistic! So don't be afraid to try mixing in a little bit of grit, dort, grundge...noise.

[ Clicks ]

In the middle, the 'Clicks' set of mic sliders are quasi-rhythmic loops of background textures that give a sort of 'evolving or moving' pad feel to the overall sound. As is often the case with this type of 'extra' element to a sound, you do not need very much volume to get the right balance of pitched sound and supporting movement. These definitely are not intended to be the loudest and most obvious part of the final sound! Subtlety is your friend here. 

The Extra Mic Sliders


On the second row, are five extra mic sliders. These are just little bits of extra tonality to add a bit of spice to the main 'top row' mic sliders. 

[ Detune ]

The 'Detune' set of mic sliders are just deliberately detuned versions of the 4 'Tone' sliders that are directly above them vertically. One obvious thing to do is to just raise the same Detune mic slider as the main Tone mic slider that you have above it. But there are no rules! - There's nothing to stop you using different Detunes to your Tones!

[ Fab ] 

Just a little bit of fun, this is the exact opposite of putting effects after a synth or sampler - it puts a phasing effect into the source mix! The phaser is deliberately 1970s in feel, and can either add a little bit of subtle movement to the final timbre, or can be over-used to swamp the sound in washiness. Or places in between - you choose.

The Processors


There's always a temptation to add too many processors. More rotary controls is better, yes?

But sometimes, less is more. This isn't meant to be a full synthesizer - note the name: Decent Sampler. (Not 'Decent Synthesizer'!) And samplers have different UI design rules - lots of controls are definitely too many. So I've deliberately kept to a minimalistic set: 

Attack and Release to control the start and end of notes (and slow versus fast 'Attack' settings can change the feel of a sound quite remarkably, which is often overlooked in a world full of patches with appealing names...).  

Tone (Low-pass filter cutoff frequency) and Q (Resonance) for setting the brightness of the sound, or rolling the top end off. The cutoff frequency is mapped to the Mod Wheel and MIDI CC 1 as well. I'm still trying to get my head around the <midi> section of Decent Sampler's .dspreset XML file, and so Expression (CC 11) and other MIDI controllers are still in the pipeline for a future version. 

Size and Reverb complete the processing section. Room size is an interesting control - just about everyone starts out with it on biggest, and gradually learns that smaller can be better, depending on the timbre. The Reverb rotary control is the Wet/Dry mix (Do not put a string reverb into water!) and again suffers from the 'more must be better' syndrome. This is only true in Demos and (maybe) in Christian Henson YouTube videos! 

Using It

'Bathroom Door' isn't a 'single sound' type of virtual instrument. It can provide unusual leads for melodies or counterpoints, as well as background pads, plus there's a lot of scope for atmospheric fills and effects. It got a 5 Star review on Pianobook.co.uk where the reviewer seemed to like it, and said that it was well suited to Pierre Henri material and ambient music.

Getting It

'Bathroom Door' can be downloaded, for free, from Pianobook.co.uk

---

If you find my writing helpful, informative or entertaining, then please consider visiting this link:

Synthesizerwriter's Store (New 'Modular thinking' designs now available!)

Buy me a coffeeBuy me a coffee (Encourage me to write more posts like this one!)