Sunday 17 September 2017

ProbablyZ Tutorial - adding time warping

When I released Probably, my Max For Live 'antidote to step sequencers' MIDI Effect for Ableton Live, I included some details on how to use it, particularly the way to use the probabilistic 'more than one white square in a column' interface metaphor that it uses. ProbablyZ, the first 'expanded' version, adds in some new grids, and these extend the control possibilities, so I thought it was about time to produce a tutorial...

Programming ProbablyZ

ProbablyZ is an unusual step sequencer that breaks some of the usual rules. Here are the main features:

*NEW* A 'purple' 'Order' grid that allows time to be re-ordered and repeated, with the usual vertical column probability-based control (one white cell in a column means that note plays every time, two white cells means each plays 50% of the time, three cells equals 33% of the time, etc.). 

The red 'Pitch' grid is the same as in Probably, and allows notes to be entered over a one octave range.

The old orange 'Probability' grid has been moved downwards slightly, to make way for a new grid. It allows the probability of a note being played to be controlled, independently of the pitch, octave, velocity and length, and once again, the choice between possibilities can be controlled by having more than one white cell in a vertical column.

*NEW* The newly added, small, red 'Oct(ave)' grid controls the octave shift of the notes, and it is independent of the 'Pitch' grid. The default white cells in the Oct grid are in the middle of the five octave range, so you can shift the note in the 'Pitch' grid up or down by up to two octaves, and the usual probabilistic column control applies, so if you fill all five cells in  column, then the pitch of that note will be shifted to one of those 5 octaves at random each time the column is scanned. 

Having the Pitch and Octave of the notes controlled independently like this provides very precise adjustments to be made to what actually plays. If you have a fixed Pitch grid, but put a bit of variation in the Oct(ave) grid, then the sequence will play those notes, but the octave can vary. You can use this to create lines where just the leading note plays different octaves, or the 'on the beat' notes play a choice from a set of octaves, etc. If you do it the other way round, and put the variability in the Pitch grid, with  fixed Octave grid, then the notes will only play in the ordinary one-octave range. Remember, that this range can always be transposed sing a MIDI keyboard or the Virtual A-L keyboard on a laptop - or by the notes in a Clip. (Oh, and don't forget that you need to set the transposition when you first start ProbablyZ by sending it a note event, other wise it thinks the transposition is right at the bottom of the MIDI range, and you get very low notes!)

The green 'Velocity' grid controls the velocity of the notes in the sequence, and as usual, is independent of any of the other grids.

The blue 'Length' grid controls the length of the notes produced, and is not only independent of the other grids, but it also allows the length of the notes to be controlled, which means that you can have notes overlapping in the output. This is quite unusual for a step sequencer...

Getting Started

I'm still trying to get ProbablyZ to start up with a special default state, and this doesn't always happen. It should look something like the first screen-shot above...

From that starting position, then edit the Pitch grid so that there is only one white cell in the first column, and the Oct(ave) grid so that there is only one white cell in the first column.
I chose a very basic Electric Piano preset for this track, followed by a little reverb - simple percussive sounds are often good when starting work on a step sequence. If you set Live to play, then you get a 'ting', followed by silence for the rest of the bar, and then another ting. So far, so good, and if not, then you did remember to set the transpose by sending a note event, didn't you?

Next, let's explore the Oct(ave) grid. Add four extra white cells in the first column:
Playing this gives us one of five things, dependent on the octave that ProbablyZ randomly chooses for each repetition. If you are used to ordinary step sequencers that always play exactly the same notes every time, then this is your first glimpse of the hidden depth inside ProbablyZ.

When you are bored with those slow tings, then add in some more notes on the beat in the Pitch grid, and give them the same 5 octave choices in the Oct(ave) grid:
This gives us a ting on each beat, with a random choice of octave. This is probably a little too extreme for most purposes! (Used live, it can give the impression that something is about to happen, and can give you time to set up your next song... In the 80s, some bands used Sample & Hold into VCF for the same sort of tantalising effect. )

Next, change the last two Cs to Fs, and adjust the range in the Oct(ave) grid. this is also a good time to tweak the Velocity grid so that the beats are louder, and alter the Length grid so that the beats are longer too:
Okay, so now we have the start of something that has a bit of variation in it, and we can now add in some choices for the second and fourth beats, adjust the Octave so that it feels like a descending line on average, and make the first and third beats longer:
What we are really doing here is defining probabilities. The Pitch grid has set the first note to be a C (always, so 100% probability), and the Oct(ave) grid provides a choice of the upper four octaves (So each octave will happen 25% of the time on average). The second note can be a C or a D#, with a three octave range that doesn't have the top octave included any longer. The third note is always an F, with the four octaves shifted downwards, and the final note is either an F or an A#, with a three octave choice. Taking the final note as an example, then there are six different notes (two notes, three octaves) that could occur, so a specific note will occur 1/6th of the time, on average. Over the course of six repetitions, you might get all of these, and you might not. It is rather like throwing a die (or several dice): you will eventually throw all of the numbers from 1 to 6, but getting them all in 6 throws, or in a specific order, doesn't happen very often...

When you set this sequence playing, then what you hear might be difficult to reconcile with what you see on the grids. There may not seem to be enough white cells to create the variations that you are hearing! If this happens, then read the previous paragraph again, matching the chosen note that you can hear, with the white cells in the Pitch grid and the Oct(ave) grid. As I said earlier, ProbablyZ has hidden depths that are not immediately obvious, and a little time spent getting familiar with the way it works can be time well spent.

At this point, ProbablyZ is playing stuff that is not quite your typical robotic, repetitive step sequence. Now, let's add in some extra notes away from the beat:
You should be able to figure out that these new notes have a fixed pitch and a fixed octave. The lower velocity makes then sound like grace notes or ornamentation. You can experiment with reducing the velocity, or giving a range of velocities, or making these notes very short.

Bending time

So, far, we haven't explored the new 'Order' grid, so let's add a few extra choices to the ornamentation, tweak the octave choices, and increase the length of the beat notes. Then, let's edit the Order grid so that the diagonal is broken, and add in two 'off-the-diagonal' cells: 
 The ornamentation is now chosen from a D and a D# in the first part of the bar, and an F, G or A# in the second part of the bar... Except that the Order grid changes the order in which time happens in all of the other grids. So the first column plays as normal, but the second column jumps to the ornamentation in the second part of the bar, then jumps back to playing the middle part of the bar, and then swaps back to the first little bit of ornamentation just after the middle beat note, and the back to 'time as usual'.

This means that the time order of the columns in all the grids that you see to the right of the Order grid has been changed. Time no longer scans across the grids evenly. Instead, it now follows the Order grid. Watch the dark vertical cursors jump back and forth when this plays...

In detail, this means that after the first C, we will now get a random choice from F, G or A#, then a C or D#, and then the choice of D or D# that we got before. We then get an F, followed by the ornamentation that used to follow the C at the beginning of the bar.

If you want to, you can replace the standard 'lower left to upper right' diagonal in the Order grid with one that goes from upper left to lower right, and the sequence will play backwards. You can adjust the ordering of the sequence in any way you like, live!

If you don't remove the white cells on the diagonal, then things happen a little differently. (In fact, tings happen a little differently! :) ):
The Order grid has exactly the same probabilistic behaviour as th other grids, so when we put two white cells in a column, then it makes a choice between the values. In the Order grid, this means that we have control over the probability that time will be warped. In the above Order grid, there is a 50% chance that the first ornamentation will be swapped to the later one, and a 50% chance that the later one will be swapped with the earlier one. So there are now four ways that time can be warped in the bar: no warping, early ornamentation repeated later, later ornamentation repeated earlier, and ornamentation swapped in time (early moved the later, later moved to earlier). Thos two extra white cells have a big effect!

(As before, feel free to experiment, and to re-read the previous paragraph whilst listening to the output. ProbablyZ can be tricky to get your head around at first!)

Finally, what happens if we extend the time warping to all of the ornamentation? Here's what it looks like inside Ableton Live:
What we have set ProbablyZ to do here is this: Whenever we have an ornamentation note choice, choose from one of the four possibilities and play that. Because the ornamentation is just two sets of notes, then we are only using half of the available possibilities - you can try changing the fourth and eighth columns to give a different 'pool' of notes if you want, and then listen to the output.

You can listen to the output of the above grid setup on Soundcloud here. Remember, this is a single step sequence, produced using only the setup shown above.

I hope that this quick tutorial has shown you some of the possibilities (!) of ProbablyZ.

Warning - you may find it hard to go back to the step sequence that you used previously...

ProbablyZ can be downloaded from MaxForLive.com. It is FREE!


Saturday 9 September 2017

Mapping MIDI Velocity to Two Ableton Live Parameters

Dual Velocity Mapper_mr


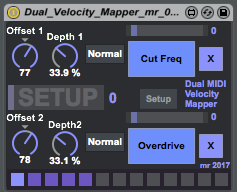
Whilst there are quite a few M4L 'Velocity-to-Parameter Mapping' utilities available, I couldn't find many multi-channel versions, so I made a two channel utility, called 'Dual_Velocity_Mapper_mr' (DVM_mr), and available from MaxForLive.com as usual. DVM_mr has an easy setup mode, that lets you quickly set the offset and depth of the 'velocity to parameter' mapping, and re-uses the Ableton parameter mapping control from their LFO device. 

To use DVM_mr, you click on the 'Setup' button (in between the two big blue buttons near the centre) and then map each of the blue buttons to a parameter inside the synth you want to control. You then move the mouse from left to right and this causes notes to be generated at different velocities, so that you can see and hear the effect of the velocity changes on the parameters. Moving the mouse up and down (on the screen, forwards and backwards from the mouse-viewpoint!) changes the pitch of the notes. This speeds up the setup phase quite a lot, and makes it quick and easy to map velocity to two parameters. To clear the mapping, you just click on the 'X' buttons. The 'Invert' button inverts (turns 'upside-down') the MIDI velocity, so that higher velocities produces lower values. 

The mapped parameters shown in the DVM_mr screenshot might be a useful starting point for further exploration...


The Velocity Mapper_mr M4L MIDI Effect is available from MaxForLive.com

(Yes, this is extracted from a previous blog post, because it was hidden away at the end, and I thought that it deserved better visibility!)


Sunday 3 September 2017

A Brief 'Alternative Manual' for the Pulsor Synthesiser by Amazing Noises

I recently bought the Pulsor Suite from Amazing Noises, which contains both the Pulsor 1 and Pulsor 2 monophonic MaxForLive synthesisers for Ableton Live. Pulsor is an interesting synthesiser because it has four oscillators (including 2 in a special FM/Ring Modulator arrangement), 3 envelopes and 4 LFO with complex output processing options. In fact, those words: 'complex processing options', apply throughout the Pulsor design. This is not another generic, bland, 'off the shelf', 'me too' synth - Pulsor is powerful, deep, and can make some very expressive sounds. In other words, it is exactly what I look for in a synthesiser!

Whenever I get a new synth, I always 'revoice' it. It's a bit like the ceremony that lab technicians have with a new lab coat: they spill some coffee on it, write on it, fray some of the edges, burn a few holes in it with a soldering iron or acid... Anything to make it looked used and loved. So for synths, I create my own presets to replace the 'factory' default ones. Some people also customise their hardware, and my personal reference is for printed diagrams, tables and other information stuck onto the front panel (or underneath for table-top gear like MIDI controllers) with Blu Tack (other slightly sticky stuff is also available). Programming a new device is a great learning opportunity, and rapid ascending of the learning curve is something I worked hard on when I was doing lots of equipment reviews for Sound On Sound magazine many years ago...

After producing more than 100 new 'presets' for each of the Pulsor synths, I was pretty familiar with how they work, although there is still plenty of scope for further exploration. Now one of the things I remember from before the Internet, when people used FTP sites to exchange information, was the  'alternative manual'. Not a replacement for the real user manual, but an attempt to provide additional detail and clarifications from people who had some experience, and intended to make things easier for newbies. So, here's what I learned about the Pulsors.

Programming model

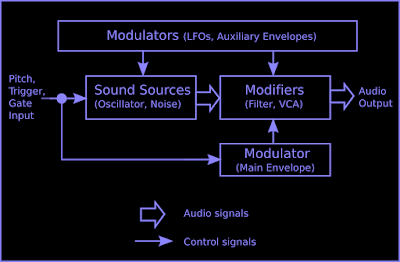
Sound synthesis at the highest level usually looks something like this:

For actual programming of a synthesiser, it can often help if you have a more detailed 'programming model' to help you understand where you need to make changes to get the desired result. Synthesiser programming may look like just turning knobs and pressing switches (real or virtual!), but actually that 'edit' is really the end point of a whole series of decisions. A programming model shows how the various parts of the synthesiser connect together - kind of 'what is happening behind the front panel'...

So here's my programming model for the Pulsor 1 architecture.


There are some differences between the Pulsor 1 and 2, but they are in the detail, not the overall architecture, and so the same model mostly works for both. The main flow of the 'sound' is in the centre, and happens from left to right. At the top and bottom of the diagram are the modulation sources. The model highlights some of the unusual features of the Pulsor architecture: lots of 'mix' controls between oscillators, lots of wet/dry control around processors, a very flexible 'spectral' section utilising FM with Ring Modulation, and complex post-processing around the Multi-Modulators. 

Programming models are not meant to be perfect in every detail: the idea is to show how it works in sufficient detail so that you can see where to make edits. The Ring Modulator output is particularly difficult to represent in a simple way. The output 'mix' control (to the right of the 'Ring' box) allows a continuous mix between Oscillator 3 (at 0%), the Ring Modulation output (50%) and Oscillator 4 (100%), the oscillator which is FM'd by Oscillators 1 and/or 2. So the 0-100% labelling is slightly misleading... The diagram also misses out the wet/dry mix control around the Multi-Modulator amplitude modulation (the box in the bottom right hand corner of the Ring Mod box).

Hints and Tips 

My first problem was figuring out how the user interface worked. I couldn't get those little 'no' boxes to do anything. 
The Multi-Modulators were easy - they dropped down from the triangle, and so I could edit them easily. But the 'no' boxes took a little more experimentation.

To use the 'no' boxes, you click and hold in the box, and then move UP. So, exactly the opposite to the drop-down Multi-Modulators, the 'no' boxes are 'drop-up'! 

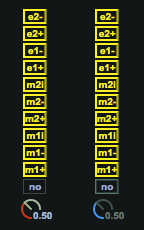
Here's are the two 'no' boxes expanded as if they were normal pop-up selectors:

So as you move upwards, you get 'm1+' (the LFO on the left hand side, in the top bar of the front panel layout), then the inverted version: 'm1-', etc., then all the way up to 'e2-', the inverted second 'attack-release (AR)' envelope on the right hand side of the top bar. 

Intrigued by the 'no' in the box? It just means 'none' - so it indicates 'no modulation selected'. 

Note that on some monitors (mine, for example), the 'm1i' and 'm2i' interpolation output labels tend to look like an 'l'. The significance of the 'i' output is covered in the Pulsor Reference Manual, but here's another way of thinking about it (and this shows the deep thinking hat has gone into the design of Pulsor):

Each of the two 'top bar' LFOs has two outputs: the '+' and '-' are just the ordinary and inverted versions of a sine wave that you would expect (although 'Amazing Noises' use the word 'reversed' where I would say 'inverted'... Perhaps 'upside-down' is a less technical explanation), and the 'Rand' control makes the LFO frequency wobble or 'jitter' randomly, whilst the 'i' output turns the 'Rand' control into another mix control - this time between the sine wave and a random waveform. So the '+' and '-' outputs are a fixed sine wave where you can control the amount of randomness in the frequency, whilst the 'i' output is a fixed frequency where you can control the amount of randomness addd to the sine wave. Of course, I would like a third option, where I can control the randomness in th frequency and in he output, but maybe we will see that in Pulsor 3...

( As before, to keep things simple, this isn't shown on the programming model diagram above. )

The Pulsor Reference Manual uses an unusual abbreviation: 'F.i.'. It took me an embarrassingly long amount of time to figure out it meant: 'For instance' of 'For example' (e.g.). 

Spectral Control

One of the most powerful parts of the Pulsor architecture is in the central box, where a complex mix of FM and Ring Modulation takes place. Ring Modulation produces sum and difference frequencies, which tend to produce bell-like sounds, whilst FM produces a different set of frequencies determined by Bessel functions. Combining the two together produces a 'spectral' processor that can add a wide variety of additional frequencies to the sine waves produced as the base for the 4 oscillators (although there is some oscillator output wave shaping available as well). Harmonics and inharmonics can be controlled in a variety of ways via the LFOs, envelopes and Multi-Modulators.  if only there was a polyphonic version!

One of the side effects of FM can affect tuning, and my preferred setup when programming Pulsor was to have the 'Tuner' effect after Pulsor, so that I could keep the presets in tune. Using the shift key when changing the frequency controls is very important when fine tuning control is required. 


With all of the available control over the spectral content of the output, there is one area where Pulsor needs a little help, and this is dynamics/velocity control. The only dynamics control is the main AR envelope, where MIDI velocity can control the volume of the output over a 40 dB range. 

Now, having been raised on Mini Moogs, where the keyboard is not velocity sensitive, I have maybe over-compensated in some of my programming by adding too much velocity sensitivity (e.g. some of my FM sounds for the Yamaha DX7 and SY99), but with polyphony I do like being able to control the expression whilst playing with two hands, even though it means that I fall into the 'rigid' keyboard player syndrome. On a mono synth, then one hand for playing and the other for mod wheel or cutoff frequency (etc.) is okay, and does look good on stage - but in a DAW, then the ease of use of velocity is often much better than other controllers, and so velocity control is a natural choice to control expression. 

There isn't enough space here to go into the details of how you program velocity-controlled expression into a synth. Just changing one parameter with velocity is the baseline, and there are lots of possibilities above that, which is one of the reasons that I like FM! 

Dual Velocity Mapper_mr


Whilst there are quite a few M4L 'Velocity-to-Parameter Mapping' utilities available, I couldn't find many multi-channel versions, so I made a two channel one, called 'Dual_Velocity_Mapper_mr' (DVM_mr), and available from MaxForLive.com as usual. DVM_mr has an easy setup mode, that lets you quickly set the offset and depth of the 'velocity to parameter' mapping, and re-uses the Ableton parameter mapping control from their LFO device. 

To use DVM_mr, you click on the 'Setup' button (in between the two big blue buttons near the centre) and then map each of the blue buttons to a parameter inside the synth you want to control. You then move the mouse from left to right and this causes notes to be generated at different velocities, so that you can see and hear the effect of the velocity changes on the parameters. Moving the mouse up and down (on the screen, forwards and backwards from the mouse-viewpoint!) changes the pitch of the notes. This speeds up the setup phase quite a lot, and makes it quick and easy to map velocity to two parameters. To clear the mapping, you just click on the 'X' buttons. The 'Invert' button inverts (turns 'upside-down') the MIDI velocity, so that higher velocities produces lower values. 

In a blog full of hints and tips, the mapped parameters shown in the DVM_mr screenshot might be a useful starting point of further exploration...

Downloads

Pulsar 1 and 2 Presets

My Pulsor 1 and 2 presets are available here. There are two sets of 12 folders (no velocity sensitivity, and full (-40dB) velocity sensitivity) for each synthesiser. Each folder contains 12 presets. To install the presets, then you need to put them into this folder:

User Library/Presets/Instruments/Max Instrument/Pulsor by Amazing Noises/

or

User Library/Presets/Instruments/Max Instrument/Pulsor 2 by Amazing Noises/

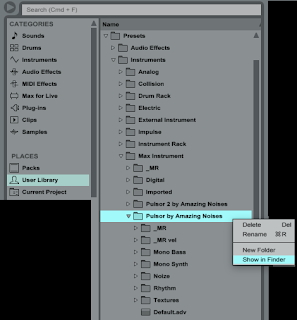
Here's what it looks like in the Ableton Live Library window:
 The '_MR' folder contains the presets without velocity sensitivity, whilst the '_MR bel' folder contains the presets with velocity sensitivity.

Note that the default place for the 'User Library' folder is here on a Mac:

/Users//Music/Ableton/User Library

and here in Windows:

\Users\\Documents\Ableton\User Library

( See this article from Ableton for more information: 209774665-The-Live-Browser-and-Library-Locations )

An easy way to open the install directory from inside Live is to select the User Library window in Live's 'Browser', right-click on 'Pulsor by Amazing Noises' (or 'Pulsor 2 by Amazing Noises') in the right-hand 'content' pane, and then choose "Show in Finder" (Mac) or "Show in Explorer" (Windows) in the little pop-up menu that should appear:

Dual Velocity Mapper_mr


The Velocity Mapper_mr M4L MIDI Effect is available from MaxForLive.com