But, anyway, here's the answer. A Max For Live plug-in that does MIDI Note filtering (maybe sieving is a better word), polyphonically, with quite low-latency (in the MIDI path, there's a single look-up table, no multiplies, and definitely no modulus or division operations.) and it even monitors the incoming MIDI notes so you can see what notes you might then want to filter. It might be possible to speed things up more using Gen, but that's for another day or two...
(What usually happens with these things is that despite me diligently searching around, I won't have found any examples of this type of utility... But the moment that I publish one, I then discover that there are zillions of them already out there, normally with one standard 'classic' that 'Everyone' uses. So I will apologise in advance, now, up front, for releasing Yet Another MIDI Note Filtering Utility. (YAMNFU) I think of this as a 'discoverabilty' paradox, and I nearly got a patent based on something related, but that's another story, and this isn't that type of blog...)
MIDIfilterNOTEmr
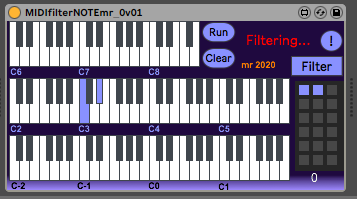
The screenshot above shows MIDIfilterNOTEmr actively filtering C3 and D#3 out of a MIDI stream. Here's a conceptual diagram of what it does:
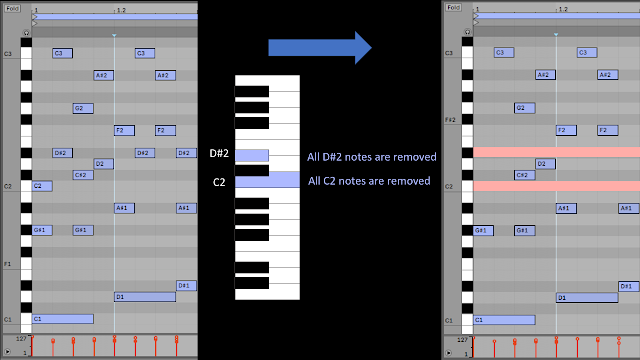
Imagine all the notes being sorted and separated into separate flows, and then going through tubes: one tube per note. Unfortunately, the C2 and D#2 tubes are sealed up with rubber bungs, and so no C2 or D#2 notes will get through. MIDIfilterNOTEmr is like a 'sieve', really.
So those two highlighted light purple notes mean: 'remove these note from the MIDI stream.'
Here's a diagram that shows the filtering or sieving process happening with piano rolls:
And in detail for MIDIphiles... (One thing does intrigue me about the timestamps in the screenshot below - the time delay through MIDIfilterNOTEmr seem to be negative. I would love to know what is happening!):
Finally, a screenshot of what you would see in Ableton Live during debugging or testing:
The MIDI flow is from left to right, so the first MIDI Monitor shows the six notes that are coming from the clip. These then pass into INSTfilterNOTEmr, where the D, D# and E are highlighted, and finally, the MIDI flows into the right hand MIDI Monitor plug-in, which shows that the highlighted notes have been removed.
(I changed the highlighted notes because the MIDI Monitor plug-in starts at C, and I wanted a gap in the block of notes!)
Walkthrough
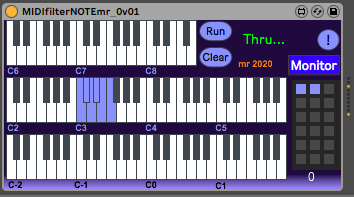
Probably the first thing to do with INSTfilterNOTEmr is put it in Monitor mode, so that you can see the notes which are passing through it (When it isn't Monitoring, it is Filtering or Thru'ing). Notes that are detected are highlighted in what I will call light purple - the phrase 'light blue with a hint of purple' is too long.
Based on those notes, you then select the ones that you want to pass through, and you press the 'Run' button. So whilst it technically is a 'filter', a better description might be to call it a 'sieve' - because you can set individual notes to be removed. The notes you have selected (one note is fine, too!) will be shown as light purple in colour, and they will then be removed from (filtered out of) the MIDI stream that is passing through the plug-in - actually, if you look at the MIDI stream, then you will find lots of MIDI Note Off messages, which is something that I previously exploited in the MIDIprob devices. Basically, if you set the velocity in a MIDI Note On message to zero, it becomes a Note Off message. To stop the filtering, then you press the 'Clear' button, and all notes will then pass Thru the plug-in, unimpeded.
If you want to add or remove notes, then click on them in the keyboard graphics so that they are no longer light purple, and then click on the 'Run' button again to update the filter.
If you want to turn off the filtering then you can just use the 'Power' button in the top left hand corner. If you click on the 'Clear' button then that does indeed put the device into 'Thru' mode, but it also clears the notes! I did wonder about adding another button called 'Thru/Filter' that doesn't clear the highlighted notes, but the 'Power' button does this already!
(Because I'm using Max For Live and Ableton Live here, then I'm using the 'C3=60' MIDI Note numbering convention. I know there are other conventions, and the whole 'MIDI and Middle C' topic is one that I steer well away from.)
In Monitor mode, incoming notes are shown as light purple.
In Run / Filtering... mode, notes that will be filtered out are shown as light purple.
In Clear / Thru... mode, all notes should be white or black as usual.
The '!' button is a panic button that should stop any stuck MIDI notes. My usual 'borax-object-based 'held notes' prevention stuff is built-in, so hopefully you should never need to press this button.
The block of squares are 18 preset memories. Shift-click to store a filter. Click to recall a filter. Shift + (option/alt) to delete. MIDI Program Change messages (0-17) can be used to recall presets (1-18).
The presets are stored with the plug-in when you save a Set in Ableton Live.
MIDIfilterNOTEmr01 does something that I'm not very keen on with its user interface. Instead of being modeless, there are several different 'states' that it can be in. Now I know this is bad design, but in this case the alternative would be real coding, and Max For Live is quite tricky enough for me.
Using it.
Please. Try it on the output of arpeggiators, on the output of drum clips (to save muting with those little buttons), or on the output of clips that have too many notes! You can thin out pads or melodies, or even create motifs from blocks of notes that are too dense and unstructured to be usable conventionally. You can bring order to chaos by restricting the output to just a few notes, even though the input is lots of notes (so perhaps in installations and performance...).
You could even use it as a huge version of the factory Scale plug-in that isn't restricted to a single repeated octave - with MFNMR the entire MIDI Note range is available to you. (Ah, and that's an important consideration - one way of doing a similar type of filtering/sieving is just to transpose the notes that you don't want to note number zero, or note number 127, and to rely on most synths not being able to make a noise that low or that high. MFNMR allows you to create music for whales and for bats, and anything in between, with no restrictions.)
So, nothing much in the way of applications then... I'm kind of intrigued that there isn't something like this in the Ableton factory set of MIDI plug-ins - and I know that you can do this by using a MIDI Effect Rack and having 128 Velocity plug-ins in it, and 128 rows (one per note), and a lot of time and effort, and you get a 'less than perfect' user interface for your time and trouble. But you can do it - I just prefer something a little neater. (but don't look inside: I'm not noted for my tidy M4L coding...
Inside
Oh, and here we are inside.The Max For Live code to do this 'sieve' or 'filtering' process is quite simple:
1. Clicking on the keyboard graphic object highlights the notes in light purple, and these are sent to a 'list'. The 'list' is the contents of the grey box full of 127 '1's: one per MIDI note number. Highlighted notes would replace the 1 with a zero in the list. In the case shown, there are no highlighted notes, so there are no zeroes in the list - but imagine that there are one or two!
2. MIDI arrive at the input of the device.
3. Only MIDI note and program change messages are needed for processing in this device, so the 'midiselect' object extracts those from the MIDI stream and sends the remaining MIDI messages to the 'idiot' object, which acts as a MIDI 'Thru' to the next device in the chain in Ableton Live.
4. The MIDI Note messages are decoded into 'note number' (the left hand output) and 'velocity' values (the right hand output).
5. This section processes the MIDI velocity value. The 'zl lookup' object takes the 'list' and treats it as a look-up table: it 'looks up' each MIDI note number and sees what value is stored in the list at that position, and then outputs that number. So if MIDI note number 0 had been highlighted, then the first number in the list would be a zero. The output of the 'zl lookup' object goes to the 'select 0' object, which does one of two things: if the input is a zero, then the left hand output activates, and that little grey box will output its contents: a zero. if the input is a 1, then the right hand output will be activated, and this time the little grey box will output the value of the velocity from the 'unpack' object. So when there is a zero in the list, the velocity is going to be zero, but when there is a 1 in th list, the velocity is going to be left unchanged. So when there is a zero in the list, whatever the velocity value was is replaced with a zero, and a zero velocity value means a Note Off, so the Note On is changed to a Note Off, and the note has effectively been removed, filtered, sieved...
(Those little grey boxes are very useful. Notice how one of them is just a store for the value zero (which never changes), whilst the other is a store for the velocity (which changes all the time). So the same little grey box does two different things!)
6. The MIDI note number and the processed velocity value are turned into a MIDI Note message and sent to the MIDI output, thus going to the next device in the chain in Ableton Live.
Getting MIDIfilterNOTEmr
You can get MIDIfilterNOTEmr here:https://maxforlive.com/library/device/6023/midifilternotemr
Here are the instructions for what to do with the .amxd file that you download from MaxforLive.com:
https://synthesizerwriter.blogspot.co.uk/2017/12/where-do-i-put-downloaded-amxd.html
(In Live 10, you can also just double-click on the .amxd file, but this puts the device in the same folder as all of the factory devices...)
Oh, yes, and sometimes last-minute fixes do get added, which is why sometimes a blog post is behind the version number of MaxForLive.com...
Modular Equivalents
In terms of basic modular equivalents, then MIDIfilterNOTEmr is tricky. I'm not aware of a MIDI processor utility module or CV processor module that does this type of filtering for more than one note at once, and so we enter the awkward territory of needing 128 pretty-sophisticated utility modules, plus loads of parameter storage, and an ME of over 150-ish. Using programmable utility modules then you might be able to customise something, but that tends to be at the 'specialised skills' end of the modular user spectrum. Of course, someone is now bound to let me know about a new bit of 'under the counter' custom firmware for the OxyProceyBlue75 module that makes this sort of thing a complete doddle...If you find my writing helpful, informative or entertaining, then please consider visiting this link:


This comment has been removed by a blog administrator.
ReplyDeleteThis comment has been removed by a blog administrator.
ReplyDelete