Friday 16 January 2015

Pitch Progression MIDI Effects

Pitch Progression Grid and Pitch Progression Follow are two MaxForLive MIDI Effects for Ableton Live. They provide control over the transposition of bar-length sequences, and so can quickly produce progressions of transposed sequences.

Pitch Progression Grid

Pitch Progression Grid grew out of a simple transpose control that I created. It allows semitone or octave transpositions, and I thought that it would be good if it could be extended so that it was more flexible, and the result is a mini-sequencer that runs at the 'bar-rate', and which allows whole bars to be transposed according to the settings on the grid (pitch or velocity).


(You can see the remains of the original transposer on the far left hand side... Note also that this is a MIDI Effect, so it is on the left hand side of the track area, and requires an 'Instrument' to be on the right hand side, otherwise you will not hear anything from the track. The 'Lectric Piano' from Simpler is shown here just as an example - you can use any Live Instrument.) 

Moving across, the next vertical set of controls are the LFO, which normally runs in 'Sync' mode for this effect. (If you run the LFO free-runnng, then the transpose is not tied to the bar boundaries, which can cause hanging notes and other problems. Please leave it in Sync mode at first!) The transpose amount is shown in the large box. The transposition in this first version is crude - it transposes chromatically, so for a transpose setting of 1 semitone, then every MIDI note input will be transposed by 1 semitone. Future versions may be more flexible and do more musically useful transpositions. 


The next vertical set of controls are for the 'Position'. The transpose change normally takes place at the end of the bar. You should not have any notes in the last part of the bar - the 'Position' control sets where the transpose changes. If you set it to 50% then it will happen in the middle of the bar. The normal position is at 99.2%, right at the end of the bar. The 'Position' of the transpose change is shown as a percentage of the bar (0% = start, 50% = half way, and 100% = end) as well as more conventional beat and unit (480 ppq) notation. The block of presets allows the storing and recall of grids of transpositions. Click to recall a stored grid, and Shift-click to store a grid.


The next vertical set of controls allows the number of Repeats to be set (1 gives one bar of this mini-sequencer per bar of the sequence in the track, 2 repeats the transposition twice before it moves to the next bar, so you could think of this as being a rate of half a bar, etc.) The 'Steps' control lets you control the number of steps in the mini-sequence. This is limited to 32 (Max allows 64, but the UI becomes too small for the layout I have used!) The steps that are not in range are still available, so if you set up an 8 step transposition, and then reduce the steps to 2, then you can always increase the steps to 8 and the mini-sequencer will loop around the 8 steps. So you can control this as part of a sequence using the unlinked Envelope section of the sequence controls. 


The grid is the next and largest section. Notes rise in pitch vertically, and horizontally, the sequencer runs from left to right, and loops when it gets to the right hand side. The higher the number of steps, the shorter the notes appear, but remember that each one is still one or more bars long (unless you are in async mode). You can also transpose the velocity of the notes in each bar by using the Pitch/Velocity button at the top right. 


For anything to happen then you need to set up a sequence (one bar in this version) in the track. When you play the track, incoming MIDI notes are transposed per bar - in the edited screenshot above, the end of the bar is inverted, and this is where the transposition change will happen - this is where the 'Position' control points at. So the first bar might not have any transposition (and the sequence will play as you see it), but the first repeat could be up a fifth (as shown in the top screenshot), the next bar might be up by a fifth again, and then back down a fifth and back down a fifth again, and then it repeats. The top screenshot shows exactly this transposition grid. 


Here's a diagram that reiterates the operation. Remember that this is not a conventional 'sequencer' - it advances by one step for every bar when set to 1/1 and Sync. (It advances less slowly if you set the Repeat to more than one bar.) The sequence itself is not transposed - only the notes that are passed through the MIDI Effect to the Instrument are changed. So if you want to edit the sequence, then you need to be aware that there is only one sequence - the untransposed one. If you edit the sequence, then all of the transposed ones will be altered as well. Also recall the previous note: the transposition in this first version is crude - it transposes chromatically, so for a transpose setting of 1 semitone, then every MIDI note input will be transposed by 1 semitone. Future versions may be more flexible and do more musically useful transpositions.

The Max For Live 'code' for this is pretty straightforward:


Incoming MIDI Note messages are filtered out of the stream, then unpacked into the note number and the velocity value. The note value is then transposed (r trans) from the mini-sequencer section, flushing for held notes is attempted, and the transposed notes are clipped so that they can't go outside the 0-127 allowed range. Then the transposed MIDI Note messages are passed to the rest of the track processing - normally the Instrument. This code doesn't show the velocity transpose, because that's made slightly more interesting by release velocity...

Sustained notes longer than a bar may not work correctly (remember the 'no notes in the last part of the bar' limitation.) Basically, the effect works well when there are notes or chords in the main part of the bar and there is a gap at the end of the bar. 8 or 16 staccato note sequences work nicely, and I leave the cliched transposition progressions up to the user!

The right hand set of vertical controls allow editing of the contents of the grid. 'Random' is not a very useful option to choose, but some may like it!

Pitch Progression Follow


If you want to transpose another track in sync, then use the Pitch Progression Follow MIDI Effect in that track. This will receive the transpositions from the 'master' Grid Effect track and apply them to the notes in the 'Follow'ing track. There is some delay in the transfer, so notes at the start of the 'Follow'ing track may not be transposed until the following bar (try moving the position to a lower value...). Again, you can see the simple roots of this project here - this is very similar to the original 'transpose' MIDI Effect where I started.

Summary

This pair of MIDI Effects are very much a work in progress. They are not finished, they may well glitch, the transposition is crude and limited musically, and they are definitely not 'production-ready' in any sense.

As usual, they can be downloaded from http://MaxForLive.com . Enjoy!


Monday 12 January 2015

Making noise

I needed some noise, and whilst there are many ways to create noise of various colours, none of them quite met my need (I wanted '11' and the noise I got only went up to '10'!). Instead of exploring the available resources further, I decided to think about my ideal noise source...

In the past, I've been guilty of using the very predictable 'noise with LFO'd filtering' patches that are often used to make surf and train noises. In my defence, whilst some of the synths in question were obvious examples like a MiniMoog and 'white-top' ARP Odyssey, I've also done much the same on slightly more unusual examples like the Oberheim OB-1, Synton Syrinx, Korg PS-3300, even a Yamaha GX-1 (I also repaired it) and others. But enough of the past...

Adding a phaser and some panning and you get a pretty versatile surf, wind, rain generator. As with Comber V0.3, I had the intention to make some sort of complex multi-filter section, and maybe add this to the phaser in Comber.
But then I stumbled upon fffb~ in a quiet backwater of the Max Help pages, and I realised that with a bit of tweaking, it could make a pretty useful dynamic filter bank. The Max Help pages tauntingly say: 'This object is more efficient than using a number of reson~ objects, but for the sake of speed does not accept signals for parameter changes.'. Well that was it, it looked like I'd found my versatile filter and I just needed to find a way round the control limitation.
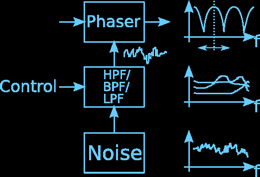
fffb~ is quite a monster of a filter. You get 8 resonant filters by default, but you can go up to 50 if you want to, and I decided that 16 was probably enough for a first attempt. You can control the centre frequency of the lowest frequency filter (F in the diagram above), and then the spacing between the other filters as you go along the frequency axis (I've called this 'Spread', S in the diagram above). The Q of the filters is global, but still a useful control, and the F, S and Q all duly got separate LFOs to control them. The individual Gains (G) of each filter can be set individually - so I used a conventional multi-slider controller for that. Although you can't drive everything directly with signals, you can update the parameters in real-time, and this has much the same effect.

The Q control has some problems at low values, and whilst the jerkiness that this produces in the output audio can surprise you the first time, it can also be used to provide exactly the sort of chaotic uncertainty that you get with wind sounds. There's a red indicator to warn you as you go into this mode.

The Spread control is best left near the middle (= '1') at first. This keeps the filter stable - and NOTE the 'Reset' button for when things get out of control!

Because two noise sources are better for doing wind and rain, or surf and wind, or rustling leaves and howling wind, then I doubled everything, and added LFO-modulated panning too (that's 8 LFOs in total). There are colour-coded White/Pink noise selection buttons as well.

The three LFOs provide lots of control over the filtering, and you can make lots of wind, rain and surf effects - use a phaser after it ini the chain for better surf sounds. I recommend that you use the excellent built-in 'Spectrum' display to see the output of the filter, and turn it off when you don't need it to save processing power. I've included the Spectrum display in the screenshot below as a 'serving suggestion'.


So that's the mundanely named 'Noise Generator mr 0v01'. As usual, you can download it for free from MaxForLive.com. Enjoy!

Related articles

Refined Combing...

Things don't always go the way you intend. I had an idea for a phaser effect that was driven from a filtered noise source, and the end result was something rather different. Here's the story...

'Phasers' are just comb filters where the notch frequencies are modulated up and down in frequency by an LFO. (My previous Comber effect was nothing more than a few of these in one place.)
The audible effect for typical 'vibrato/tremolo' LFO rates sounds a bit like detuned oscillators, and so can be used as a simple 'chorus' effect (there are other ways of doing chorus effects as well). At slow LFO rates then the effect is more like several resonant filters sweeping up and down, which is exactly what is going on!

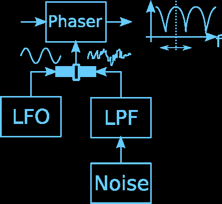
But whilst sine wave shaped LFOs are all very nice, there are many other possible alternative waveforms, and repetition can get a bit boring. So my idea was to got most of the way to the opposite extreme from the pure predictability of a boring sine wave and use noise instead. Filtered noise seemed like the right thing, and so I envisaged an array of resonant high-pass, band-pass and low-pass filters, and perhaps some sort of neat GUI control to create a final 'noisy' modulation for the comb filter.
Unfortunately, the end result was not as interesting as I hoped. High-pass filtered noise just gave a rapid tremolo effect, and not a particularly nice or useful one. Band-pass filtered noise was still too busy. The only really useful noise was heavily low-pass filtered noise, containing exactly the sort of frequencies that you would use for tremolo, vibrato or a phaser! After a bit of experimentation, it turned out that I didn't need any conventional filtering at all, and that just a bit of sample averaging (OK, primitive filtering) produced nice random wobbling that sounded ok - but it wasn't anywhere near as impressive as I'd been hoping.

So I wondered if something combining the LFO and the noise was a better idea, and I added a DJ cross-fade type control to mix between the LFO sine wave and the noise waveform. This seemed to liven up the result and make it a bit more interesting and unpredictable...
But then I realised that I had an alternative source of variation, and so I added a second LFO to drive a Sample/Hold circuit that sampled the original sine wave LFO. Sample/Hold circuits have always fascinated me, right from the days when you put high-input impedance op-amps on Teflon PCBs with polycarbonate capacitors and used reed-relays as input sampling switches, all in the analogue quest for long-term voltage storage (and you still got droop over time!). In the digital domain, things are different (and you add imperfections if you want to model the real world) and so a quick bit of M4L'ing later, I had an LFO with sine waves for high sample rates, and repeated complex patterns for lower sample rates. (The S/H samples when the indicator lights up yellow, btw.)
The DJ slider became a 'Randomness' control, and I added a red indicator to provide visual feedback for when the 'Freq' and 'Depth' controls needed to be adjusted (up and down respectively), and Comber V0.3 was born! I hope you find it a more versatile and inspirational effect for your music. 


Comber V0.3 is available, as always, for download from MaxForLive.com.

Related articles