Thursday 31 December 2020

Thoughts on Asynchronous Loops in MaxForLive for Ableton Live...

I ruthlessly prune comments. There are some people who think that every blog is a place where they can advertise for free, and so they add automatically generated comments with a clickable link somewhere and hope that people will click on it. I just delete these 'chancer' comments. But, sometimes, a genuine and interesting comment arrives...

ElDepleto wrote a comment recently at the end of the 'Non Euclidean...' blog post:

Hello. I have been reading your blog for a while and I really enjoy your devices. I am hoping you can help. I am looking for a m4l device that can play 4 asynchronous loops not tied to Ableton’s tempo or any tempo really. Thinking Discreet Music by Eno. I’d also like to be able do Reich style phasing with it. I am hoping you know of something that exists. Drag and drop would be ideal. Anyway, I hope you have a happy holiday and keep up the great work! -Brian

This one caught my attention, and I thought that it would be a good opportunity to do a one-off 'Adam Neely'-style 'Q&A' blog post, and you are reading it!

Asynchronous loops...

The blog post that the comment was attached to was was for my Non-Euclidean, Non-Linear Sequencer Toolkit, and this can be thought of as being close to the opposite end of a spectrum of approaches that has the 'I'm looking for...' 'Asynchronous Loops' at the other end. My Non-U, Non-L sequencer produces MIDI notes where the timing can be phased/slipped relative to each other, and you can have up to four sets of sequences running plesiochronously at once. The 'Plesio' prefix is a description of the case where two systems are not asynchronous, but they are not synchronous either. It turns out that async and sync are just extreme cases, an there are lots of 'partially synchronous' cases in between, hence 'plesio' meaning 'partly'. In this case, the minimum time interval is a 64th note, and so the phasing is coarse and quantised to Live's timing clock, but it can still give some interesting outputs. 

The 'other end' is multiple loops (samples that repeat with some degree of seamlessness) where the ultimate 'analogue' form would be four separate tape loops, with the minimum time interval between them being down to an atom of iron on the magnetic tape. The digital equivalent could be implemented in a number of ways: fractions of a cent of pitch shifts, perhaps, or just four different length loops played back at the same rate (although the sample rate imposes a 'quantisation' limit of time for this method), or different playback clocks... Of all of these, the analogue tape is probably my favourite - because it is simple and mechanical. So, not for the first time, digital technology has turned easy accessible DIY into something more like arcane complexity...

Database?

There's an easy answer, of course. Just search the MaxForLive.com repository of M4L devices. Unfortunately, whilst there are a lot of M4L devices on MaxForLive.com, the sheer number of them can make it hard to find a specific instance (or instances). It isn't an accident that it took several different attempts at Internet Search Engines (Alta Vista, for example) before we got the current giants of search, and it took a lot of thinking, invention, and several reworks of business models before we got where we are now. MaxForLive.com is a wonderful resource, but asking the developers of devices to describe their work isn't a guarantee of unbiased, accurate and consistent classification. 

Databases are interesting pieces of software. Shoehorning data into a spreadsheet and expecting it to be usable as a powerful relational database is unlikely to pay dividends, and actually, that's the point - for a database to have value, then it needs to have money spent on compiling it, on verifying the data in it, on making it accessible, on keeping it up-to-date, and more. Sometimes you can get people to do this themselves: Google Earth is an astonishing example of how ordinary people freely provide hugely valuable data updates. But it normally requires money up-front, and with payback later. The scale gets big very quickly. On the opposite end of the scale, you have Pianobook.co.uk, where in just over a year or so, over 400 sample-based virtual instruments have been freely donated as a common resource (looked after by volunteers), and there's already a problem of finding stuff, just like on MaxForLive.com. 

400 is an interesting number. If you were asked to sort 10 numbers into order, then you would probably have no hesitation in doing it without any planning. For 100 numbers, then you would probably spend a bit longer planning out your approach. 400 is getting big enough to think about asking a few other people. 1,000 would be quite daunting. 10,000 and you would be thinking about having to do a lot pf planning and setup to achieve the task. 100,000 and most people would probably go to a specialist company to do it. So 400 looks like it might be close to the number where it starts to turn into something non-trivial and requiring real effort - and money. 

MaxForLive.com has almost 5,000 devices...

5,000 devices is a lot. If it takes you an hour or so to get thoroughly familiar with how something works and what it does, then you might do 5 or maybe 8 devices in a working day... This means that it will take you something like 2 years to get a good level of familiarity will all the devices, and this isn't taking into account updates and new device releases. I would be surprised if there are many people who have a good grasp of all of the devices on MaxForLive.com.

Back Catalogue...

My first thought was to look in my own back catalogue! I have about 100 M4L devices on MaxForLive, and there are some that get close to what is required. (And if not, then the temptation to make one of my own would be enormous!)

I didn't find exactly what was required, but they were related and still interesting...

26 November 2017 - dFreez

dFreez is the 'drone-performance-oriented' version of sFreez, a 4-channel sample player that uses a 4-phase LFO to cyclically fade between the four samples. It makes creating atmospheric washes of sounds (drones, etc.) very easy - just drag and drop four samples and off you go! The addition was a slow 'Fade Up/Fade Down' control that can take a long time to fade up or down...

https://blog.synthesizerwriter.com/2017/11/dfreezmr-m4l-live-performance-utility.html

20 October 2017 - sFreez

This is the original 4-channel sample player with a 4-phase LFO that fades cyclically between 4 dragged and dropped samples to create continually changing washes of sound. 

https://blog.synthesizerwriter.com/2017/10/sfreezmr-4-phase-lfo-looped-sample-live.html

24 January 2016 - Saw4Generator

4 channels, but Sawtooth oscillators, not samples. But I learnt a lot about how tricky it can be to control 4 channels of sound at once...

https://blog.synthesizerwriter.com/2016/01/generating-audio-soundscapes.html

9 February 2019 - INSTsineATMOSPHERE

INSTsineATMOSPHERE uses 3 channels of FM oscillators and is another attempt to provide a simple user interface to a complex sound generator.  

https://blog.synthesizerwriter.com/2019/02/modulated-sine-waves-two-ways-recipe-in.html

30 August 2016 - gFreez

This is the ancestor of sFreez and dFreez, and uses granular 'frozen' spectra as the source material. So you capture a spectrum from an incoming instrument or recording, and then that is replayed as a looped 'grain'. More slowly changing washes of sound...

https://blog.synthesizerwriter.com/2016/08/audio-environments-from-frozen-spectral.html

So looking back through previous MaxForLive devices had some 'close approaches', but no direct hits.  

So I thought about it from an oblique angle...

Go local!

I realised that Ableton Live itself was originally designed as a MIDI sequencer, but that when sample replay was added to the 'Clip Launching' (Session) view, then something very different was the result. Live's Session View doesn't have any link to time in the upper part of the window - just a matrix of clips. It isn't at all like the 'Piano Roll' or 'Tape Recorder' views that had time on the horizontal axis, and pitch or tracks on the vertical axis. 

Clips in Live can do a lot. I've always been a fan of the slightly obscure 'Clip Envelope' functionality, which many people overlook. But when you have a sample as a Clip, and you loop it, then you get a lot of ability to do interesting things, all from when the Session view first appeared and Ableton let people play around with samples without any dependence on a time axis.

So if you create a Clip in Ableton Live, and set the 'Warp' and 'Loop' buttons on, then it will play as a continuous loop. The length of the sample determines the length of the loop, so it isn't tied to Ableton's transport clock. Activating the 'Warp' button but not using any warping functions means that the clip plays asynchronously to Live's transport, but it also means that if your loop is seamless, then there is only one length that you can use - the one where it is seamless! So as long as your sample has silence at the end, then you can reduce the length of the sample, and it will loop that reduced length sample. (More about warping later).

I'm sure that this is well-known, but I hope that my rediscovery may be useful to some people. 

Here's a Clip on a Track, set up as I have outlined:


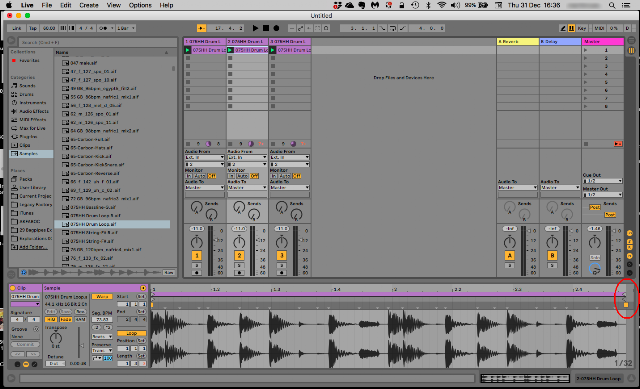
The sample that I'm using is just one of the factory samples that comes in Live Suite, I think. This is just the raw 'dragged and dropped' sample. There are several things to note in the screenshot. First, the sample is not a whole bar in length - you can see the 1.1.2 marker just after the middle of the sample, but this is a view of the whole sample, as you can see in the tiny preview box at the lower edge of the screenshot. Secondly, the 'quantisation' is shown as 1/512 in the lower right hand corner, which is equivalent to 'no quantisation' in Live. Finally, there's no yellow 'Warp' marker in the grey 'warp' bar on the right hand side. In the purple bar you can see the end triangle, and in the light grey bar under that you can see the repeat triangle (or is it the other way round?), but the next bar down, the 'warp' bar, doesn't have any marker at all. All three of these signs indicate that this sample isn't tied to Live's transport. 

Track 2 has the same sample, but this time the length of the sample in the Clip has been adjusted:


The upper red ellipse on the far side shows that the length of the clip has been shortened - the purple and light grey bars now end, and there's a light grey area to the right of them. The darker grey 'warp' bar still doesn't have a yellow 'Warp' handle in it (this is good for this application!). When you change the length of a sample by dragging the end triangles, then they jump to specific places, so you don't have complete control over the length, and those places are related to the bar and beat positions. (But remember that the sample in Track 1 is NOT linked to bar or beat positions at all...)

Track 3 is just a slightly shorter sample:


The white triangle has now gone black, which indicates something related to warping, but note that there isn't any yellow warp handle, so this is just a shorter sample. Playing all three tracks at once gives exactly the asynchronousity that ElDepleto wanted! (You just need to add a fourth track and tweak it, of course!). Using the same sample makes it very easy to hear hat is happening, but you can get very good results by transposing samples down or up, and by using the /2 and *2 halve/doubling buttons to change the length. Detuning samples gives asynchronicity at a finer level of detail, if you want. 

Warping

If you want, you can use/activate the Warp facilities and see how this changes things. Here's Track 2 with modifications in Tempo applied to the sample:

If you click on the far right hand side, in the darker grey warp bar, where the yellow 'Warp' handle would be if it was there, then you will find that it appears and you can move it so that the sample changes tempo to match the loop length. This does mean that it is now synched to Live's transport, but the loop length need not be whole bars, and so is 'plesiochronous'. You can see that the quantisation has now changed to 1/32, and the length is a whole number of beats. 

If we do the same with Track 3, then we get this:


Yes, a broader light grey region to the right hand side, and a shorter, tempo-tweaked clip...

You might like to try out both variants to see which gives the asynchronicity that you want. I have to apologise for not delivering a MaxForLive device that does this, hut having the native functionality in Live is very useful. If you want to have seamless samples, but which are slightly different lengths, then the technique that I use is to overlap copies of the start and end of the sample and do a cross fade, then merge and trim back to the original sample. This means that the sample fades out its end as it fades in its beginning. I wish that audio editing tools would automate this type of editing function (Audacity, for example), but once you've got your head around it, it isn't difficult to do. 

I have done a video which shows the 'no warp' asynchronicity in action, and this is available on my YouTube channel: 

If I can find time, I may see what a stand-alone MaxForLive version would look like...

And thanks to ElDepleto for the comment! Much appreciated!

 ---

If you find my writing helpful, informative or entertaining, then please consider visiting this link:

Buy me a coffeeBuy me a coffee (Encourage me to write more posts like this one!)


Synthesizerwriter's Store
 (New 'Modular thinking' designs now available!)


Wednesday 30 December 2020

MIDI Distribution Processor - a different approach to making a sequencer

Step sequencers tend to follow a very well-defined blueprint, and getting away from fixed step timings, deterministic playback, fixed swing, limited probability controls, boring repeated velocity and other immutable articulations can be difficult. If you look back through my MaxForLive devices then you will find a few of my attempts to break free of the constraints, and this blog post aims to highlight my latest version.

When I created a tee-shirt design featuring a fictional modular synthesizer module with controls in the shape of a Christmas Tree, the plan was not to trigger the creative process. But my mind is strange, and that triangle shape got me thinking, and before I knew it, my brain had produced an idea for a very different type of sequencer - and it was different again from the Non-Euclidean, Non-Linear sequencer that I released only a few weeks ago.

The Christmas Tree looked like one of those marble-based binary decision trees that ends up with a Gaussian distribution of outputs, where the outermost 'bins' are the least likely to end up with a marble in them, whilst the innermost on are the most likely, and there is the familiar bell-shaped curve connecting them. What struck me was that the 'tree' of decisions was allowing control over the distribution of the outputs, and it was like a light coming on inside my head: I couldn't think of any sequencer that allowed control over the distribution of notes, not even any of mine!

MIDIdistPROC

So I did some exploratory programming, then tidied it up through a couple of iterations, and finally smoothed a few rough edges. The result is MIDIdistPROC, a MIDI note distribution processor that allows you to explore what happens when you choose a set of notes, and can then control the frequency of occurrence of those notes. It is kind of like a sequencer where the concept of 'notes in a specific order' doesn't exist. 

So if you give it C, E and G (as MIDI Note Numbers!), then the simplest (and the default) distribution would be for each note to be equally likely, so you would get outputs like CEG, CGE, GEC, GCE, ECG...  If you increase the likelihood of the C, then you might get CGC, CEC, GCC, ECC...  Ultimately, if you raise the likelihood of C to the max, then you might just get CCC, CCC, CCC... That struck me as being too much like current pop song melodies, so the design deliberately doesn't allow you to go quite that far, and you will always get a few other notes sprinkled here and there. If you want to use it to generate pop song melodies then you will just have to edit those 'other' notes out. Sorry.

Velocity uses the same principle: a 'pool' of velocity values where you control the distribution, but not the order. Over time, the values will fit the specified distribution, but without requiring a fixed sequence to happen.

Previously, I have looked at different 'flavours' of randomness, and a bit of experimentation resulted in another design decision: to provide a simple 'structured' source of notes where the user controls the amount of order or disorder. So there's a 'Mix' slider which has Random notes on one extreme (the left, of course), and a rising sequence of notes on the other extreme (the right), and so you can choose how much chaos you want to inject into the notes or velocities.

Following on from the many asynchronous clocks that I've been incorporating in designs for some time, I split the clocks for the notes and the velocities, which allows you to have different rates for notes and velocities, as well as different distributions and different mixes of random or ascending values. The note clock is the master clock for generating the MIDI notes, but isn't synched to Live's transport at all, so I should probably call this a 'toolkit' - because it is intended for exploration and experimentation.

From left to right, you have two sections: notes (light purple) and velocities (light grey). Apart from a few minor details, the two sections are very similar. At the top left hand side is the Rate rotary control (shown as BPM and Hz) for the beats. This is not synched to Live's transport clock. Directly underneath is a slider with 'MIX' in the centre. This mixes between a Random source of values and an Ordered source of values (from a rising sawtooth waveform), allowing you to choose between chaos on the left and order on the right, or any mix in between. As guitar pedal manufacturers like to say: We have designed it so that all settings will produce good results!' Underneath the Mix slider is a graphical representation of the past, which fades away into oblivion as it scrolls to the right. 

Most of the section is occupied by seven slider controls. These are arranged as a binary decision tree: the values from the Mix slider are sent to the left or right of the top-most slider (the little white lights show which way the values go...), and then go to one of the two slider underneath that, where they are again sent either left or right depending on their value, and thy finally end up at the lowest set of four sliders, where they are again divided into 8 outputs, an these output s can then be mapped to MIDI Note Numbers (or Velocities) in the number boxes at the lowest edge of the device. So, depending on the value that is produced by the Mix slider, a given value will end up at one of those 8 output boxes. And those 8 boxes can be set to either MIDI Note Numbers (light purple boxes) or MIDI Velocity values (light grey boxes).

The seven sliders are used to set how the values are distributed. If you press the 'Centre' button, then th sliders will be set to their default positions. The top slider will be at 63, which means that a value of 63 or less will go left, whilst any higher value will go right. This is why it is called a 'binary' decision tree: there are only two outputs at each layer, but the three layers results in a total of 8 final outputs. (Two for the first layer, then four for the middle layer, and then eight for the third/final layer). 


Yep, the velocity section is very similar! (But greyer...)

But note that the timing, amount of randomness, and distributions are totally separate for notes and velocity values...  This means that a specific note might have very different velocity values each time it happens (or you could set all the velocities in the 'pool' of values to be the same, but that would be boring!). 

Workflow

You will need to follow MIDIdistPROC with an instrument to make sounds... I used a Collision-based Marimba sound a lot during development. Remember that the 'Centre' button resets the sliders to their mid positions, which is usually a good place to start. You will find that the sliders tend to interact, so the best approach is to start at the top slider and work downwards. Extreme slider positions may give a single output value on one side or the other, or even a single value either way if the slider above is also at an extreme value. The Note 'RateN' rotary control sets the speed at which MIDI notes are generated, whilst the Velocity 'RateV' rotary control sets the speed at which the velocity values are generated, and so changes the volume or timbre of the notes, but not their timing... The rates can be varied between 30 and 300 BPM... (Beats Per Minute, which I show as 'bpm' on the UI because I think it looks cooler! It turns out that both 'BPM' and 'bpm' can be used, although BPM is often used to mean 'Business Process Management', which is very corporate-speak and not very musical...)

This is a toolkit, which means that further processing of the outputs will probably be required, so be prepared to capture the MIDI notes and change their timing. At one stage, I did contemplate including timing distribution as well, but that quickly got very complex and it seemed better to leave it to you - plus I'm not in Plaid's league when it come to amazing uses for unusual time signatures!

Max For Live...

'Slider interactions' probably sounded interesting, so here's how the sliders are interconnected so that the upper ones affect the ones lower down. Only one layer is shown...

The upper slider has a range of 0-127 - the full range of MIDI notes from the Mix slider. The output is 63 when the default position is set by the 'Centre' button. The two sliders in the next layer down have different setups. The one on the left is going to need to have a range from 0 to the output of the upper slider, which is called 'n' in the diagram above. Sending a 'size $1' message to the slider will set its range to '0 to n' (where $1 has the value of 'n'). The slider on the right is slightly more complex. The slider needs to start at 'n' rather than zero (set by the 'min $1' message), and the range needs to be set to 128-n (so that the highest value is 127 on the far right hand side). So the 'size' message just needs to be 'size (!- 128)' to set the range correctly. 

I'm not perfect. The red 'X' shows how I made an error in logic and used the range to set the slider value - not a good idea. I located the problem and fixed it - after I did the screenshot composite shown above. So I ended up editing the M4L and the diagram! (The red cross is NOT a new MaxForLive object, of course!)

 The Asynchronous Clock is pretty straight-forward, and is included here because it shows the conversions to get the BPM and Hz values, which aren't as tricky as you might expect... The 'cycle~' object is very easy to use in this case!


 Using it

The sliders don't necessarily work the way you might expect. The more you move them across to the right, the more values will be sent to the LEFT, and vice-versa. You can watch the white indicator lights to verify this. Now that you know this, you should be okay, but you may find yourself accidentally moving the sliders the wrong way when your conscious brain hands over mousing to your subconscious brain. 

The three 'Preset' buttons for Notes and Velocities provide starting points for setting the 'pools' of output values. Feel free to use your own values! Note that the 'Octaves' preset illustrates very nicely that you do not need to have different values for all of the outputs, which is something that people tend to assume is the case. The presets also show why I didn't include any other 'Ordered' waveforms that the SawUp - you don't need them! You can change the output values to give the equivalent of any source waveform with 8 vertices. (This is more waveform choices than you get with most analogue monosynths (The MiniMoog, for example, has a mere six.) If the concept of waveforms being an emergent property at the end of a processing chain doesn't bother you, then you are in the right place!

I'm going to mention it again, because people are used to M4L sequencers that look a lot like MIDIdistPROC: This is NOT a conventional sequencer! There isn't any of the timing variation you might expect (all the notes are the same length), the notes and velocities aren't linked, and it isn't very good at repeating the same boring sequence over and over again. However, if you are interested in getting inspiration and breaking out of melodic cliches, then you may find it useful. (If you just realised why I have been referring to the output values as a 'pool' of values, then you are ready to exploit this device fully!)

One very useful piece of additional processing is the factory Ableton Live device called 'Scale', which is very good at transposing and constraining the output to a given range or scale. There are commercial plug-ins (like Scaler 2) that do similar things and more... You could also try my scale utility or my 'one control' to process the output of MIDIdistPROC. 

Getting MIDIdistPROC

You can get MIDIdistPROC here:

    https://maxforlive.com/library/device/6829/mididistproc-mr

Here are the instructions for what to do with the .amxd file that you download from MaxforLive.com:

     https://synthesizerwriter.blogspot.co.uk/2017/12/where-do-i-put-downloaded-amxd.html

(In Live 10, you can also just double-click on the .amxd file, but this puts the device in the same folder as all of the factory devices...)

Oh, yes, and sometimes last-minute fixes do get added, which is why sometimes a blog post is behind the version number of MaxForLive.com...

Modular Equivalents

In terms of basic modular equivalents, then implementing MIDIdistPROC seems like it will be quite challenging - there are not many binary tree implementations that I'm aware of, but there are so many modules out there that I could easily have overlooked some. Worse, it may well be a hidden feature of a well-known module, so I may be completely wrong and it is a doddle to implement. 

Alternatively, then there are various utility processing modules that could be used to produce an eight segment transfer function, which would achieve the same end-result. So this might be only 1 or 2 ME. (Revised after I realised that this compresses all the layers into one!)

In reality, I suspect that MIDIdistPROC would probably be implemented in a very different way, by a super smart modular guru, by looking at the requirement from a totally different viewpoint. I would love to hear about it, by the way...

Links

Non-Euclidean, Non-Linear sequencer     - MIDInonU

'one control'                                               - MIDIchronatixONE

'flavours' of randomness                            - MIDIrandomABC

my scale utility                                          - MIDINoteScalery

---

If you find my writing helpful, informative or entertaining, then please consider visiting this link:

Buy me a coffeeBuy me a coffee (Encourage me to write more posts like this one!)


Synthesizerwriter's Store
 (New 'Modular thinking' designs now available!)


Wednesday 9 December 2020

Seasonal and Almost On-Topic!

It is the time of year when some people celebrate by sending other people greetings or gifts, when some people contemplate what they bought in the annual 'Black Friday' ever-expanding sales, when some people suddenly play a very specific genre of music (on-topic!), when some people anticipate the end of one year and the beginning of another year (with various emotions), and when some people do none of these things. 2020 seems to have been a year of extremes, of change, of polarisation and increased uncertainty. I hope the coming year is different!

Apparently, putting people in lockdown has resulted in huge sales of musical instruments... To kind of reflect this, I have added a seasonal design to the Tee-shirts in my online store: Synthesizerwriter's Store. If you wanted a 'Christmas Tree'-themed tee-shirt with a modular synthesizer bias, then you might be in luck! And if you wanted something that says 'Synthesis' in other ways then there are alternative designs and items - there are even cushions! 

Genre-specific music...

Here's an example of some seasonal genre-specific music, less most of the repeats and lacking a huge production budget...

A link to the music...

One of the main instruments that I used is a Kontakt virtual instrument that has the dubious honour of being a submission to Pianobook.co.uk that has been 'lost in the system' - it IS there, but the only way to find it on the site is if you know the URL! (or you do a search...)

https://www.pianobook.co.uk/library/29-bagpipes-synthesizerwriter/

---

If you find my writing helpful, informative or entertaining, then please consider visiting this link:

Buy me a coffeeBuy me a coffee (Encourage me to write more posts like this one!)


Synthesizerwriter's StoreSynthesizerwriter's Store
 (New ''Xmas Modular' design now available!)


Friday 4 December 2020

Non-Euclidean, Non-Linear Sequencer/Toolkit = NonU in MaxForLive for Ableton Live

I always try to explore the edges of things. When pre-11 Ableton Live wasn't into probability, I published lots of MaxForLive devices showing some ways of adding probability, and Ableton seem to have taken the hint in Live 11! One other thing that I have always been interested in is unusual timing - my Probably sequencer includes probabilistic micro-timing per note, which is kind of tricky to get your head around. But recently, I've been playing with the opposite of the many Euclidean sequencers that are available in MaxForLive circles. So here's a non-Euclidean, Non-Linear, 4-section step sequencer/toolkit for you to explore elastic time and polyrhythms. I say 'toolkit' very deliberately here, because this isn't an M4L device that you just drop into a track and make cool drum sounds or 'bleepy' sequencer riffs, - rather it requires experimentation, recording of the output, retiming, and more. Once again, it is giving you 'modular'-style functionality in a DAW - although I don't know of any direct hardware equivalent modules for Eurorack et al...

MIDInonU

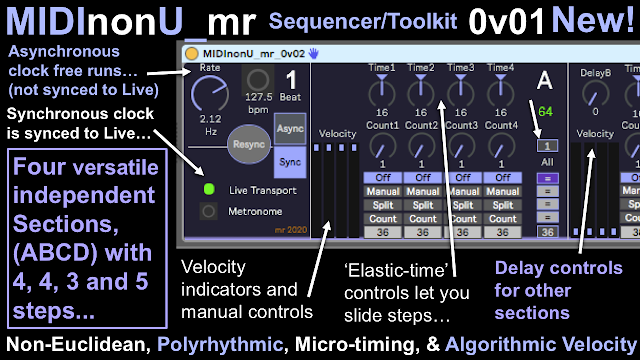
Above are the 'headlines' about MIDInonU, whilst below is the 'in use' shot where it is followed by a drum Rack (note that it is very wide!):


From left to right, there is the clock part, where you can choose between a free-running 'Asynchronous' clock, and Ableton Live's own internal 'Synchronous' transport clock. Then there are two 4-step sequencers, then a 3-step, and finally a 5-step sequencer.


The 'Resync' button forces all the internal counters inside MIDInonU back to zero, and so resets all the timing. You will find that changing the Time rotary controls can cause a section to get 'out of sync' with the other sections - which can be avoided by only making changes when the 'Sync' clock is selected but Live's transport is not running (a red light in the 'Live Transport' indicator... But stopping every time is not ideal, and tweaking timings live is good, so the 'Resync' button is there to get everything back on track. Unfortunately, there is a short delay whilst all those counters reset, though...

Euclidean...

Euclidean sequencers distribute steps as evenly as possible over the looped time: 4 beats on the beat being a familiar example that often gets overlooked! MIDInonU takes this as the starting point and then allows you to subvert it. So if you look at section A (there are 4 sections: A-D), then MIDInonU takes even time spacing as the starting point - so each of the 'Time' rotary controls is set half-way through the range, where the triangle is, at a value of 16. You can change the time between 2 and 30, which allows you to move the steps backwards and forwards in time by changing the 'Time' value away from the default value of 16 (where the triangle points to). 

The loop time is on the right hand side (underneath the section character), and is 64 (and green) when the looped time is a 4/4 bar. When the value is NOT 64 then it goes grey, because it is now longer or shorter in time that the 4/4 bar length. You can hear this by using section B to set up a 65 length sequence (as shown above), and you will hear the two sections drift out of time and back in again. (Read on to find out how to make this happen!)

The screenshot above shows a simple starting position. It plays a single note (MIDI 36) from step 1 of section A, 1 note per bar. 

The blocks of control buttons to the right of the Velocity indicators are used to control the note velocities. 'Off' mutes that step output. 'Manual' allows you to use the Velocity sliders on the left hand side to control the velocity directly. 


You can only adjust the velocity sliders when the 'Manual' buttons are lit with light purple. For the rest of the time, the sliders show the algorithmically-generated velocity values...


There are two algorithmic controls, which both use the 'Count' rotary controls: 'Split' just outputs two velocity values - max and off, and it does this based on a counter that increments for each repeat and resets when it reaches the 'Count' number. So for a Count value of 1, then every step will have high velocity, whereas for a Count of 3, there will be one high velocity and two low velocity steps. The 'Count' button just provides a scaled 0-127 velocity value, derived from the counter. This means that a Count value of 4 will step through four descending values of velocity. Try adjusting the count values and the buttons to see what the effect is on the velocity sliders.

In section A in the screenshot above, the Time3 and Time4 rotary controls are set to 15 and 17, but the loop time is still showing 64 (16+16+15+17=64). This means that step 3 is slightly ahead of where a pure 4 beats per bar step would be, whilst step 4 is slightly later. You can move the steps ahead or behind in time, and you do not need to have the total add up to 64 - as long as you are okay with the loop length not matching the bar length in Live.  


One important thing is hidden at the lowest part of the window - the small boxes there allow MIDI note numbers to be assigned to each step, so the 36 in section A is a bass kick drum, for example. You can set a different note number to each step, as well as assign the same note number in different sections - so you could have a '36' kick in sections A, B C, and D if you want. On the far right hand side of each section, in the 'All' column, are buttons labelled '=' that control all the buttons in that row. So the button to the right of the 'Off' row, sets all the buttons to 'Off'. Similarly, the small box on the right of the note number buttons sets all of the note numbers to the same value (and the same for the 'Count' rotary controls). You might find the following useful at this point:

"Just because you can, it doesn't mean you have to!"

That should give you some of the flavour of MIDInonU. Yep. Quirky. Not your average step sequencer, and not the usual controls or the usual way of working. 

Sections C and D


Section C has only three steps, and so doesn't start out with 64 micro-steps. You can set it so that there are 64 steps by increasing the time between each step - you can think of the steps as being connected by elastic, if you increase the time between two steps then you will need to reduce it between some others to keep the overall length of 64. Unless you don't want 4/4 bars, of course. Each of the sections can have different lengths. 

Section D has five steps. This makes any nicely-equally-spaced timing difficult, which, in this context, is definitely good! It is probably a good idea to start out with section A first, then add section B, and get very used to how they work with or against each other before jumping into using sections C and D.

Delays


Sections B, C and D can each have their timing delayed (individually) from section A. This can be surprisingly musical! When you have discovered that playing a 64/64 loop against a 65/64 loop just sounds like a drum pattern gradually going out of time and then back again, then it can be very  gratifying to discover that changing the delay can often immediately give a good-sounding output! 

Explore

The quick introduction above only scratches the surface of what you can do with MIDInonU. Note that you get two clock sources: an Asynchronous clock where the rate is not tied to Live's transport, and a Synchronous clock where the clock is the same rate as Live's transport. This means that you can explore timings that are not synced to Live if you wish, and if you are brave, you can change the timing source dynamically by mapping an LFO to the clock selector switch... Instead of using a drum instrument, try a synth instrument, for instance - and remember that you can assign a note number to any step in any section, or multiples of either. Try moving steps in pairs: increase the time on one, and reduce it on another - this keeps the loop length the same. Alternatively, deliberately have different loop lengths! Explore the 'Split' and 'Count' algorithms - the velocity accenting can change the feel of the sequence hugely. Basically, MIDInonU gives you the freedom to change a lot of things which conventional thinking normally stops you from changing. Enjoy! 

16 rotary controls...


A previous blog post featured my visual reminder accessory for my DJ Tech Tools MIDI Fighter Twister, which has 4 banks of 16 rotary controls, just like the 4 4 3 5 Time controls in MIDInonU. This is not a coincidence, and actually there are 16 'Count' controls as well, which could be mapped to a different bank in the Twister...


Getting MIDInonU

You can get MIDInonU here:

     https://maxforlive.com/library/device/6758/midinonu

Here are the instructions for what to do with the .amxd file that you download from MaxforLive.com:

     https://synthesizerwriter.blogspot.co.uk/2017/12/where-do-i-put-downloaded-amxd.html

(In Live 10, you can also just double-click on the .amxd file, but this puts the device in the same folder as all of the factory devices...)

Oh, yes, and sometimes last-minute fixes do get added, which is why sometimes a blog post is behind the version number of MaxForLive.com...

Modular Equivalents

In terms of basic modular equivalents, then implementing MIDInonU is interesting - there are many 3,4, and 5 step sequencers that you could use, but the micro-timing is less common, and might be easier to do by processing the clocks for the step sequencers, probably using another sequencer. The velocity algorithms are going to require a quite sophisticated processing module because of those counters. One brute force method might be to use more sequencers to do the counting, but this is probably not going to be straight-forward. You could use a descending sawtooth LFO to replace the counters, or course, and then use a threshold gate for the 'Split' function.

One possible alternative would just be to use a sophisticated digital sequencer module, but then this is closer to a DAW and not quite in the spirit of DAWless 'analogue' modular... Tricky!

Overall, I reckon that MIDInonU would require an ME of about 20 minimum, which is quite high. I haven't tested this out myself, but I would be very interested to hear about it if anyone manages to get something like this functionality (or better!). 

Links

Probably   A step sequencer that does a lot, and then some...

DJ Tech Tools MIDI Fighter Twister   One of my all time favourite MIDI Controllers!

Euclidean  Let's go to the source...

---

If you find my writing helpful, informative or entertaining, then please consider visiting this link:

Buy me a coffeeBuy me a coffee (Encourage me to write more posts like this one!)


Synthesizerwriter's StoreSynthesizerwriter's Store
 (New 'Modular thinking' designs now available!)