Saturday 24 November 2018

Doubling the levels in a Quantiser in Max For Live device for Ableton Live - User Interface considerations

When I added four extra levels to MIDI ccQuant so that it had 7 levels instead of 3, I already knew that the user interface was going to be a challenge. The original design for MIDIccQuant had three levels because the available vertical space in a MaxForLive device is fixed: there are 170 pixels to play with... For live.dial this means you can have 4, 3 or 2 stacked vertically...


Now I'm not the greatest fan of the 'tiny' live.dial rotary controls (or the rather sparse live.slider when used at this size), and the 'panel' dials are often mistaken for the Macro Controls, which leaves the three standard 'vertical' sized live.dial rotary controls. Which means that most of Max For Live devices have at most three horizontal rows of controls - and those that have 4 (the <x>_Freez series, for example) don't use live.dial rotary controls.

MIDIccQuant used the standard 'vertical' live.dial rotary control, which meant that choosing the number of levels of quantisation was easy: 3. That way I could have three dials for setting the main parameters for the quantisation. Unfortunately, this also meant that there would be four output settings, and so I compromised to the live.dial mode that I really, really don't like: the 'bare' view:


In the 'bare' view, you turn off all of the labels and numbers (you can have labels or numbers at the top or bottom, but it looks weird) and you put the number next to the dial, as you can see above (and below). It is possible to have 5 dials squashed into the vertical space, but it isn't pretty, and it can get worse...


For the 8 output levels that I needed in MIDIccQuant8, I rejected the use of eight 'tiny' dials without labels and numbers, and instead I went for live.sliders, which normally I avoid because they are very plain and don't have the characteristic 'Ableton' look that the live.dial has. I also oriented the sliders so that they match the two parameters: horizontal for the levels, and vertically for the outputs. Finally, I colour-coded the sliders so that they matched the lines in the display:


Hopefully it should now be more obvious that you move the orange sliders from side to side to influence the horizontal spacing of the orange lines, but you move the light purple sliders up and down to move the purple line segments vertically. It worked for me, and I did consider going back and reworking MIDIccQuant so that it had the same metaphor.

Whilst I was doing all of this user interface consideration, a crazy though did pop into my mind, and I wondered about taking the quantisation to the limit, with 127 levels and 128 outputs - which stops being quantisation and becomes a transfer function, or a mapping. So watch MaxForLive.com for another device...

Getting MIDIccQuant8_mr_0v03

You can download MIDIccQuant8_mr for free from MaxForLive.com.


Friday 23 November 2018

Quantiser bug fixing in two Max For Live devices for Ableton Live...

"It worked absolutely fine...right up until I tested this..."

I have heard those words so many times, but it was quite a surprise when it was me doing the talking. Somehow, in the development of MIDIccQuant, and it's bigger sibling, MIDIccQuant8, an avoidable problem found its way into the quantiser, and a user found it a few days ago. In response, my testing and debugging was just a little intense - and eventually I found the problem.

I had broken one of my own rules, and now it was biting me. Badly.

What was happening was that both quantisers would occasionally output a MIDI Controller message with zero as the value, even though that wasn't what was supposed to happen, and especially because a quantiser shouldn't be able to output anything other than the allowed values. But the zeroes were there when you looked for them. Time for a diagram:


So what did I do wrong?

It's simple really, in the quantiser itself (yep, the core of the devices!) I had two things happening simultaneously, and as a result, in certain circumstances, the quantiser stopped being a quantiser. Rather than bore you with Max code, I'm going to use an analogy to give you an impression of what was happening, an suffice to say, the replacement code (a more or less complete re-write of the quantiser) doesn't have the problem any longer.

So, here's a scenario for you to think about. Imagine if inside the quantiser there were two switches and an output. Switch 1 connects to the value 80, whilst Switch 2 connects to the value 10. Both switches meet and produce the output at point A.


Obviously, if Switch 1 is closed and Switch 2 is open, then output A has the value 80. Similarly, if Switch2 is closed and Switch 1 is open, then output A has the value 10. Traditionally, logic designers would summarise this behaviour in a 'truth table':


However, this isn't the full story. There are two switches, and so there should be four different ways of setting them, so let's extend the table:


Aha! There are now two interesting additional settings of the switches, and they don't give useful results. When both switches are closed, then both 80 and 10 are connected to point A, which might produce an output of 90... When both switches are open, then nothing is connected to point A, and so it is difficult to know what the output value might be... Zero, perhaps? 

In my original quantiser design, each of the levels had its own detection 'circuit', and so when the input crossed from one level to another, two separate 'circuits' did two things to change the output from one level to another. If those two weren't exactly in sync, then you got an output (zero, in the case in question), and actually, keeping two things exactly in sync is pretty difficult. 

In the revised design, there is only one switch changing at any time, and only one value available at any time. The switch is either open or closed, and so you get either the value, or you don't get anything. If you want a different value, then another switch gives you that, and only one switch can be active at any time. In the quantiser, this means that now you only get the quantised output values that you are expecting, and getting anything else is kind of 'designed out'. And yes, this is how I should have designed it in the first place, but in my defence, there was quite a lot going on, and it was very difficult to spot what I had done wrong. 

Just in case you think this is an isolated example, and that 'real world' examples of 'two things not needing to happen at the same time' are difficult to find, think about the 'shift' key on a computer keyboard. What happens when you press down on the 'shift' key? Does anything happen when you press the shift key? Or does something only happen when you keep holding the shift key down and press another key, and then release that other key and then finally release the 'shift' key. The shift key gets pressed before the other key, and only gets released after the other key has already been released.   There are lots of other things where what at first sight appears to be two things happening at the same time is actually one event happening and a second event happening inside that first event. And don't try releasing the shift key whilst you are holding another key! 

Whilst I was rewriting the quantiser code, I also had another look at the user interface, and so the 'fixed' versions (0.03) now have more colour coding for controls, so the 'levels' are now in orange, and the quantised outputs are in light purple. After a lot of devices that only use various shades of light purple, this is a big change! Here's the revised look in one of my deliberately eye-catching ads:


As usual, you can get all of my Max For Live devices from maxforlive.com. 

Getting MIDIccQuant_mr_0v03

You can download MIDIccQuant_mr for free from MaxForLive.com.

Getting MIDIccQuant8_mr_0v03

You can download MIDIccQuant8_mr for free from MaxForLive.com.


Monday 19 November 2018

Quick Transpose Customised For Live Performance Usage

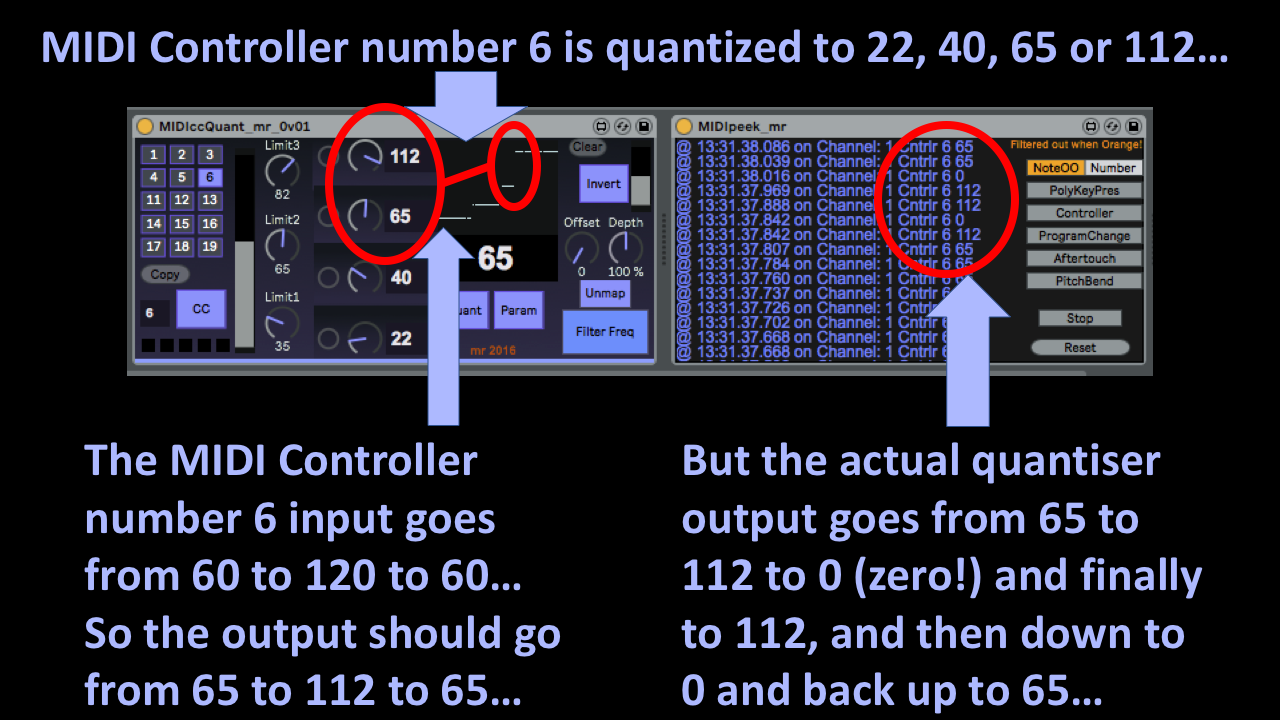
This is 'Quick Transpose' customised for live performance, and so it joins the 'series' of devices that arose from me publishing my personal utility to ease my programming of Racks in Ableton Live:

Quick Transpose - my original 'make it easier' personal utility
Quick Transpose BW - with added counter
Quick Transpose Audio BW - audio instead of MIDI, and more 'live performance' oriented

Quick Transpose itself was criticised very effectively and persistently in one of the Facebook 'synthesiser' groups because it could be replaced by keyboard shortcuts for the factory 'Pitch' device. Yes, I acknowledge that this is indeed the case, but I'm a mouse clicker, not a keyboard shortcut user, and I almost always prefer to use a single mouse click to mode-changing combinations of mouse clicks to set the focus, followed by keyboard shortcuts to do the action. Different folks, different strokes.

However, brucewayne247 commented on maxforlive.com that what was also needed was what I now call 'Counter' mode, where mouse clicks advance a counter that does the transpose (and this added 'BW' to the name), and JapanLoveStar took this further by requesting via this blog that I should make everything MIDI-mappable, especially a few buttons that I had over-looked (so adding 'JLS'). Somewhere in there, there was also a request for an 'audio' version instead of just MIDI, and before I knew it, I had a series of devices that had strayed some distance from the original 'Make Rack programming easy' goal!

Quick Transpose perf JLS

Previously, when a device gets optimised for live performance, I have added a 'perf' to the end, and so that's where the 'Quick Transpose perf JLS' name comes from. This time the customisation is quite interesting because it moves away from the usual tight timing and synchronisation of DAWs in live performance, into a space where the timing is user-driven instead. I've never been very good with looping, especially not live, and hugely admire those people who have mastered them (see below), so I had to cast my mind back to when I used to do stage lighting. The result is a 'scene' based sequencer that take the output of the counter and makes it available as transposition, plus two additional other tracks that are mappable to parameters inside Ableton Live. For musical use, then I have replaced the words 'scene' with 'section', because that's the closest word I can think of for part of a song, and I'm happy for better suggestions to turn up!


The far left side of 'QT perf JLS' (as I'm going to abbreviate it herein) has the counter from the 'BW' version, but with the added 'zero' button in between the '+' and '-' buttons to clear the count quickly with a single mouse click. I also changed the 'ANO' button so that it not only flushes hanging MIDI notes, but it also sends the basic 'All Notes Off' MIDI message as well. Everything to the right is new, and reflects my new insight into this way of performing courtesy of BW and JLS. 

The most obvious part is the 'section' sequencer, which is a repurposed 'step' sequencer, and yes, the screenshot is out of date because it still has 'step' shown - the current version on maxforlive.com has a few cosmetic changes that I made after going from 'dev' to published, and so the graphics here aren't totally in sync. Versions 0.01 and 0.02 were never published because I had a little bit of development hell, but that's another story. There are three tracks: Transpose, as you expected, and C3 is the 'centre' zero, 'no transpose' pitch setting - if you press the 'X' red button on the 'Transpose' track then this resets the current sequence (there are 16 'songs', set by the big number selector) to all C3s. The 'Value1' and 'Value2' tracks are the other two, and they can only be mapped to other Ableton Live parameters using the little 'Map' buttons on the far right.


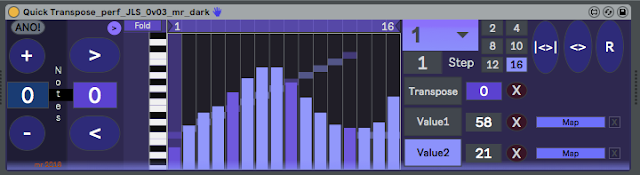
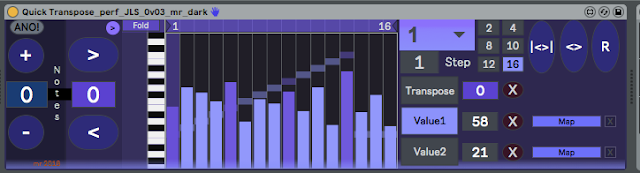
The grid is always 'live' for editing, and so when you select a track, then moving the mouse around in the grid part will edit the values of the sliders for Value1 and Value2 - for the Transpose track then you have to click in a grid cell to add or remove a pitch entry. The 'Fold' button works just like the same button in the Ableton Live piano roll window, and makes it easier to view pitch sequences with narrow ranges as well as edit within a restricted set of already-chosen values. You can always add the Ableton Live factory device called 'Scale' after 'QT perf JLS' if you want to constrain the pitches.

Immediately on the left side of the grid are the main user control buttons, and these are very similar to the '+' and '-' buttons in the counter, except that '>' moves the sequencer one step to the right, and '<' moves the sequencer one step to the left. (Interestingly, using the characters '>' and '<' in the maxforlive.com description caused me some problems, because the web-site detects them as 'HTML', and you aren't allowed to use HTML in the description field...) Anyway, as you go across the grid, then the middle purple box shows the transpose value, and so the buttons work in much the same way as the counter immediately to their left. Above the buttons, there is a tiny 'show/hide' button that allows the whole of the remaining right hand part of the device to be hidden (or revealed again!) so that you only have the main buttons visible. The idea here is that you spend time setting up the grid with the transpose and other values that you want, and then in live performance, all you want to do is advance through the sections by clicking on the upper '>' button, or maybe the middle hidden 'go to step 1' purple button. (I'm kind of assuming here that most people will start on 'no transpose' in the first section...)

On the right hand side of the grid there are the 'Song' selector (big, 1 of 16 numbered songs), the 'current section' indicator which is now echoed in the minimised tab view, the section lengths (2 section to 16), the tracks control buttons, and finally, three rather cryptic buttons that are alternatives to the '>' and '<' buttons. '|<>|' moves back and forwards across the grid, repeating the first step and the last twice, whilst '<>" moves back and forth across the grid with only one output of the first and last step. The 'R' button move across the grid randomly. All of these 'movement' buttons can be controlled by mouse clicks, or by assigning them to MIDI controller buttons.

Workflow

The workflow for using 'QT perf JLS' goes something like this:
1. Click the little round 'show/hide' button to reveal the expanded view.
2. Set the song number (1-16)
3. Decide how many sections you have in your song/piece-of-music. (<16!)
4. Set the section count to the nearest larger number.
5. Choose the Transpose track and fill in the transpose values for each section (C3=no transpose)
6. Map the 'Value' tracks to two other parameters (volume, filter cut-off, chorus, reverb, etc.)
7. Set the values for each section for the two Value tracks.
8. Reset the sequencer to section (step) 1. (The transpose and value settings should now happen!)
9. Click the little round 'show/hide' button to hide the expanded view.
10. Start the performance.
11. Click on the '>' to advance to the next section. Click on'<' if you change your mind an want to keep playing in the previous section!
12. Click on the middle button (the transpose value in the purple box) to return to section 1 and end the performance. (You could also use '3rd Hand' to help automate the volume fader...)

Masters of looping - a personal selection...


Getting Quick Transpose perf JLS

You can download Quick Transpose perf JLS for free from MaxForLive.com.

(The links above should now be fixed!)

Here are the instructions for what to do with the .amxd file that you download from MaxforLive.com:

     https://synthesizerwriter.blogspot.co.uk/2017/12/where-do-i-put-downloaded-amxd.html

(In Live 10, you can also just double-click on the .amxd file, but this puts the device in the same folder as all of the factory devices...)

Modular Equivalents

In terms of modular equivalents, then reproducing this functionality in my modulars was pretty straight-forward. It is just a couple of 8 step sequencers chained together and some patch cables - so 2ME altogether, plus maybe one or two extra ME for the random selection (which depends on how 'basic' the step sequencer is...).

Buy me a coffeeBuy me a coffee


Friday 16 November 2018

Defacing a Laptop Keyboard For Use With Ableton Live's Virtual Keyboard

I use the virtual keyboard in Ableton Live a lot - and I keep telling myself that I should tidy up and reorganise my working space so that I have room for a real keyboard, but...

The problem I have with the virtual keyboard is the black notes. Firstly, ALL of the keys on the laptop (Qwerty) keyboard are black (with white letters), and so although the two rows are pretty obvious, here's something that I did to my laptop to make it even easier to avoid pressing the Q and the R and (hardest of all) the I...

All I did was get one of the fine point fibre-tipped permanent pens and add a few bits of black to the anodised aluminium between the keys on the laptop keyboard:


And that's it. A quick, simple and very useful way to deface your laptop that makes using the virtual keyboard much easier. Yes, I know that there are various commercial keyboard overlays that also do this, but I already have other bits of black marker pen on my laptop anyway to indicate where the sockets are (I do the same with MIDI sockets so I don't have to go feeling around the back of synths...), and this cost nothing (except the use of the pen's ink), plus if I ever need to remove it, then a cotton bud and isopropanol should remove it easily.

What I'm not doing is correcting the characters, so A is not being replaced with C! Although F and G are correct, and H looks a bit like A. The D key being an E really annoys me every time, but I'm definitely not going to do this:


I know from seeing many synthesisers that are used live, that lots of people add various embellishment to their instruments - from tactile, glowing or coloured dots on keys for use in the dark, to set-list sheets, and even 'A', 'B', 'C', 'D'. etc., marked on the keys... Well, I have just extended this approach to my laptop. 

Note that I'm just showing you what I did to MY laptop. I'm not advocating, suggesting, or proposing that you should deface your laptop. What you do with your equipment is your responsibility. So you do any defacing like this at your own risk!


Sunday 11 November 2018

Distortion using Irony - a Max For Live experimental device

For too long, I have been working on an update to Waverne, the 'wave-sliding' synth written in Max For Live for Ableton Live, that I adapted from Laverne written by White Box Synth Makers (Now known as Flintpope (who makes superbly amazing devices for Reaktor, DAWs etc.), who said:

"I really enjoy the sound of this. You've done a terrific job. I was going to try and mix your work into my prettified visual version of laverne but so far I'm not up to speed on all that patching.

You've made a "working class synth" sound classy."

(I couldn't find Laverne on the maxforlive.com web-site when I searched today, so I guess that makes it a collectors item!)

Anyway, one of the recent additions to Waverne 2, the 'project that won't finish', was inspired by zipper noise, which anyone who lived through the early days of the analogue-to-digital transition in the 1980s will immediately recognise as one of the least wanted of the many ways that signals get degraded: hiss, aliasing, quantisation noise... and zipper noise. Zipper noise is particularly nasty because it isn't continuous, it only appears when you move a controller, and so your ear is naturally attracted to this nasty unwanted intrusion. So, naturally, it is a useful side-effect for Waverne 2's armoury of 'crazy things you can do with wavetables that don't get used very often...'.

And it got me thinking. Suppose that, in the future, digital acquires the same sort of nostalgic appeal as analogue has now. Instead of 'Vinyl' plug-ins that add hiss and clicks, you would have plug-ins that add all of the distortions associated with the digital sampling and reproduction process. Yep, so now you know how my mind works, because before I knew it, I was deep in another project that sucked more development time away from Waverne 2, yet again...

(When I demoed the then-current prototype of Waverne 2 at Ableton Loop 2017, I thought that the release would be happening soon...)

Irony as distortion

The result, after a tidy-up of the initial release, is 'Ironic Distortion mr 0v02', a Max For Live device for Ableton Live that allows you to add distortions inspired by Aliasing, Quantisation Noise and Mains Modulation to any audio, which probably belongs in the 'Mastering' section of your audio effects library. (I think this is my first 'mastering' tool ever...) This isn't totally serious - the distortions are not exact scientifically honed reproductions of real-world digital distortion, and they have not been rigorously tested using trained ears and expensive measuring equipment. Instead, I have used irony, a powerful technique that works well in comedy, satire and wit, and that sometimes has alternative applications in music technology. What Ironic Distortion does is provide vague emulations of the sort of digital distortion that you get in digital audio processing systems - using a digital audio processing system!


Ironic distortion has four sections, although the final section (on the far right) is just the Input monitor/switch and the 'Reset' button. The three main sections provide the aforementioned distortions: Aliasing, Quantisation Noise, and Mains Modulation. Each section has controls at the top, graphic displays showing the spectrum and a scrolling sonogram, and a combined level meter, gain control/fader and Mute switch. The gain controls let you adjust the mix of distortion types, and the Mute switch allows you to switch them in and out quickly.

All of the sections are based around spectral mirroring (followed by various other bits of processing), something that I wrote an unreleased Audacity plug-in for some time ago, and which is another on the list of 'things to release at some stage'. Cycling 74's Max makes it easy to do the required frequency-domain processing (ring modulation, alternate sample inversion, etc.) and so made turning an ironic idea into a digital reality very quick and easy.

Version 0.02 changes the 'Mains Modulation' to replace the low-pass filter with a 'Drive' rotary control because I found that I was always opening up the filter anyway, and there wasn't enough 'Umph'. This modification sounds much more like the sound that I associate with problems like faulty power supplies and hum loops, and could be used maliciously to upset recording studio engineers...

Version 0.02 also adds in preset storage, and should store settings between sessions in Live.

Back in the pre-digital days, things called 'exciters' and 'enhancers' were used to add small amounts of distortion to audio to try and counter/hide/disguise/obfuscate the hiss that using analogue tape recorders ends to generate, and you could think of Itronic Distortion as a re-imagining of this type of thinking for a digital world.

If you are used to distortion devices that work in the time-domain and directly affect the waveform, then a frequency-domain device like Ironic Distortion could be an interesting alternative approach. Use at your own risk, and don't forget to apply your own irony to the results.

I'm gradually getting more experience at doing 'demo' videos, so one may appear here at some stage...

Getting Ironic Distortion mr 0v02

You can download Ironic Distortion mr 0v02 for free from MaxForLive.com.

(The links above should now be fixed!)

Here are the instructions for what to do with the .amxd file that you download from MaxforLive.com:

     https://synthesizerwriter.blogspot.co.uk/2017/12/where-do-i-put-downloaded-amxd.html

(In Live 10, you can also just double-click on the .amxd file, but this puts the device in the same folder as all of the factory devices...)

Modular Equivalents

In terms of modular equivalents, then reproducing this functionality in my modulars presented a number of problems, since many of the modules I have are digital inside, not analogue, and so they are already intrinsically 'corrupted' with their own digital distortion. In the end, I resorted to my stand-by: that useful, catch-all, vaguely-described 'utility' module (no matter how many you have, you always need another one with a new and different function that you never knew you needed or would ever use), a couple of VCOs and VCFs, and giving a sub-total of about 6 ME per section, which makes an impressive grand total of 18 ME for the whole thing. Basically, that's an entire small Eurorack just for this one MaxForLive device...

Buy me a coffeeBuy me a coffee


Saturday 10 November 2018

Ableton Loop 2018 - 'Start Here' Creative Challenge - My 'Too Late' Entry

One of the interesting bits of this year's Ableton Loop event (in Los Angeles instead of Berlin) was the 'Start Here' Creative Challenge, where a sample was provided and you had 12 hours to submit a 90 second piece of music using it.

Here's the start-here web-page that gave the background instructions.

My Non-Entry

Well, for me the timing wasn't good (PST is awkward in Europe), and so what with one thing and another I didn't get my piece finished in time, so I have put it on SoundCloud instead. I used only the sample provided, and I used a lot of stuff from my MaxForLive devices as found on this blog and available from maxforlive.com. Overall, it took me about 90 minutes to create. I could have spent more time (the original challenge allowed 12 hours in total), but since I had already missed the deadline...

There's a lot of sample manipulation of the basic sample, taking my research on residuals and using it to do unusual things to the timbre. I also used flams (OK, reverse flams, as a Facebook person corrected me recently) on short sample fragments (there's a point where flams and granular cross over...), and my usual Auto-Pan and reversing of audio. Basically, everything I do, I did, which explains why I ran out of time - although the visualisation running in my head was a major distraction. (You will see what I mean when you hear the track!)

Given the title of the original sample: 'Snow' then I was particularly pleased at the crunchy 'snow' sounds that I managed to produce. Again, it helps to have the context - so imagine what the two words: 'Snow' and 'Chase' suggest to you...

And finally, here's the SoundCloud piece: 'The Chase 02' that didn't make it into the 800+' entries. Enjoy.

The Sample by Flora Yin-Wong

Flora Yin-Wong was asked by Ableton to produce a sample for the challenge. It's a wonderfully atmospheric snippet of ambient music, with a diverse content eminently suited to re-use by producers.

Here is some collected information on Flora Yin-Wong to save you the effort of searching the Interweb:

Twitter: PetitFlo

Flora tweeted: " asked me to create a sample loop to be used by producers for their Loop challenge - v interesting to hear ppl’s reworks:"

SoundCloud: floraytw

Lots of interesting tracks and a live set from Boiler Room. Granular, Paulstretch, mixes of real and digital, and fascinating textures a-plenty. I can understand exactly why Ableton asked her to provide the sample!

Events: Sat, 24 Nov 2018, Flora Yin-Wong at Grow, Tottenham, London, UK

Grow Tottenham is an interesting mix of gardens, community and event space, etc.

Interview in As If: interview-flora-yin-wong

A bit more depth on her music, her techniques, etc.

Cafe OTO: flora-yin-wong


Friday 9 November 2018

Dj On Button - a MaxForLive live performance device for Ableton Live

When I added the two round black buttons to 'Quick Transpose Audio BW', I thought that they were an interesting way of providing a live performance element, and that set me thinking...


So here's the result of taking the idea and making it more generic. I call it: 'DJ On Button', because it emulates the effects On/Off buttons that you see on DJ Mixers for ad-hoc live insertion of effects into audio. But rather than add it to lots of audio devices, I took the Max code from 'Quick Transpose Audio BW' and made a general-purpose mapper that turns clicks into parameter settings. The basic 'DJ On Button' device has three buttons, but with 'hide/show' buttons that enable 1, 2 or 3 of them to be shown, depending on your application.


To use this utility, all you do is click on the 'Map' button, then choose the Live parameter that you want to control, then adjust the 'Min' and 'Max' rotary controls to give you the parameter values you want. Then when you click on the big round black 'On' button, the 'Max' value will be sent to that parameter. When you stop clicking, then the 'Min' value will be sent. That's all there is to it!

In live performance, you pre-assign parameters, and then just click on the buttons at the appropriate time - just like you would on a DJ mixer. It's a bit like the toggle buttons in the classic Ableton 'EQ3' audio effect, but turned into momentary action buttons instead.

Here's a video showing 'DJ On Button' in use.

Getting DJ_On_Button_mr_0v01

You can download DJ On Button mr_0v01 for free from MaxForLive.com.

(The links above should now be fixed!)

Here are the instructions for what to do with the .amxd file that you download from MaxforLive.com:

     https://synthesizerwriter.blogspot.co.uk/2017/12/where-do-i-put-downloaded-amxd.html

(In Live 10, you can also just double-click on the .amxd file, but this puts the device in the same folder as all of the factory devices...)

Modular Equivalents

In terms of modular equivalents, then reproducing this functionality in my modulars required nothing more than a momentary switch and a utility module, giving 2 ME.

Buy me a coffeeBuy me a coffee


Thursday 1 November 2018

An audio version of the 'Quick Transpose BW' MaxForLive device for Ableton Live...

One of the questions about QuickTranspose BW was: 'Does it transpose MIDI or Audio?'. The answer was 'MIDI', but this set me thinking, and so here's a quick test of what happens when you put the enhanced (maybe 'over the top') user interface of 'Quick Transpose BW' over an audio-domain pitch shifter.


Above is a screenshot of what the result looks like. The left-hand side is 'Quick Transpose BW' just moved into a MaxForLive Audio device instead of a MIDI device, but the right-hand side isn't just a bolted-on pitch shifter, because when I played with the draft version, I got inspired. So those two big black 'DJ' effect 'ON' buttons are intended for live performance use (or you can map an LFO (etc.) to control them (etc.), and provide mouse-gated Detune (which is a chorus effect that you can just gate in and out, or the same sort of gating, but for a transposition. The idea is that you choose a transpose value, then press the 'Set button (and the value will appear in the purple box), and then you revert back to no transposition (all zeroes across the middle), but clicking on the 'On' button gates that transpose on and off. So that's two liver performance buttons... Oh, and the 'Glide' button lets you set how long the pitch transposition takes, so you can do all sorts of sweeps and drops on whatever audio you are processing. Overall I had great fun making this cross-dimensional variant!

Here's a video (updated) showing two LFOs mapped to the Octave buttons and the 'DJ' detune trigger button... For some reason, you need to choose '480p' to get better quality video playback than the default blocky '144p'... The source material is just a synth arpeggio, and there are no effects other than 'Quick Transpose Audio BW' - which just goes to show what you can do with a pitch shifter and 2 LFOs.

Getting Quick_Transpose_Audio_0v01

You can download Quick_Transpose Audio_0v01 for free from MaxForLive.com.

Here are the instructions for what to do with the .amxd file that you download from MaxforLive.com:

     https://synthesizerwriter.blogspot.co.uk/2017/12/where-do-i-put-downloaded-amxd.html

(In Live 10, you can also just double-click on the .amxd file, but this puts the device in the same folder as all of the factory devices...)

Modular Equivalents

In terms of modular equivalents, then reproducing this functionality in my modulars required a pitch shifter, and whilst the Bose module was a part of some old classic modulars, it isn't exactly a 'basic' module in these 'interesting' times. So I'm temporarily extending my definition of 'basic' to encompass a pitch shifter, and then it requires just a couple of utility processing and button modules. Overall, the core is about 3 ME. I can't recall having ever seen a live modular performance using this kind of effect (although performers like Caterina Barbieri are imho, remarkably accomplished!), but I'm sure that the Interweb will provide lots of examples that I overlooked.

Buy me a coffeeBuy me a coffee