Sunday 31 October 2021

Vintage Synth meets 21st Century Multi-Effects (and a live gig!)

Back in the 1970s, analogue monophonic synthesizers didn't often have on-board effects. In the 1980s, DCO-based polyphonic synths added chorus to try and make up for the single oscillator. When the DX7 ushered in digital synthesisers in 1983, that didn't have any effects either. It wasn't really until the late 1980s that effects started to appear, particularly on workstation keyboards like the M1. 

Aside: Mawhrin Skel et al

As I've mentioned before, I have a couple of vintage synths, and enough outboard gear to do quite a lot of transformative processing on their sounds. But going to a live 'showcase' gig at the Smokehouse in Ipswich, kind of gave me a different perspective on current live performance. When you have seven performers in 4 hours, you need to be pretty slick with changeovers, and the solution they used was to have tables for the early acts (I spotted a 404 Mk1 (maybe II), a Crave, a Model:Cycles (or Samples), an (original?) MS-20 and more), with the penultimate act, Girl in a Gale, having a Nord Stage Piano, looper and various other bits of gear set up at the back of the stage, and the headliner, Mawhrin Skel, using a custom multi-tier stand with laptop on top, Push 2 for control, and various other bits of gear.  

Compact, minimalistic, and easily transportable were definitely high on the priorities for the rigs that were being used, and it was a refreshing alternative to the H9000s, H9 Max, Big Sky, Empress Zoia and CXM1978s that you find in all of those flashy 'home' studio pictures on Instagram. Which got me thinking about the opposite of Gear Acquisition Syndrome (GAS), which is something like Making The Most Of Budget Gear (MTMOBG - the acronym definitely isn't going to catch on!)... 

In fact, I was deep in thought about this when Girl in a Gale leaned over to me and revealed that ear plugs were available at the Bar. As it happens, I had actually bought my own ear defences: almost invisible and scarily hi-tech German ones that were totally essential at that amazingly loud Ableton Loop Concert in Berlin... But the sound at the Smokehouse was more constrained and controlled - I saw the sound engineer using a spectrum analyser on his phone, as well as an SPL meter. So, the usual low frequency 'physical' wobbles to remind you that music is visceral, and one of the early acts was intent on producing standing waves at about 70 Hz, but the PreSonus desk was coping very nicely, thank you.

An excellent gig, by the way... Mawhrin Skel was suitably sci-fi and enthusiastic, Girl in a Gale was a powerhouse of skilled invention, giving glimpses or sketches of music that left you wanting more, and overall, a varied 'selection box' of electronica. Venue and Music: Recommended.

The Opposite of Expensive...

But anyway, back to the opposite of expensive out-board gear... Some time ago, I started to look at something to process my Yamaha TX7 (the one where I replaced the LCD with a back-lit version ...), and started with thinking about something 'Multi', like an Eventide H9 or a MOD Devices MOD Duo, rather than a Sytrmon Big Sky, and then I realised that I was approaching this from totally the wrong direction. I was going to use a multi-effects pedal that was several times the original cost (and current value) of the synth - which seemed silly. So I happened across multi-effects designed for guitarists, and after realising that the top-end (the Line 6 Helix, Boss GT-1000, Headrush et al) was a money magnet, I deliberately looked at the opposite end - Amazon. (Well, Smile.amazon.co.uk, to help charity a bit). 

I've got a couple of pedal boards. The 'cheap and nasty' one has those 20 to 30 quid Behringer 'Boss' clone pedals on it, and is fine for live use and abuse. But I have learned that pedals boards, even with the considerable investment of crazily expensive switching/routing units, suffer from problems with recalling specific sounds. You can put the effects pedals in the right order, but what were the settings of all those knobs and switches? High-end pedals can use MIDI to store and recall presets, but that seems dangerously like a full-time job. 

It turns out that there is an alternative to the 'Pro' guitar multi-effects - for about 130 quid (150 Euros or dollars) you can get tiny little boxes that have built-in Expression/Volume pedals, colour LCD screens, and a couple of foot switches, and which do a very good job at providing quite a lot of the functionality of the 'around a grand, mate' 'Pro' multi-effects boxes. So, after a bit of research on YouTube (I hate the adverts!) I bought a Valeton GP-100 and connected the TX7 to it...

Okay, so there's a definite set of design decisions about the 99 Factory presets - and this is a 'Guitar' multi-effects (Actually, because of the 'Will be Mis-Used by Guitarists' design requirement, it is all-metal construction, and feels like it might survive live use quite well!). So there's a lot of fuzz, overdrive, saturation and just plain distortion, exactly as you would expect. But those 99 User presets and a computer editor (or the front panel controls) and you can concentrate on the Modulation, Delay and Reverb effects, plus a few extras that you might not be expecting: like a Ring Modulator, or a 4 Step Filter Sequencer. also, it turns out that having IR-modelled Amps and Cabs can give subtle tone variations, and you can load in your own .wavs for the Cabinet modelling, which opens up all sorts of experimentation. Oh, and you can arrange the effects in any order you like - so the Reverb does not need to be last in the chain... There's a looper built-in as well, and a Tuner. That's a lot for your money...

A couple of hours programming, and I had about fifty 'synth-oriented' presets that turned the TX7 into a host of alter-egos. One particularly nice sequence (the Arturia KeyStep is your friend) ended up as the sting/jingle for a corporate video I was working on... (I forgot to mention that it is also a class-compliant USB Stereo Audio Interface... which made recording it into my DAW a doddle...) Because every setting (and order of effects) is stored by the preset, then it just becomes a quick 'Paint By Numbers' 'Choose-a-Preset' procedure to turn a bland TX7 sound into something that sounds like it came from... well, from something else entirely. No need for trying to remember which pedals to switch in, and what the knob/switch settings were - you just select the preset. Simple - the sort of thing that even I could get right live!

Hiding the Truth...

I am considering putting the TX7 and the Valeton GP-100 inside a box (with suitable ventilation, of course) so that it isn't immediately obvious what is making that killer bass sound, or those ambient jangles. But regardless of pimping it up, it has been the bargain of the century. My only problem is that I have a feeling that at some stage, GAS is going to kick in and I'm going to end up upgrading... But they do say that:

Limitations are the Spur to Creativity...

So perhaps I should leave well alone, and leave my TX7V as my 'live' minimalistic secret weapon.

---

If you find my writing helpful, informative or entertaining, then please consider visiting this link:


Synthesizerwriter's Store (New 'Modular thinking' designs now available!)

Buy me a coffeeBuy me a coffee (Encourage me to write more posts like this one!)


Saturday 16 October 2021

My Pianobook.co.uk Virtual Instrument User Interface

The world on which we live is precious, unique, too often taken for granted, fragile, not loved enough, beautiful, amazing... and continually astounds me.

I have always had the crazy idea that if I make a user interface that is totally obvious to me, then it must also be intuitive to everyone else as well. Sometimes (Well, my Probably M4L sequencer is a good example), I am very wrong. Actually, reset that word 'sometimes'. Just about every time I think this, it seems that I get it wrong. My user interfaces work for me, but not for everyone. For this I apologise. I'm not perfect, and neither are my user interfaces.

To try and fix it, here's the 'Words & Pictures' part of a series of resources that I'm producing with the aim of making my user interfaces for my virtual instruments on Pianobook.co.uk easier for people to get their heads around, and use!

Mattress


As you can see from the screenshot above, I'm going to use my 'Mattress' virtual instrument as the example. I've uploaded it to the review queue on the newly re-launched Pianobook.co.uk version 3.0 web-site, so it should be available there for download at some stage. My 'Spoken Pads' virtual instrument (Sample Pack) went from upload to being published in a couple of hours just before the launch event, but the site seems to have slowed down a little since then.

A quick shout-out for Rachel K Collier, whose YouTube channel just released a 'How to do a remix' video featuring Mary Spender's latest 'predictive' single (Adele, not John Mayer, this time), and this rather distracted me. I did make the third comment though, so I was a little early. I'm going to use the 'amazing' word again for both of these amazing musicians!


Yes, I'm using my current favourite, Decent Sampler, again. As you can see, there are two major parts to the user interface. On the left: Timbre controls. On the right: Synthesizer controls.

Timbre Controls


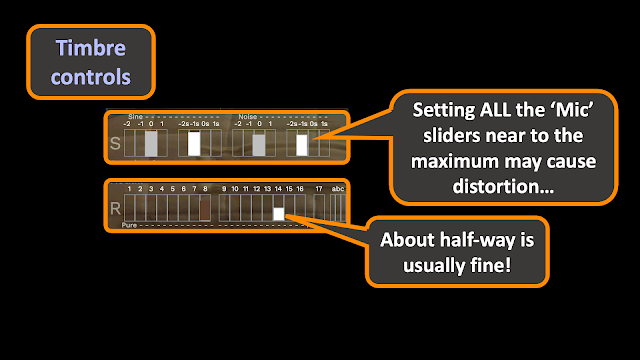
My interfaces have two (sometimes three) horizontal rows of controls. They are essentially little mixers, made out of the 'Mic' sliders that you sometimes find in sample players for choosing microphone polar pattern/response shapes and characteristics, plus their positioning. So you might have a cardioid close up to capture an 'intimate' close-up sound, and an omni far away to pick up the room. And no, a 'shotgun' microphone is not used to pick up the sound of guns!

To give some leeway in levels, I deliberately set the volumes of my samples so that a slider setting of about half-way is okay for most purposes. You can set it higher to make something stand out, but overall, about half-way is good. Too many maximum settings may well overload things, which is either what you want, or what you don't want - your choice.

Sometimes, for samples that are minor, special 'tiny' 'Mic' sliders are used, typically half the width of the ordinary 'Mic' sliders. These work the same way - they just take up less room, and are less important!


When there are two (or three) horizontal rows of 'Mic' sliders, then the intention behind the design is then same - you choose one or more 'Mic' sliders from each row, and set them to about half-way (don't overload things, remember?). 


One exception to this would be those tiny 'Mic' sliders, where you can add them to the main, big, 'Mic' sliders! Remember that they are small because they have one, special purpose - often sine waves or noisy sounds.


The basic 'initial' preset usually has the left-most 'Mic' sliders set to about half-way up. The idea is that you work your way across to the right, auditioning 'Mic' sliders until you find the ones that give you the sound you want.


Here's another reminder about those levels. Half-way is fine!


The rows are often organised into smaller blocks, sometimes internally arranged in pairs. There is often a gradual change from left to right - so 'Pure' sounds on the left might gradually change into 'Noise' sounds on the right. Sometimes the left to right arrangement is octaves: sine waves are often low pitched to the left, and higher pitched as you go to the right. 

Synthesizer controls


On the right hand side are the 'synthesizer' controls, which change how you can use the timbre that you have set using the controls on the left hand side. These are more about 'shaping' the sound, rather than setting the timbre itself.


The very first control would traditionally be on the far right hand side in most classic 70s and 80s synthesizers - the volume control. But in a sample player, then the major use for this control is very different - it isn't used to set the output volume of the synthesizer and then never touched again during performance (which is why it is way on the right (or sometimes the left in 21st century synths)). Instead, this control is used for 'Expression' - the minor changes in volume that a performer makes all the time with a real instrument. 

People who use MIDI to sequence music often use velocity for this purpose, because when you play a synthesizer with both hands, then you don't have any hands left to move an Expression control. Now, this isn't the case for a traditional pipe organ player, where their hands are playing at the same time as their feet are playing bass on those long wooden 'keys', or even controlling volume (Expression) using a foot pedal. For some reason, synthesizer players don't seem to use volume pedals very much, perhaps because at least one of their feet is controlling the sustain footswitch. And it seems that very few multi-dextrous pipe organ players move over to playing synthesizer. If you do see a synth player who uses expression pedals, then they are probably special!

If you are programming orchestral instruments in a DAW, then velocity is a strange way of controlling a violin, flute or oboe. Instead, the Expression control (MIDI Controller 11, usually) is a good way of having a continuous controller on the DAW screen that shows the 'volume' of that part as a line. Velocity of notes is normally shown as individual events, and it is harder to see trends, as well as being harder to edit. Some instruments ARE more suited to using velocity: pianos, double basses, brass instruments, and  percussion are some examples.     


Anyways, in sample players, the Expression control is one of the most important ways of controlling the ebb and flow of an instrument relative to all the others in an arrangement. In DAWs, you will see people record the notes first for a violin or woodwind part, and then go into that track and adjust the expression by editing MIDI Controller 11 to give the 'feel' that they want. You will also then see the same person record a piano part using velocity to control the 'expression' or volume. Just as in a real orchestra, the way you perform music with different instruments varies.

So the 'Expression' control is lots more important to orchestral composers who work in DAWs, and they tend to be the people who use lots of virtual instruments. Keyboard players who normally use velocity and record MIDI into a DAW and then edit the velocities, are probably not going to use the Expression control anything like as much. (Unless they know about this and deliberately exploit velocity AND expression...) This, by the way, is the sort of knowledge that expensive courses on arranging and orchestrating sell you...)
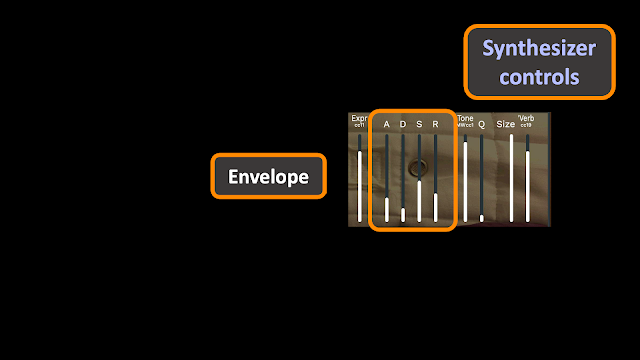

The Expression control affects volume on the grand scale. At the opposite end, the 'Envelope' controls affect the volume of each note over the time it plays. Historically, there's a very popular way of representing how the volume of a note changes over time: the start bit, where the note goes from silence to being heard, is called the Attack; the next bit where the sound falls back to a lower level, is called the Decay; the level that the note stays at is called the Sustain level; and the final bit, where the sound falls back down to silence again, is called the Release. These tend to get abbreviated to ADSR, and some manufacturers have the Release and the Decay set to the same value, but the models is more or less the same in all cases: three times (ADR) and one level (S). Of course, if you set the Sustain level to the maximum, then no Decay can happen and the sound just goes to the maximum and then falls when you let go of the keys - an AR envelope (and yes, it should be ASR, but conventionally, that isn't done!). 

One of the things that confuses people who don't know that the envelope is three times and one level, is that the shape made by the envelope controls (especially sliders) isn't what the envelope actually looks like. So in the example above, you could be forgiven for thinking that the note would start out loud, then go quieter, then go louder again, and then go quieter again. What those slider positions really mean is that the sound takes some time to do the Attack 'segment' of the note (i.e. it isn't a fast abrupt start, but it isn't a slow laboured one either), then decays slightly faster to a middle 'Sustain' volume, and then dies away slightly slower than the initial Attack. 

If you haven't use an envelope before, then set the Sustain all the way to the top, ignore the Decay control, and play with the Attack and Release controls. When you understand how the A and R controls affect the 'shape' of each note, then set the Sustain to the minimum, and then try adjusting the Decay control, plus the Attack and Release as before. When you have got that figured out, then set the Sustain to half-way up (or down) and listen to what the ADR controls do this time. You shouild now have a good feel for how envelope controls work.


If you listen to most musical instruments, then the start and end of notes is not linear. Notes start quite quickly, but seem to take longer and longer to get to the maximum. When a note ends, then it drops away quite quickly at first, but then it seems to take a long while to vanish altogether.  You can see this in the shape of envelopes that are used on screens and in diagrams - the segments are curves, not straight lines (in most cases!). 

As a further complication, whereas the Sustain control generally work as you would expect, the relationship between the 'time' controls and what happens in reality may be different. Some synthesizers and sample players can require moving the control almost to the very maximum to get a really slow Attack, Decay or Release, and some can only do fast ADR when they are very near to the minimum. This can vary a lot. Taking a few minutes to get a 'feel' for what positions of the ADR controls does what in terms of time can be very useful.


 To reinforce the importance of 'what the sliders show is NOT the envelope shape', the two envelopes above show this very clearly. If you have spent time learning the controls, then this should now make more sense to you.


The next controls affect the tone of the sound that is produced. For historical reasons, many synthesizers (and sample players) tend to use a low-pass filter for controlling the tone. 'Low-pass' means that when the frequency control is set to a low value, then the only low frequencies can pass through the filter, and as you increase the value of the frequency control, then more and more higher frequencies can pass through the filter. So a low-pass filter 'cuts-off' high frequencies - and so the frequency control is called the 'Cut-off' frequency. 

In sample players, the Tone control is often assigned to the Modulation Wheel (MIDI Controller 1), so moving the mod wheel up opens up the filter and makes the sound brighter, whilst moving the mod wheel down makes the sound darker and bassier. In most synthesizers, the mod wheel usually controls the amount of LFO modulation (hence the name) to the Pitch of the notes or the Filter cut-off - or many other parameters. Once again, sample players and synthesizers differ slightly in the eay that they are controlled. In a virtual instrument from a Sample Pack that you have downloaded from Pianobook.co.uk, then it will probably have the controls of a sample player, so the Low-pass filter cut-off frequency (the 'Tone') will be controlled by the Modulation Wheel as MIDI Controller 1.

The other control over tone is the 'Q' control, which comes from radio terminology. A more musically appropriate word here would be 'resonance'. At low values of Q, there is no strong resonance in the filter, and so as you increase the cut-off frequency control, higher frequencies can pass through the filter, so it gets brighter and brighter in tone. But as you increase the Q control, the the filter becomes more and more resonant, and so it emphasizes the frequencies at the cut-off frequency. This makes the harmonics in sounds stand out more, and gives a characteristic 'Weeyaheeoouuh' sound (you can do this when you open and close your mouth and make a sound). 


The final two controls on the right would be unusual in a 70s or 80s synthesizer: reverb. But again, in a sample player, reverberation is very common in the 21st Century. 


Again, there are two controls. The 'Size' control sets how large the reverberant space is, and so changes how big it feels, as well as how long the reverb lasts.


The other control, shown in my user interface as 'Verb', is just the Wet/Dry mix of the reverb. So the higher the control value, the more reverberation you will hear. This is assigned to MIDI Controller 19 in my virtual instruments, but this can vary with manufacturer for other sample players. 


Summary

And that's how the user interface for my Pianobook.co.uk virtual instruments in Sample Packs are intended to work. Some of the instruments have variations of the controls (older instruments may have rotary controls instead of the new linear ones in the latest ones), but the principles remain the same, and the idea is that you should move sliders around, listening as you go, and gradually home in on the sound you want. Decent Sampler lets you save any sounds you particularly like by using the Developer>Save Preset... menu options. This is how I made the presets which come with some Sample Packs.

One thing that maybe isn't immediately obvious is that I try to ensure that each of my instruments contains a lot of different timbres and sounds. Even simple sounds like the Synthfest UK Water Bottle have multiple controls that change the mix of the separate timbral components. Or 'Parallel Inversions', where what might initially sound like an organ is something much stranger than you think, with all sorts of tricky detunes and autos... It is nice to see people discovering the unexpected details in their reviews - and I love reviews! You probably won't be surprised to know that my favourite Spitfire Audio product is BT Phobos, which is much the same idea: give people lots of possibilities and lots of control, and let them find their own sounds! So maybe I should call them 'Sample Libraries' instead of 'Sample Packs'.

I hope that you enjoy using my Sample Pack virtual instruments. A lot of time and effort goes into producing the samples and the instruments, and there is often special thought given to the musicality of the user interface and the sounds. There are even some minor Easter Eggs in the form of inverse controls or ranges or pairings, just to surprise the unwary. I also can't praise enough the amazing people who produce the Pianobook.co.uk Demos - they are experts at extracting the maximum musicality out of virtual instruments, and you should definitely listen and learn from what they produce.

YouTube

There is also a video of this topic, with the same diagrams, but without any distracting text, and no voice-over!


 ---

If you find my writing helpful, informative or entertaining, then please consider visiting this link:


Synthesizerwriter's Store (New 'Modular thinking' designs now available!)

Buy me a coffeeBuy me a coffee (Encourage me to write more posts like this one!)


Friday 1 October 2021

Behind the scenes of the 'Straight Maths' Virtual Instrument on Pianobook.co.uk

I have been exploring the possibilities of mis-using a sample player recently. Dave Hilowitz's excellent 'Decent Sampler' is, imho, not only much better than merely 'decent', but it has also allowed me to go slightly outside the usual territory of samples and to become an intrepid explorer. Huge thanks also to the team behind Pianobook.co.uk - a great contribution to the world of sampling, created by Christian Henson.

So here is a quick recap of the design thinking behind two of my recent releases on Pianobook.co.uk.

Parallel Inversions

'Parallel Inversions' was my first really developed idea that isn't just a sample replay. It deliberately breaks the rules to produce an 'alien' instrument. In a 5 star review, Michael Milburn said; 

'I don’t understand what these are, but do enjoy the sounds.'

The user interface is the first thing that hits people with this virtual instrument. The top row of controls has 23 vertical faders that look a bit like the 'Mic' sliders that you see in many sample players - except that instead of 2 or 3, or maybe 5, or (extreme) 7 or higher, there are almost two dozen of them! They are split into four sections, and there are some subtleties in the way that these are put together.

The most important section is the one that has the 0 to 4 'Mic' sliders in it. The 'Zero' slider is set at about 75% in the default preset, so that you know it is important. This slider plays the 'fundamental' frequency that is played by Decent Sampler, or rather, it plays that frequency sometimes - the XML code that Decent Sampler uses to specify how samples are played allow all sorts of manipulations, and I'm exploiting this here. So the 'Zero' / '0' slider plays three different octaves, using a random 'Round Robin' assignment. So if you play a C3, then you will actually get a C3, or a C4, or a C5. The ratios are set asymmetrically, with the 'octave down' option half the probability of the others. So for every chord that you play, you may get that chord, or you may get a biased inversion of it instead (a 'bass-light' inversion). This isn't how many instruments work! (But it is an 'alien' instrument...)

The 1 to 4 Mic sliders are actually pitched in semitones up from the 0 (zero), which is why they are arranged in the staggered 'piano keyboard' arrangement. This is immediately obvious if you increase the '1' slider, because you get a C / C# discord! So the 0 to 4 section controls parallel pitches, which (again) isn't how many conventional instruments work - organ drawbars are a bit like this, but...).

The next section to the right is from 5 to 11, and again these are parallel semitones up from the 0 (zero) pitch. The '5' (fifth) slider is set at about 75% in the default preset so that you know it is important (just as with the 0 (zero) slider. So the default preset plays two sine waves, a firth apart, and in both cases, the pitches are inverted (or not) at random, with a preference for one octave up instead of down. All of the inverted pitches are slightly detuned relative to the fundamental pitch, which gives a more interesting tone. All of these 'Parallel & Inverted' sliders are centred in the stereo image.

The combination of fixed parallel intervals (the default 5th is just intended as a hint to get you started) and random inversions kind of breaks 'the rules', and gives this instrument an interesting and unusual character. Have fun breaking all those conventions that you are supposed to follow, and embrace performances that are never the same twice!  

On the far left, there is a single '-12' slider, which was supposed to play a pitch one octave down from the fundamental. Unfortunately, I'm not the world's greatest programmer, and so it actually plays the same pitch as the '0' (zero) slider, except that the random inversions mean that most of the time it plays a different octave. Although Parallel inversions has had 3 versions, I have left this defect in there, because serendipitously, it sounds good. 

The A to K sliders are different again. This time they are panned either hard left or hard right, and they are distorted sine waves, instead of the purity of 0 to 11 and -12. So the A to K sliders add timbre and broaden the stereo image. Again, this isn't how normal instruments tend to work, but...

Finally, the lower row has more 'synthesizer'-type controls than is normal, with a full ADSR 'envelope' control, and I recommend the 'Attack' control for giving gravitas, and the 'Decay' control (with 'Sustain' set to near zero) for adding a 'Radiophonic' or synthetic character that sounds like it is from the 1970s. 

Straight Maths

'Straight Maths' has a busy user interface, but it extends some of the ideas in Parallel Inversions. The left hand side has 48 'Mic' sliders (yep, a lot!), whilst the right hand side has the extended 'synthesizer' controls, but in a more compact vertical format.

The three rows on the left are devoted to three different types of sound source. 

S - Top Row - additive synthesis

The top row (S) is sine waves (with twists) to provide simple Fourier additive synthesis. The '0' (zero) slider is again set as a hint that it is the fundamental in the default preset, but it does tend to get lost with all the other sliders! 

The three blocks of four Mic sliders on the top row have, from left to right:

- a Sine wave (0, 1 or 2 octaves up, shown as 0, 1 or 2), panned to the centre,

- a hollow-sounding, slightly square waveform (-), panned to the centre,

- a slightly bright, slightly sawtooth'y waveform (N (get it?)), panned to the centre, and 

- a detuned stereo 'sweetener' sine waveform (s) that adds a bit of interest and broadens the stereo image. If you want, you can ignore the 's' sliders and add your own preferred chorus effect via VST or outboard...

Yes, there's a bug with the 'S' in the two octaves up section, but that's part of the charm of the user interface, and does not affect the tone! 

The '-2' and '-1' mic sliders are sub-octave sine waves that can add low end to sounds. Use with care! 

As with all additive synthesizers, you mix and match the sliders to give you the combination of harmonics that you want, and then use the ADSR controls to give the sound a bit of shape in time. 

M - Middle Row - Karplus-Strong physical modelling

The second row has 16 different samples of metallic-sounding decaying sounds, derived from the Karplus-Strong hammered/plucked string physical model. '13' is my personal favourite, but it is way too strident for most purposes, and so just the merest hint of it is usually plenty! I resisted the temptation to arrange the sliders in any sort of order (previously I tried a 'tone-to-noise' arrangement), mainly because when I have tried to do this, I have rediscovered just how difficult it is to arrange multi-dimensional differences into a linear order. So I'm afraid that you will just need to play with the sliders until you get used to the sounds. Oh, and 10 and 11 ARE different, but not as different as I wanted! 

The 16 sliders are all tuned slightly differently, and are all stereo. This means that you can use combinations to add harmonics and detuning

My preference is to use the middle row to add a little bit of metallic 'bite' to sounds that are mainly top-row additive at their core. You can completely ignore this and do your own thing, of course!

W- Lower Row - Risset physical modelling

This row mis-uses Risset's work on synthesizing drum sounds, and adapts it to producing 'woody' sounding fast-decaying thumps and clunks to add percussive starts to the higher row sounds. There are four sets of sounds, arranged with the left-most sound in each set being the thickest (three sounds at once) and the others just single sounds. The detuning is toned back for most of these samples. These sounds are in mono, centered in the stereo image. I did play with stereo samples, but at low frequencies there isn't much to gain. To show how self-contradictory I can be, my '9126 Sawtooths' instrument on Pianobook.co.uk has way too much stereo bass!

It is quite fascinating how just a brief 'blip' of woodiness at the start of a sound that is all sine waves can totally change the character and timbre that you perceive. (Oh, and too much reverb is always a good idea!) This low row is influenced by the clicks found in old tone-wheel organs (the idea of adding percussive starts is not 'new' in any way!) and by the rather novel use of samples of the starts of instruments that Roland used in their D-50 synthesizer to augment a simpler digital synthesis technique for the sustained sounds. Roland called this mix of samples and synthesis 'Linear Arithmetic', so 'Straight Maths' is my way of paying homage to a classic 'personal favourite' synthesizer from the 80s. Okay, so now you know where the name comes from!

As before, the lowest row is used to add a little extra bit of character to the sound. The default preset  deliberately adds too much 'W' so that your first experience of 'Straight Maths' is 'Wow!'. Maybe that what the 'W' really stands for? But remember that subtlety is often the best approach, and too much 'W' may take you into cheesy territory...

Trivia

The rows were going to be labelled as: J, AK and C, for Joseph, Alexander, Kevin and Claude, but I thought this might be too obscure. What is interesting is that you now know a famous 'Kevin' - although Karplus still sounds uber-cool to me!

Letiti gave 'Straight Maths' a 5 star review, which is much appreciated, including this comment:

'One of the most innovative and unusual Pianobook entries'

For which I am enormously grateful!

---

If you find my writing helpful, informative or entertaining, then please consider visiting this link:


Synthesizerwriter's Store (New 'Modular thinking' designs now available!)

Buy me a coffeeBuy me a coffee (Encourage me to write more posts like this one!)