Tuesday 18 December 2018

Modulated Sine Waves Two Ways - a Recipe in Two Parts (Part 1)

I was one of the helpers at the recent Rebel Technology 'Gen' Workshop in association with the Music Hackspace at Somerset House in London, and I got inspired by the way that many of the attendees went beyond the basics and took a basic oscillator and modulated it with another, and modulated that, and...

So I thought that I should try to make a multi-oscillator generic version of this 'modulated oscillator' genre, and at the time I was using Max 7.3.5 and the Live-bundled Max 8.0.0 - the significance of this will become apparent later... As my previous 'BankOSC' device (and quite a few others, on various platforms!) reveal, I have a weakness for sound generators that make atmospheric drones, hums, buzzes and other background 'subliminal' noises - the sort of thing that makes the bridge of the star-ship Enterprise immediately recognisable (or the transporter noise, or the sounds or planets, or... Hmmm, time to activate the 'Star Trek' filter.)

Which begs the question, what is the underlying 'genotype' of modulated oscillators? Considering what I saw at the workshop, plus more years than I care to think about of experience, I eventually decided that it was something to do with themes like: detune, tremolo/'ring modulation' (AM) and vibrato/'frequency modulation' (FM). Now as with slash fiction (don't look it up if you don't know about it), it is the juxtaposition that matters, and here it is the broad range that tremolo (usually interpreted as meaning low frequency (10 Hz or less) amplitude modulation) and ring modulation (usually interpreted as audio frequency (20 Hz to 20 kHz) amplitude modulation) imply that is the key, and this applies to FM as well. So wide range was essential, which mean using 'exponential' scalings to keep a huge range manageable with a single rotary control.


This is a very broad specification, so I cut it down to something simpler for my first attempt, mainly because there are limits to what you can do on platforms that use gen, like the Rebel Technology devices (OWL Pedal, OWL Modular, Alchemist, Wizard...) Now, I've always preferred FM to AM because it seems to provide a broader range of timbres, and so I went for FM, leaving AM for another day. I also restricted the waveforms to sine wave, because one of the major constraints is the number of controls. (4 rotary controls, one expression pedal input and one switch on the OWL pedal, for example) I also like auto-pan, and so I subverted the AM into simple panning just to give movement to the output. Here's the gen code and the block diagram for what I made as my underlying oscillator module:

So there are two oscillators, one detuned by 1.001 (I didn't spend any time optimising this!) and a straight-forward LFO-driven anti-phase panning circuit. Above this, there is the modulation section, which has another LFO (that can also run at audio frequencies...) and uses a '+' add object to do the modulation. This gives 'linear' 'vibrato-style' FM and so I chose a suitable frequency range of 0.01 to 2.5 Hz (look in the Param C 'scale' object) - if you replace the add with a '*' 'multiply' object (and tweak the scaling multiply and set the LFO to run at audio frequencies) then you get the 'multiply' FM (frequency modulation) variant. 'Linear/vibrato' gives a milder sound, whilst 'Multiply/FM' is much brighter in timbre.


 Here's where the oscillator module fits into the main gen code. At the top there are interfaces to the rotary controls etc., followed by slide objects to smooth any bad connections in the potentiometers, and then scale objects to turn the 0 to 1 range into useful ranges for the oscillator module. The 'Spreader' gen object is my attempt to turn those single values into a range of values - there's no point sending the same control values to all of the oscillator modules, because they will then all make the same sound. So what the spreader does is turn one incoming value into several different output values, and the range of those output values is set by the 'Spread' variable.

When I wrote the spreader object, then I was using Max 7.3.5 and the bundled Max 8.0.0 that comes with Live 10. I didn't have Max 8.0.2, and so I hadn't seen the 'spread' object that is included! However, that spread object is in Max, and not in gen, and so it won't work for projects that can only use gen, as is the case with devices like those from Rebel technology.

Having to work exclusively in gen also has other consequences. One type of object that is often used in Max projects is the toggle - either the 'box with a cross', or a text box that can be used to set values to on or off. In Max this is fine, but in gen there's no such object, and what you usually get is just a push-button that goes from 0 to 1 when you press it, and from 1 to 0 when you release it. So the button has a 'momentary' action, and you can use it as a toggle that stays in one of two states, and when you press the button is goes to the other state. In order to implement this, then you need to store information about the current state in an object, and then to change that state when the button is pressed. Because this isn't needed in Max (there are already objects that provide 'toggle' outputs), then there aren't any ready-made objects in gen that solve this. So what is needed is something that turns pushes on a switch into toggling between two values.

Toggling

This sort of functionality is called sequential logic, and one of the standard ways to store a specific state is to have some feedback around a logic gate. Here's an example:


Now you don't need to know that these are NOR gates, or have any specific knowledge of how sequential logic works, because how this works is really straight-forward if you just follow what happens when we change the value of the 'Set' input from 0 (zero: false) to 1 (true). Those two gate symbols do only one thing: if either of the inputs is true, the output goes false. You can think of each NOR gate as being a bit like a person who is watching a room via closed circuit television. If they have been told to say when the room is empty, then as soon as one or more people enter the room, the room is no longer empty. So when the Set goes to 1 (true), then the output of the first gate will go to 0 (false). But this output is connected to another NOR gate, and so because Reset is also 0 (false), then this gate will output 1 (true: the room is empty!), and so the value of 'Output' will be true (1). But that true (1) value is fed back into the input of the first gate, and so that input will be 1 (true). So now there is someone in the room, which means that it isn't empty. And no matter what value 'Set' has, there's still someone in the room, and so it stays false (0), which means that the 'Output' stays at 1 (true). In order to change things, then we need to change the 'Reset' input from 0 to 1 (false to true), and then the second gate will no longer have two false at its inputs, and so will go false (the room is no longer empty!). Once the 'Output' goes false, then this goes back via the feedback to the input of the first gate, and so that now has two false, and so the output stays at true (1) (the room IS empty).

In other words, if Set goes from 0 to 1, then the value of Output goes to 1 and stays there, and after that, Set can return back to 0 because that won't affect the Output. The only way to affect the Output is to have the Reset go from 0 to 1, because that will then force the circuit to change the Output to 0 and stay there. 

So, remarkably, this simple pair of gates acts like a memory that can be set and reset. Setting and resetting a value sounds like what a toggle switch does - it sets something, then resets it, and so the state changes every time that we do a set or reset.

So to implement a toggle switch, all we need is a bit of feedback, and some way of using just one 'Set' input to do the setting and resetting, instead of two separate inputs. In gen, here's an example piece of code that does exactly that:


The input is from the push button, and goes from 0 to 1 when it is pressed, and then back to 0 again when it is released. This is turned into a quick pulse by an edge detector circuit, which is used to trigger a latch that holds the value. But we need to have the toggle action, and so we can't just put the input value in, we need to alternate between the input and its inverse. So the output of the store is delayed by the 'Previous' time delay box (1 sample delay), which then selects the inverse of the input, then the input, and so the value that is latched changes back and forth between 1 and 0 for each press of the push button. So this gen code provides exactly the 'toggle' action that is needed. 


Looking again at the main gen code, the toggle code is inside the 'gen @title toggle' object, and when the push-button is pressed, the output of the toggle object output goes to 1 and stays there, then when the push-button is pressed again, the toggle object output goes back to 0 and stays there, and so on.


The output of the toggle is multiplied by 0.4, and this is then smoothed into an envelope by the 'slide' object, which then controls the fade in and out of the volume at the outputs. 


At the very top level for the project, you can see the test controls that emulate the controls in the Rebel Technology devices: in this case an OWL pedal with four rotary controls, and Expression Pedal and a Push-button. All of the gen code from earlier is inside the gen~ object. You can also see the extra Max objects that I used whilst debugging the gen code during development - gen doesn't allow the same sort of monitoring of value directly, and so you need to use extra out<n> ports to send values up to this project level where they can be displayed. 

Upload and Download


The final result was compiled into C++ by the gen compiler inside Max, and the result uploaded to the Patches area on the Rebel technology web-site, from where it can be downloaded and put into any of the compatible devices. You may notice that there are two different versions: one for the 'Linear/Vibrato' and one for the 'Multiply/FM' versions of FM. To keep things simple, I have named these based on how they sound, not strictly according to how they work (they are both really FM!). Why two different versions? Well, there wasn't an easy way of switching between the two variations of FM because I had already used the push-button to fade the volume up and down. Of course, there's nothing to stop you altering the code to suit your own purposes...

In Part 2 (coming soon), I will take the gen code developed here, and make it into the core of a MaxForLive device...

Thanks

Thanks to everyone at Rebel Technology and the Somerset House Music Hackspace for a wonderful day!


Friday 14 December 2018

TR2gen Revisited - resulting in a Probabilistic Chord Utility for Ableton Live

In 2017, I published a free two-step, two-bar triad generator that made simple chord progressions very easy to produce, and the main feedback was that people loved it and wanted more steps and more chords.

After thinking about this for a year, and having produced lots of devices that utilise probability (the 'Probably' series), then I came up with a way of extending TR2gen into something that included 'more': and it is called ProbablyCHORD.


ProbablyCHORD

ProbablyCHORD takes a lot of inspiration from ProbablyR, the latest monophonic sequencer in the Probably series - it has the same style of probabilistic grids, the same generative control, the same separation of notes and octaves,  and the same rainbow colour coding of sections (which seems to be becoming fashionable in commercial plug-ins too!). Underneath, the core is TR2gen, expanded and with new features to make it more flexible, more powerful, and more powerful. In summary, the same but 'more'! (And still FREE!)

The 'elevator pitch' goes something like:

'ProbablyCHORD is a free multi-step, clip-event triggered, generative and probabilistically controlled chord generator plug-in device for Ableton Live, implemented in MaxForLive.' 

It can be thought of as the 'chord' companion to the 'melody' ProbablyR sequencer. (and any following devices in that series...)

Although it looks very simple, there's actually a lot going on, and you need to do some setup before ProbablyCHORD will work properly when you first use it. So the following instructions are deliberately detailed so that you get familiar with how it works and what it can do for you.

(I probably need to warn you that music theory is not my strongest skill set, and so some of the stuff on chords that follows may not be 100% correct...)

From left to right, the sections are:


Root and Control

The top part of this section is the 'Octave' grid. The two default 'white' (which can also mean 'highlighted with the vertical scrolling colour bar') cells mean no transposition - as indicated by the +2...-2 labels on the right hand side of the section. If you click on any of the cells above or below then you will get a new white cell for that step, and a note will be generated when the sequencer reaches that step - or rather, the note that is output at that step will be either of the notes represented by the cells that are white. So if the '-1' cell and the default '0' cell are both white, then half of the time the root note will be produced, and half of the time a note one octave down will be produced.

At the bottom of the section are two slightly larger white boxes that control the root note - and they default to white. As the sequencer steps through, the coloured bars scroll across each grid - in the screenshot above, step 1 is playing, and so the root note white box is highlighted in red. If you click on either of these root cells so that it goes grey, then the root note will not play (even if you have a white 'octave' cell in the octave grid above). The Octave Grid is always over-ridden by the note grids in the lower pat of each section.


The big number selector in the centre of this section is the Step selector. In the screenshot this is 2, which means that there are two steps in the sequence. To the right is another selector, which shows 'A' for automatic - this controls the note length, and can be fixed (to a variety of values: 1 = short, 9 = long) or automatic. Automatic should be fine for your initial explorations...

The 'Step->' button advances the sequence by one step each time you click on it, and causes notes to be generated so that you can hear the result of adding white cells to the grids. ProbablyCHORD doesn't use Live's timing directly, but instead it uses note events in clips to tell it when to generate a chord, and how to pitch that chord. So one of the first tasks is to generate a clip that has four monophonic notes on beats, in the track that ProbablyCHORD is in.


Here's probably the simplest clip contents: four C1s on the beats, and a very boring chord progression. I would recommend leaving John Coltrane's 'Giant Steps' for a little later on! Note that the pitch of the notes on the grid transposes the chords, so this clip will cause C1s to be played as the root of the chords that ProbablyCHORD produces. You could try changing the notes and see what happens... Remember that this clip MUST be monophonic: one note at once!

Once the clip is done, then starting the clip should move the vertical colour bars across the grids in ProbablyCHORD, and depending on what white cells are present in the grids, and assuming that you have added an instrument after ProbablyCHORD, then you may get some notes. By default you should get the root note from the 'Root' section. A 'piano' type sound is good for the instrument that you have in the track, although I have a personal weakness for using cello sounds for chord progression development. What you should notice is that although there are four notes in the clip, there are only two steps in the sequence, and so ProbablyCHORD will repeat the steps twice for each repeat of the clip.

If you go to the 'Step' selector and choose '4' steps, then the number of notes in the bar will be the same as the number of steps, and so they will be kind of aligned, although not necessarily starting at the same time. You can click on the left circle just above the root note grid to advance the step sequence (same as clicking on the 'Step->' button), or click on the right circle to restart the sequence from step 1. The left circle will also flash with each step... I'm still trying to refine the synchronisation of the start of the step sequencer, and making it more controlled is one of the goals for future releases.


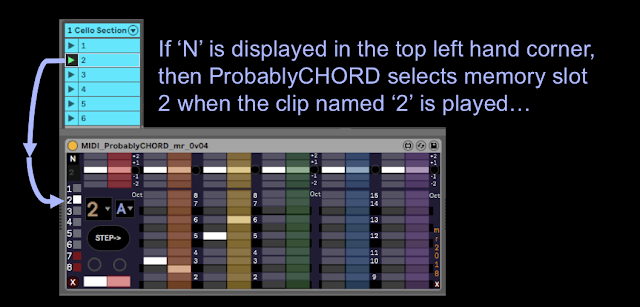
Whilst your attention is on the clip, you might like to try naming it with a number, and restarting the clip to play: '1' is a good value to try. At the very top left corner of this section is a letter 'N' or 'C' - this is a toggle button that controls how clip names affect ProbablyCHORD. If 'N' is displayed, then the clip name (which must be a number) will select the step sequence that ProbablyCHORD will play. So the number immediately below the 'N' (or 'C') is the current step sequence number, and the square below this are the step sequence memory slot buttons. In the screenshot above, the clip named '2' is playing, and so memory slot number 2 has been selected. (shown by the number 2, and the white highlighted memory slot button) If you don't put a number in the clip name, then nothing will happen - although you can always click on the memory slot buttons to recall a memory, of course.


To store the settings in the grids in ProbablyChord into a memory slot, then you just shift-click on one of the memory slot buttons. Empty memory slots are dark red. Memory slots with saved grids inside them are grey (or gray). The currently recalled memory slot will be highlighted in white. If you save to a memory slot then you will lose whatever was in there before you saved! Finally, at the lower left hand side, below all the memory slot buttons, there is a dark red button with 'X" on it. This CLEARS all of the memory slots - they will go dark red and will all be empty. Use this with care - it is a good idea to use this 'clear' function when you first use ProbablyCHORD in a track, and then once you have stored a step sequence in a memory slot, you should save your Live Set, which will save the memory slots as well.

First Octave


I'm calling the octave above the Root note the 'First Octave', mainly because there's another octave grid higher up, which we will come to later...

As with the Root section, the upper part is for octave grids, and the lower part is for note grids. In this section, there are three pairs of grids: one for each note that we add above the root note in a chord. So in the screenshot above, the root section is playing the root note, and this is transposed based on the note that is in the clip. So in the clip that was shown earlier, the root will be C. In the octave above that C, the grid with the orange scrolling bar plays a note above the root, and the 'yellow' grid plays another note above the root. So the combination of the root section, plus the first two grids in this first octave, gives us a triad: the root plus two other notes. The third grid in this section is for any extra note that you want to have above the root, and remember that the note grid over-rides the octave grid, so if there aren't any white cells in the note grid, then no note will be generated, regardless of what the white cells in the octave grid might suggest.

The note grids in this section are numbered as intervals from 1 to 8, where 1 is the note above the root (which is zero (0)), 2 is a 'second' interval, 5 is a fifth, etc. So the dark gap between 2 and 3 is a flattened third, or a sharpened second.


If we look at the orange grid, then there are two white cells: the first step has a white cell in the third, and the second step has a white cell in a flattened third. The yellow grid has a white cell in the fifth for the first step, and a 6th for the second step. If we look at each step in turn, then the first step has the root, plus a third, plus a fifth - which gives us a major triad, and if the root is C, then it is C Major.


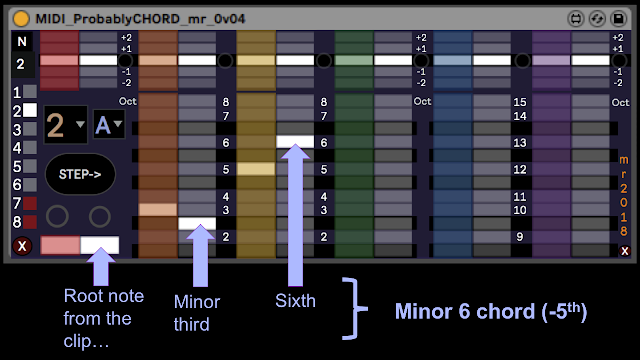
For the second step, then the root is the same,  but the third is flattened, and you would normally expect a fifth to give a minor chord, but I have changed the interval to give a Minor 6 chord without the fifth, which I like the awkward jarring sound of, but which isn't going to be to everyone's taste. If the fifth was present in this second step then ProbablyCHORD would be producing exactly the chords that TR2gen would produce when playing a Major/minor sequence, but ProbablyCHORD has no such imitations, and this illustrates that you are free to do whatever you like with making chords.

This also illustrates an important part of the design of ProbablyCHORD. What happens if the clip looked like this instead of just repeated C notes?


With this clip, then the root for the first step is C, but for the second step then it is D. So although the layout of the notes looks like it is in the key of C, this is just to make entering chords easy, and it also keeps the graphics from becoming mind-bendingly complex. All you need to know is what intervals make up the chords that you want to use, and you then enter them in the key of C into the grids. The clip then sets the root note, and so whilst the first step produces a C Major chord as before, the second step now produces a D minor 6 chord. (or a D Minor if you have used a fifth instead.)

ProbablyCHORD thus enables you to enter chords easily, without needing to know anything more than the intervals that are inside them, and the clip the sets the root. Ordinary triads are going to have the same thirds, flattened thirds and fifths, and they are always going to be in the same place on the grid, because the clip will cause the transposition of the root. The output of ProbablyCHORD is not just what you see in the grids - it is a combination of the grid plus the transposition in the clip.

Because this simplifies the entry of chords, I have resisted the temptation to provide a drop-down menu that inserts pre-prepared chords into a step (there are plenty of apps that do this already!). The simple entry of intervals enables you to concentrate on the sound of the chords, instead of the names, and the clip transposition means that you never have to think about the structure of chords in any key other than C. If you want to look up the structure of chords in books, then feel free to do so and put their intervals into the grids - there are a number of useful low-cost apps for mobile phones and tablets that can provide the same information in electronic form.

The third grid in the first octave is green, and could be used to add additional notes to the triads - sevenths for example.

Second Octave


The second octave is two octaves up from the root, and can be used to add notes with intervals like 9ths, 11ths and 13ths.

There's a tiny little 'X' button at the lower right of this section. This clears all the grids, and is probably something you should click when you first start up ProbablyCHORD...

Probability

Up until this point, the grids have been used to produce single notes, but these are probabilistic grids! If there is more than one white cell in a vertical column, then the probability of that white cell causing a note to be output is distributed across all of the white cells. If there are two white cells in a vertical column, then each will occur about half of the time, on average - the actual choice happens randomly. If there are three white cells, then each possibility happens about a third of the time...

If we go back to the original 4 sep clip, and change the steps to 4, then ProbablyCHORD and the clip are in bar sync. Let's add some white cells to the note and octave grids in the first octave section, and see what effect having more than one white cell in a vertical column actually has on the output.


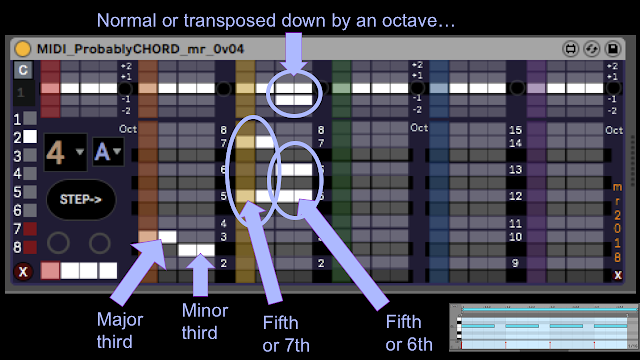
For the orange grid, then we have a third in the first two steps, followed by flattened thirds in steps 3 and 4 (so suggesting a major chord followed  by a minor chord), and there is only one white cell in each vertical column, so the output will always have these notes at these steps. But for the yellow grid, then steps 1 and 2 have fifths or sevenths, and steps 3 and 4 have fifths or 6ths. So for steps 1 and 2, we will get either a fifth or a seventh to accompany the third, giving either a Major chord or a 'kind of' Major 7 chord (without the fifth). For steps 3 and 4, then the output will be either a fifth or a 6th, and so the output will be either a minor chord, or that minor 6 chord that I like again.

But don't forget the octave grid for steps 3 and 4 in the yellow grid. There are now two white cells in the vertical columns: one in the default cell, but two more in each column for the -1 octave transposition. This means that at random, the notes in steps 3 and 4 in the yellow grid will be transposed down by one octave - about half of the notes in any time period will be one octave down, and half will not be affected. In terms of what this does to the chord, then it gives an inversion of the chord - the fifth or sixth notes in the yellow grid might be transposed an octave down, below the root note. You could put similar 'inversion controls' in the orange octave grid if you wanted, and this would allow you to control when the thirds were transposed, giving other inversions. In other words, whilst it may be called an 'Octave' grid, it is actually used mainly to control inversions of the chords. If we think back to TR2gen, then that had a much simpler control that didn't give this degree of flexibility.

More clips

Up until now, the clips have been very simple, but ProbablyCHORD just uses them as events that control the transposition, and so you aren't limited to straightforward 'on the beat' notes, nor are you limited to simple transpositions. Here are some other possible clip contents:


This clip has F as the root for step 1, C# as the root for step 2, B for step 3, and finishes with D for step 4. If the grids were set up with a simple two steps Major, two steps minor sequence, then this would give an output of F Major, C# Major, B minor and D minor.


This clip has twice the number of note events in the bar, and so the output of ProbablyCHORD will be at that rate, so a 4 step sequence will play twice per clip bar. The output chords will jump up and don by octaves every two notes.


Not quite a Coltrane cycle, but this clip runs through five different roots in the bar, and with the 8 step sequence in ProbablyCHORD, then this clip will also trigger two runs through the sequence per clip bar.


Finally, let's throw away 'on the beat' timing, and trigger the chord generation in a somewhat less 'dance-floor friendly' way...

Velocity

Ableton Live's factory device called 'Velocity' is very useful for manipulating the velocity of MIDI notes (an under-utilised function of Live, I would say...). You can put the Velocity device between ProbablyCHORD and the Instrument that you use to make sound...


In the screenshot above, I have deliberately compressed the MIDI velocity values so that the Cello Section has lots of drive, and to provide 'voicing' of the chords I have added randomness to the velocity values. The SoundCloud demo uses a variation of this setup, with LFOs driving the articulation. 'Three Steps from L(ive)' territory, in some ways...

Comparison

How does ProbablyCHORD compare to TR2gen? Well, here are the controls for TR2gen mapped onto two-thirds of the first octave grid in ProbablyCHORD:


The above screenshot shows the default TR2gen 'inversion' settings - which produce no inversions at all, when the R, 3 and 5 buttons are all highlighted. The 'MAJ' button is like the 3rd white cells in steps 1 and 2 of the orange grid, and the 'min' button is like the flattened 3rd white cells in steps 3 and 4 in the orange grid.


The '- button produces inversions where the Root, third and 5th are transposed down by an octave, and these are like the white cells in the octave grid. Only the mappings for the 3rd are shown here to keep things simple. The octave grid in the yellow grid controls the inversions for the 5ths.


The '+' button is for inversions where the Root, 3rd and 5th are transposed up by an octave. The equivalent in ProbablyCHORD is again the octave grid, and once again, only the thirds are shown.


The'+-' buttons in TR2gen control inversions where the transpositions can be up or down by an octave (or no transposition at all). This is like having white cells up and down an octave in the octave grid in ProbablyCHORD.

Note that ProbablyCHORD provides extra control over the transposition of the notes, so you can have an inversion mode that is not possible in TR2gen, where the notes are transposed up or down an octave with 50% probability - this is done by removing the white cells in the middle '0' default row in the octave grid, and only having white cells in the +1 and -1 rows. Also ProbablyCHORD allows notes other than the 3rd and fifth to be added to chords. Finally, ProbablyCHORD can have steps other than 2! Up to 9, in fact. (although the gird is quite small when this is the setting...)

Inversions

At the risk of too much music theory, here are some screenshots of the various inversions for a basic three note triad:


The basic Major triad has the Root, the 3rd and the fifth. This is the default, with the 'Octave' grids all showing just the middle position, and so the chord is exactly as defined by the note grids, and doesn't change. A little bit repetitive..

ROOT


The three screenshots above show the Root section (Red) with the octave grid rows for +1 and -1 filled in with white cells. The three shots show: the basic chord with the root not transposed; the root transposed one octave up, and the root transposed one octave down. With these settings, each of these chords will be equally likely, and so each will happen about one third of the time, on average.

THIRD


The above three screenshots show the orange grid, which has white cells in the note cell for the 3rd interval, so this is making the middle note of he basic triad. The octave grid has +1 and -1 white cell rows added, and the three shots show the third in: the normal position; one octave down; and one octave up.

FIFTH


The above set of screenshots show the yellow grid, which has a row of white cells producing a fifth interval in the output chord, corresponding to the fifth in the basic triad. The octave grid again has the +1 and -1 rows filled with white cells. The screenshots show: the basic triad with no inversions; the fifth transposed up one octave; and the fifth transposed down one octave. As before, with these settings, each of these chords will occur with about 33% probability on average, over time.

Finally, here's a shot of all of the possible notes that can be produced using if the octave grids for these three notes are all set to +1, 0 and -1. In reality, only particular sets of three of these notes will ever sound at once - this is a composite of all the possibilities:


Determinism

ProbablyCHORD tries to abstract a lot of detail behind what looks like a very simple user interface (like forcing everything to be rooted by a 'C' that can be any note, or making it event-driven instead of being tied to repetitive timing), and the idea behind making almost every control probabilistic via the grids is to introduce variation and unpredictability into music. But if you only put one white cell into a vertical column, then you are in direct/unambiguous control of that parameter - it becomes deterministic. So whilst you can use ProbablyCHORD to generate music with randomness inside it, you can also use it to generate exactly what you want, without variations, where it plays the same every time.


Here's an example of using ProbablyCHORD purely as a deterministic chord generator. Can you figure out what famous piece of music these are the first four bars of?

ProbablyCHORD

That completes this quick introduction to ProbablyCHORD. I hope that you can understand what it does, and how it does it! Most of all, I hope that you can see how it might help you to make music by allowing you to explore chord progressions with minimal effort and yet have a lot of flexibility.

You can find an example of ProbablyCHORD driving a simple Instrument Rack inside Ableton Live (I love using LFOs to control articulation, and I often use the 'Velocity' MIDI effect for adding random velocity so that the voicing of the chords varies) on Soundcloud.

I am preparing videos showing ProbablyCHORD in action.

Getting Probably Chord

You can download ProbablyCHORD for free from MaxForLive.com.

Here are the instructions for what to do with the .amxd file that you download from MaxforLive.com:

     https://synthesizerwriter.blogspot.co.uk/2017/12/where-do-i-put-downloaded-amxd.html

(In Live 10, you can also just double-click on the .amxd file, but this puts the device in the same folder as all of the factory devices...)

Modular Equivalents

In terms of modular equivalents, then reproducing this functionality in my modulars seemed like it should be simple, because all it requires is a 9-step sequencer and some logic, but coding up all of the logic isn't as easy as you think, and quickly eats up modules, and you rapidly get to the point where you want to step outside of the 'basic modules only' rule and go into custom programmable specialist modules. So my estimate is that full functionality is going to require a step sequencer, clock source, a random generator per grid, and then a couple of utility logic modules per grid, which quickly gets us to about 20 ME.

Buy me a coffeeBuy me a coffee


Wednesday 12 December 2018

USB Chroma Cables from DJ Tech Tools - my favourites!

Every year, starting in late November, DJ Tech Tools in California has a 'Black Friday' sale, and this is when I tend to buy their Chroma Cables. Yep, I get cables shipped internationally, and here's why... (keep reading for lots of tips for managing cables, power supplies, equipment...)

DJ Tech Tools' USB Chroma Cables are the best I have ever used, and I have a lot of USB cables! They come in lots of colours, which makes it very easy to connect up your equipment and keep track of what is connected (and what isn't). Not having everything connected properly can be bad news, and if all of your cables are black, then tracing them can be time-consuming and error-prone. So, for me, the more colours the better, and Chroma Cables come in 6 colours, plus white and black. The colours aren't over-saturated and dark (except for the black cables!), so it is easy to see them in poor light, but, more importantly, it is also easy to add permanent marker dots to show which way up the connections should be (I love USB-C's because they don't have this problem!) - yes, I'm one of those people who put dots and stripes on cables to make them easier to use. (I also put permanent marker on laptop keyboards for a different reason...)

The sort of marker pen that I use.

I'm sure you can be neater than this...

Design

In fact, the design of the Chroma Cables is actually very subtle - that indented logo makes adding neat dots very easy with a permanent marker pen, and you can code cables with one or two dots quickly and with very little effort. For fine work like this then I use fine tip waterproof permanent pens, and these are good for labelling too. For black cables then you can also get white permanent markers to add those all-important dots!

A 'current style' DJTT Chroma Cable (Note that this Chroma Cable is so new that I haven't yet added a 'this way up' dot with a permanent marker pen...)
An 'old style' DJTT Chroma Cable...
To match up to the Chroma Cables, I also put small self-adhesive coloured dots onto the back of equipment close to the USB sockets - so, for example, I know that the purple USB cable with one stripe goes from the <insert fashionable device here> sequencer to the <insert classic brand name here> sound module... and for those 'annoying but they keep the equipment small and neat' dangling adapters like mini-jacks to MIDI DIN then I use clear heat-shrink tubing over the plugs to protect the coloured dots. You might think that you can just use clear adhesive tape to do this, but over time, it gradually unwraps and goes opaque...

Old adhesive tape goes yellow and loses transparency...
Chroma Cables come with velcro cable straps, which is good for keeping them neatly looped, but I find that the plugs on the end of cables still tend to get caught/tangled because they are wider than the cable.
The plugs are almost always wider than the loops in the other cables...
So I also put each cable in a clear zip-seal plastic bag, which keeps them separate and easy to use. Once you have sorted out your cable storage in this way, then you will never need to waste time struggling to unravel huge knots of cables ever again.

Cables in clear zip-seal bags never get tangled...
Velcro cable straps are not only useful for keeping cables in loops when they are not is use - they can also be used to keep cables tidy and routed when they are in use.

Velcro cable straps... Note that DJTT call these 'USB-A' cables, whereas in fact, they have a USB type A plug at one end, and a USB type B plug at the other...)
You just wrap the strap round associated cabling, so that the MIDI, audio and CV cabling for a device is all in a single loom - and if each cable has a velcro cable strap, then you have several points at which you can loom them together. (so buying coloured velcro cable straps for any cables that don't have them is a good idea too!)

A labelled power supply is a happy power supply!
Another tip that can be a life-saver is to put self-adhesive address labels onto all of the power adapters, wall warts, power, supplies (insert your own name for these little black nuisances here), and then write on them the name of the device that they are supposed to connect to. If you do this when you first unbox the device, then it saves a lot of 'Is this the correct power supply?' questions later.

Just some of the power supplies I have acquired over the years...
With a wide variety of voltages, and different polarities (not all devices have the same polarity as guitar pedal power supplies - so beware!) then it is very easy to connect the wrong power adapter to your device and this can be an expensive mistake... Coloured dots, labels and clear heat-shrink tubing can be used to make connecting everything up correctly quick, easy and hard to get wrong!

RF suppression ferrite 'bulges' at both ends...
Most ordinary USB cables don't have any RF suppression, and in these times of everything becoming increasingly 'wireless' then you don't want interference from mobile phones, wifi, wireless doorbells/garage door openers and other RF sources getting into your audio or computer connections. Ferrite RF suppressors are those bulges that you see on some cables, and they help to prevent high frequency interference from travelling down the cables. Chroma cables have the tell-tale bulges, of course...

Gold plating...
Gold-plating the external metal is one of those features that you don't see very often on computer-oriented USB cables, and Chroma Cables get a tick in that box too. This sort of fine detail is one of those things that pays dividends over time - after several years of cycling between hot and cold temperatures, in damp, dusty, smoky and greasy environments, then anything that helps to make sure that you get good reliable electrical  connections is well worth having - and gold is a valuable metal precisely because it doesn't degrade in challenging conditions.

Topology

Finally, there's the topology: straight or right angle? Chroma Cables come in both, although there are four different ways that you can have right-angle USB-A plugs, and Chroma Cables only have one of these. If you search around, then you can find USB-A right angle plug to straight socket cables/extenders (sometimes called 'USB printer extension cables'), which can sometimes give you some of the other possible orientations.
A right angle 'barrel' power connector, and a non-Chroma Cable with a black dot...
For those times when the power socket is right next to the USB socket, then you can also sometimes find extension cables for the power supply that have right angle plugs, which may fit inside the USB right angle - or may not! Some 'universal' power supplies come with right angle plugs, although then you have all of the complication of making sure that the polarity is correct (for which a cheap multimeter is very useful!) Unfortunately, there are so many sizes and variations of 'barrel' power supply connectors that finding the right one can be difficult...  There's a lot more to socket topology than some manufacturers seem to be aware of - particularly when there's limited space between the back of the DJ booth and your equipment.

One final thing about the physical relationship between sockets and equipment is the 'socket hidden behind the device', which happens with lots of music gear - the sockets are all around the back, where you can read the markings. Cue for more labels:

A TX7 module from the front, with a very old painted blue MIDI plug (from before I discovered self-adhesive dots). So which MIDI socket is the plug connected to? (The MIDI In, of course) Now imagine the same photo without the label... 
One interesting alternative to having separate USB and power cables for devices is to use a combined USB/Power box - often called a 'MIDI USB Host' or a 'USB MIDI Host' or a 'USB Host to MIDI 5-pin DIN Converter'. These provide a type A USB socket, a power supply socket, and one or more MIDI sockets (often just MIDI Out), but the important thing is that they mean that you only connect one USB cable to the device, and it gets power and MIDI data through that... Unfortunately, MIDI USB Hosts boxes tend to be confused with ordinary USB MIDI Interfaces where the power comes from the device (instead of externally), some devices don't like you not connecting the power and using just the USB socket, and there can be problems if the device already implements a MIDI USB Hub/Host internally. There's a whole blog post just waiting to be researched and written up on this topic...

Other cables...

So far I have concentrated on USB-B cables, because that's how the majority of my equipment (like my MIDI Fighter 3D) is connected to my computer, but Chroma Cables are also available in USB-C, and for Audio Cables too. Both of these are on my shopping list... and may well get reviewed in a future blog post.

In conclusion

The best justification for buying and marking up good quality coloured cables (like DJTT's Chroma Cables) is that they are like an insurance policy to help mitigate unexpected difficulties in the future. Trying to find a bad connection on a dark stage, an 'atmospherically-lit' recording studio, in a cramped home studio or a 'cables everywhere' DJ booth can be a nightmare, and anything you can do to avoid that sort of problem is well worth it. Making your setup and tear-down easier reduces hassle and stress (on you and your cables) and leaves you free to concentrate on making music happen. And for permanent installations, then labels, colours and dots can make maintenance and adding new equipment simple and quick too.

Sources:

Chroma Cables: DJ Tech Tools (There are other cables, but these are my favourites)

Also, a selection of places to start looking for related items mentioned in this post. This is not meant to be exhaustive (there are many other suppliers), so do your own research before buying

Self-adhesive dots: Stationery shops/stores, or try Amazon
Clear heat-shrink tubing: Electronic shops/stores or try Amazon
Permanent markers: Stationery shops/stores or try Amazon

Velcro cable straps: DJ shops/stores, audio equipment shops/stores, or try Amazon

MIDI USB Hosts:
Excel Valley
Hobby Electronics
Kenton UK
Mode Machines
MIDITech (this website has a very clear separation of MIDI Hosts from MIDI Interfaces!)
iConnectivity (I use these...)


USB Types: A, B and C


Since I have mentioned USB type C, then this is probably a good time to look at USB plugs and sockets in a bit more detail. So what are the different type pf USB plugs and sockets, where are they used, and why do you always seem to have different plugs or sockets at each end?
USB type A plugs
USB type A is the flat rectangular plug/socket that you find on computers, memory sticks, flash drives... You know, the ones where you always need to turn them over to push them in, and often you need to turn them over twice... You won't normally find type A sockets on a printer* or a MIDI Interface**... except...

Okay, so there are exceptions!
*   Printers that allow you to print from flash drives can have type A sockets so that you can plug in a flash drive. But you can't use this socket to connect a computer to the printer - especially because you should not be able to find a USB cable that has a type A plug on both ends.
** There is an exception for some specialist MIDI boxes - go to the 'Topology' section in the main part of this post for more information...)

USB type B plugs
USB type B sockets are often used for 'printers' and MIDI interfaces. It is the 'squarer' shape with two chamfered edges. Some MIDI Interfaces use 'micro' USB type B sockets to save space.

The USB cables that you will normally use when you are working with MIDI Keyboards or Controllers will have a type A plug on one end, and a type B plug on the other. This is a deliberate part of the careful design of USB: there are different sockets on each end of the cable, so that you can't do things like connect a printer to a printer, or a MIDI Controller to a MIDI Controller, or a flash drive to a flash drive, and then complain that nothing is happening...

USB type C plugs
One final exception is the latest version, USB type C, and they are the small rounded connectors that look kind of mid-way between a type A and a micro type B. They can be plugged in either way up! Also, they break the 'rule' about having different plugs or sockets on each end!

If you are interested, there's a technical document about the USB Device Class Definition for MIDI Devices which describes what USB-MIDI is all about. Warning: This is a document written in the style of a technical standard - it is not intended for casual reading.

For more general technical USB information, then there's a good introduction here.

For USB MIDI Interfaces, then here's a pretty good troubleshooting guide.


Just in case you were wondering - I don't have any connection with DJTT (other than buying things from them), and I bought all of the cables.