Thursday 30 September 2021

Step sequencer for echo delay time...

Now if this was a YouTube channel, then I might well be posting videos with click-bait titles in an ongoing quest for subscribers (or publicising an amazing device like the Rebel Technology 'Witch'!). 

But this is a blog, and I'm happy to post anything I do, that might be useful, which is why there's an eclectic mix of topics on here. And yes, I know that I haven't covered MaxForLive for a while, and there's a very good reason for that. 

Anyway, here's a little bit of fun that might be useful to some of you, or could serve as inspiration for further exploration. I'm almost tempted to post a version on YouTube with a Click-Bait-oriented title just to see what happens... 'Expression Sequencing - What you need to know!' 

Photo by Steve Harvey on Unsplash

Step Sequencing

Okay, I admit, I've been a fan of step sequencers since seeing Tangerine Dream back in the 70s at the Liverpool Empire. Dry ice clouds, mist curtains, mirror balls, CO2 lasers, guitar solos from Edgar Froese and just one or two step sequences - it was quite an experience. Since then, I have acquired a few hardware step sequencers (a Zaquencer, for instance - very nice!), and programmed a few (several in MaxForLive, for example), but my latest acquisition is a little bit different: a mix of old school (8 steps!) and new-ish school (MIDI Clock sync!). But not a Eurorack module - nope, this is a 'guitar' pedal. 

Now, I was raised on Electro-Harmonix pedals (I always wanted an Electric Mistress Flanger!) and I've gradually been getting a few modern examples, purely for research purposes, you understand. The 'pedal' in this case is on the borders of the pedal-world - it is the 8 Step Program: a CV/Expression sequencer. 

Sequencers in pedals are quite unusual, or at least, from my limited viewpoint, that seems to be the case. The Strymon 'Night Sky' has a sequencer to ty and liven up the shimmer reverb, is one example, and I'm not immediately familiar with any other examples. Of course, with thousands of pedal manufacturers and hundreds of pedals released every month (week? day? hour? minute?), then there could well be many other examples, but I'm beginning to think that it is not humanly possible to keep up with pedal releases any longer. Although, if anyone can, it would be Josh Scott of JHS Pedals...

Actually, the step sequencer that I'm talking about is quite unusual, even in a world where unusual and rare seems to be the starting point for a product, and you probably need endorsements by several online influencers just to rise above the lowest levels of noise and avoid being totally ignored. Electro-Harmonix do not shy away from making radically 'different' pedals, and they have a huge range, plus a long and fascinating history. 

Anyway, the '8 Step Program' is s step sequencer for Expression Pedal control signals.

My EHX 8-Step Program pedal!

You read that correctly. Whilst it can also output control voltages (from 0 (zero Volts) to 5Volts), it is mostly intended to act as an automatic Expression Pedal, so instead of you having to move your foot from heel to toe on an Expression Pedal, then the 8 Step Program will do it for you, repeatedly if you prefer, at a user-variable rate, or you can advance through the steps manually, or just trigger a One-shot single run-through. At the borders of 'step sequencing', there is also the ability to select steps at random, which always sounds more like a slow random noise generator to me, although it outputs a very structured type of noise where the levels are known, but when they will occur is not known.  I'm going to step away from this topic before any 'unknown unknowns' are mentioned!

Oh, before I forget, sincere thanks to Andertons for managing to procure me an '8 Step Program' on special order. It is definitely worth the wait!

Ubiquity or Not

Lots of guitar pedals have a socket marked 'Exp' or 'Expr'. Not all pedals have them, and for those that do, there are at least two different ways to wire the socket (and the pedals) in common usage (see this blog post...). So not quite ubiquitous, but certainly widely available. As that previous blog post rather gives away, I'm one of those people who likes to use a foot pedal to change one or more parameters on a pedal, and so I have 'one or two' Expression Pedals'. 

I've always been confused by the naming convention for guitar pedals, and that ignores the weirdness that you can use them with things other than guitars! One of the first pedals I ever bought was a Colorsound Wah-wah pedal (Not this modern re-creation and not from Macari's, but way older and from somewhere else, lost in the fog of time...) and this was indeed, a pedal. There was a bit that you put your foot on and moved it, and it changed the sound, and it looked like a sort of hi-tech equivalent of the pedal that my Mum used to control her sewing machine. So my mind is forever locked into the mind-set that a pedal is a thing that you move (heel and toe positions, plus in-between) with your foot. A foot-pedal. A Guitar foot-pedal. 

But then there was another type of guitar pedal, and it didn't have a wobbly bit on top where you put your foot. Instead it had one (and sometimes more!) push switch that made a metallic snicking sound when you pushed it - and this turned the effect on or off. Bypass was the word - on or off. To change the effect, you turned small rotary controls - too small and awkwardly placed for your foot, of course. Most of the foot-switches were chrome cathedrals of mechanical complexity, but there were also ones with black plastic tops that didn't have the same satisfying metallic clunk, and which were apparently notorious for 'going wrong'. Nowadays, I only ever see the all-metal variety of foot switch, so I imagine that the plastic-top ones have died out. 

When there are two things that are different but share the same name, then confusion is not far away. As I said earlier, I've always been confused by guitar pedals: some of which have a foot pedal, and some of which don't, but they are still called pedals. Expression Pedals, which don't process audio at all, and only control other guitar pedals, via a TRS or 'stereo' cable, are a third type of pedal again. Your task, should you choose to accept it, is to try and persuade me that there are three types of totally different device, all called the same, where:

- one device processes audio

- one device processes audio, and has a pedal that your foot moves

- one device does not process audio at all, but controls a device that does process audio.

 And these are all Pedals?

Sequencing...

Let's look at what you can use Expression for. That Colorsound Wah-Wah pedal is a good starting point. The foot pedal bit changes the audio that passes through the Wah-Wah pedal - it's a band-pass filter where the centre frequency of the filter is controlled by the foot pedal that your foot moves. The sound is a rough approximation to the band-pass filter that your mouth makes when you open and close it. Try saying 'wah wah wah...' and see how your jaw moves, your mouth opens and your lips move. If you say 'Waaaooouuuw' then your mouth, lips and jaw will all be moving a lot! 

Take a moment here to let the skin on your face return to normal after all that stretching...

Auto-Wah removes the foot pedal and replaces it with an LFO - a Low Frequency Oscillator. A circuit that wobbles something - in this case, the wah-wah effect. So the centre frequency of that band-pass filter wobbles up and down in frequency, and you don't wear out your foot or ankle by moving the pedal back and forth all the time. So the foot pedal bit has gone, and we have just a 'Bypass' switch to turn the effect on or off. 

Of course, some Auto-wah pedals have Expression inputs, and if you connect an Expression Pedal into that input, then you have a foot pedal that controls another pedal!  So if you don't want repeated Wah-Wahs at the rate set by the LFO, then you can use the Expression (foot) pedal to do the 'wah'ing yourself, at whatever rate you want. 

The 8 Step is like an Expression pedal, except that it doesn't have a foot pedal bit that you move with your foot: instead it has 8 linear slider controls that are activated in turn by an LFO. So you get up to 8 different settings of a non-existent foot pedal, sent down a TRS 'stereo' cable, to another pedal where those settings affect the audio. 

If you really want to blow your mind, then the 8 Step Program also has an input for... an Expression Pedal!

Wah, not wah...

I haven't been using the 8 Step Program to control Wah-wah effects. I've been playing with Echo Units or Delay Lines - audio boxes that apply echo or delay to audio signals. Small cyclical changes to the delay/echo time produce flanging, chorus, tremolo, vibrato and other 'Modulation'-type effects, but sudden jerky changes have a very different effect - they change the rhythm of the echoes. If you change the timing of echoes or delays with a Step Sequencer, then you get a sequence of different rhythmic echoes. It's an interesting and unusual effect - particularly because it doesn't settle down into a fixed rhythm. The echoes are always changing, and if the rate of the Step Sequencer (in the 8 Step Program) is not synchronised to the timing of whatever audio you are processing (a drum machine, or groovebox, or a synth playing a sequence, then the two different rates should drift past each other, and you should get 'skying', where things gradually change in a way that is beguiling, non-repetitive, and addictive.

So, above is the setup. The 'Expression' control signal goes along the TRS 'stereo' cable from the 8 Step Program device to the Echo pedal, and inside the Echo pedal, the Expression is mapped to control the delay time. The 8 Step Program's 8 numbered 'step' sliders are set to a rising stepped 'sawtooth' type of waveform, and the Rate slider on the 8 Step Program is set so that each step is close to one repetition of a drum pattern or a sequenced synth line. 

The results are 8 different patterns of syncopated echoes, because the steps from the 8 Step Program give the equivalent of 8 different settings of the 'virtual expression pedal' that the 8 Step Program is emulating.  Unlike a human being, the 8 Step Program reproduces those 8 steps more or less exactly the same each time, and so it is possible to really hear the 8 different patterns cycling through. Best of all, the Rate slider of the 8 Step Program and the audio clocks are not in sync, and so the patterns gradually change as predicted. 

What I haven't checked out yet is to use a MIDI Clock to do the exact opposite: put the 8 Step Program and the audio into sync. Even when I do, then there is still scope for additional experimentation. The 8 Step Program allows the number of steps in the sequence to be changed, so the length could be set to 7 steps instead of 8. This would mean that even though the 8 Step Program, I mean the '7 Step Program', and the audio drum machine or synth sequencer are in sync, there is a 7:8 ratio of timing, and so they will drift or slip against each other, and so they will generate long repeating patterns that last over many bars. So that is ratios of 1: 8 through to 7:8, plus 8:, which is in sync.

The 8 Step Program also allows the step sequence to run in Reverse (which isn't going to be very different - the patterns will just be different), and in Bounce mode, where the steps go back and forth from 1 to 8 to 1 to 8 etc., scanner-style. Now this 'bouncing' is 15 steps in length, which means that we can have ratios of 9:8 through to 15:8. There's quite a lot to play with here.

There's one final mode for the step sequence., and that is Random, where the steps are not output in sequence, but at random. So after step 1, then any of steps 1 to 8 could follow. This will again give 8 different syncopated echo patterns, but they won't be in any order, and so there will be less obvious patterning for a human being to detect - plus the patterns will not repeat after the same number of bars each time, because the patterns are selected randomly. Again, there is lots of scope for exploration here.

Other devices... 

I've always liked Echo as an effect, but any pedal with an Expression input socket can be used with the EHX 8 Step Program. So Reverb, Flanging, Phasing, Tremolo, even Wah-wah could all be controlled using the 8 Step Program. And all of this complexity and syncopation is totally DAWless!

The 8 Step output is also a Control Voltage (CV), and so with a 1/4 inch jack to 3.5 mm jack, could be used to control Eurorack modulars. In fact, the Expression Pedal input of the 8 Step Program can be used to control parameters like Rate, Depth, Glide (You can set how quickly the steps go from one to the next - a bit like Portamento on a keyboard..) and Sequence Length, as well as a Clock input, so there are many more interfacing options there with modular synths. 

MIDI-wise the 8 Step Program has full MIDI Control over programs of steps, plus all the parameters.  Future investigation for me...

Summary

The Electro-Harmonix 8 Step Program is just a small pedal, but there are lots of ways of using it in a DAWless setup to do things which will sound complex, syncopated and yet, can have the unpredictability, drifting and all of the unexpected serendipity of analogue modular. Using the 8 Step Program to drift through some syncopation delay effects from a DAW output might also change some opinions about the inherent boring repetition that you get with a DAW. I'm wondering if there is scope for a contest where people compete to fool a panel of judges with their DAWless or DAW systems... Now that sounds like an interesting event for a synthesizer booth type gathering!

So you can hear how all this sounds, there's a YouTube version of this blog article on... YouTube!  There are only a couple of examples, but I'm sure that you can come up with your own. Just tell EHX or  Andertons that I sent you when you get your own 8 Step Program!

The EHX page for the 8 Step Program lets you download the manual, which is full of loads of details about what it can do. Please try not to drool onto your screen...

(Note that I bought the EHX 8 Step Program with my own money, from Andertons. This blog post was not sponsored by EHX or Andertons. I just buy stuff from them because I like them!)

---

If you find my writing helpful, informative or entertaining, then please consider visiting this link:


Synthesizerwriter's Store (New 'Modular thinking' designs now available!)

Buy me a coffeeBuy me a coffee (Encourage me to write more posts like this one!)


Sunday 26 September 2021

MIDI Velocity Splits

I've been playing with Dave Hilowitz's excellent Decent Sampler quite a lot recently. One of the things that I've been exploring is velocity-switching, that time-consuming process where you record the same pitch at various intonations, strengths, powers,...velocities! 

I've always been intrigued by the way that MIDI terminology has become so deeply embedded in electronic music making. Playing notes harder and softer may have given us an instrument name derived from the Italian for those words: the Piano-Forte (or just Piano for those who know it well.), but somehow, the MIDI output related to how quickly you hit a note has become synonymous with 'how hard you hit a note'. I had always though of pressing piano keys as being an 'amount of forc'e thing, but MIDI forced me to realise that to measure that force you needed to make a measurement of the speed of the key as it moved from one stationary position to the other. And so the posh word for speed: velocity, became the word for what your fingers do on a piano - they change the velocity of the keys: the harder you press the key down, the higher the velocity. Hence, you must be controlling the velocity of the keys with your fingers, because that's what the MIDI output says you are doing!

(Note: Okay, so when they aren't moving, then the 'velocity' of the keys is zero, unless you factor in the rotation of the Earth, and the movement of the Solar System, and... Lets just say that when the keys are 'at rest' they have no velocity relative to the rest of the keyboard...) 

In MIDI 2.0, of course, velocity is 'the same, but also different' - it's a 16-bit value, which allows for 16,384 different velocities. Which is a lot of fine detailed control. If I'm honest, I'm not sure that my fingers are capable of anywhere near that many levels of conscious or physical control!

For the rest of this blog post, I'm going to stay in MIDI 1.0 land, where velocity is only 7-bits, and so has a mere 128 different velocities (Now this sounds more like my abilities!). And, as so often happens, the very first thing that comes up is not actually correct. Nope, there are not 128 different velocity values in MIDI 1.0. There are only 127, because the velocity value of zero is special.

(I'm deliberately not going to try and figure out how many 'bits' a range of 127 values is equivalent to! 'Slightly less than 7 bits' is one imperfect way of expressing it. '7 bits, where 0 is a special value' is perhaps better.)

When you think about it, a velocity of zero makes no sense. No matter how lightly you press a key on a piano, it will always go from one stationary position to the other, and so the velocity has to be greater than zero. If the velocity was zero, then the key would not move! So, when the MIDI Specification was developed back in the 1980s, a velocity of zero was used as an optional 'special purpose' shortcut that avoided needing a Note Off message to accompany every Note On message. Under ideal circumstances, this 'Running Status' tweak means that you can reduce the amount of data required to send single channel MIDI information by up to a third. So instead of sending this:

Note On Status

     Note On Number    60 (Middle C)

     Note On Velocity 1-127

<time the note stays on>

Note Off Status

     Note Off Number 60 (Middle C)

     Note Off Velocity (0, but could be up to 127)

then the next note...

What gets sent instead is:

Note On Status

     Note On Number   60 (Middle C)

     Note On Velocity 1-127

<time the note stays on>

     Note On Number 60 (Middle C)

     Note On Velocity 0 (equivalent of a 'Note Off' message)

Yep, there's no Note Off messages at all when you are using the Running Status' mode', and a velocity value of 0 turns what looks a lot like a Note On message (but without the initial status 'byte) into the equivalent of a Note Off message. So instead of 6 MIDI bytes, only 5 need to be transmitted. But for longer sets of notes, then you don't need to send any status bytes, and so instead of sending 6 bytes (3 bytes for the Note On message, and 3 bytes for the Note Off message) then you only need to send 4 bytes. Of course, any messages that require a change of status will require a new Note On status byte to re-establish what channel the notes are playing on - one example would be notes on a different channel, or MIDI Controller messages (which aren't Note On messages!). 

A quick aside about MIDI Implementation Charts:

Keyboards that implement the 'release' velocity when you stop pressing a key down are not very common, but not as rare as you might think, by the way... And often, this feature is not documented. Yes, many MIDI keyboards send MIDI Note Off messages containing release velocity, and they don't always mention it in the user manual. The place to look is the MIDI Implementation Chart: in the 'Velocity' section...


So this MIDI device implements Note On Velocity (the 'O' in the second column ('Transmitted') and the third column ('Received'), but does NOT implement Note Off (aka 'Release') Velocity (the 'X' in the second and third columns). 

What you are looking for 'transmits and receives release velocity' could be something like this:

Velocity  Note On       O 9nH, v=1-127      O 9nH, v=1-127
          Note Off      O 8nH, v=1-127      O 8nH, v=1-127

My Yamaha Montage 7 looks like this:

Velocity  Note On       O 9nH, v=1-127      O 9nH, v=1-127
          Note Off      X 8nH, v=0          X

Which means it doesn't send Note Off (Release) velocity, but it does clarify that it sends 0 (zero) for a Note Off message!

Some devices don't send a velocity of 0 (zero) for Note Off messages. here's a Roland TD-50 drum module:

Velocity  Note On       O 9nH, v=1-127      O
          Note Off      X 8nH, v=64         X

And, just in case you were wondering what does implement Note Off (Release) Velocity, here's just one example: the Kurzweil PC-4:

Velocity  Note On       O                   O
          Note Off      O                   O

And back to the main story:

So, now that we know that a MIDI Velocity of zero isn't the lowest value, but instead 1 is the lowest value, we know that there are 127 different velocity values in MIDI 1.0 - that's from 1 to 127, just to be precise. Luckily, it isn't necessary to sample every possible velocity, and as I said above, my fingers are not good enough to play exact velocities anyway. 

Velocity switching allows a sampler to play different samples depending on what the MIDI input velocity is. Sometimes people assume that this means that the samples which are going to be used for lower velocities have to be quieter, but this isn't the case. All of the samples have about the same volume level, but the velocity value in the MIDI message will determine how loud they sound when they are played. Velocity switching is not about volume - it is about timbre...

Woah! Velocity switching is not about volume? Absolutely. Let's take the example of no velocity switching, so there's a single sample, and it plays for any incoming MIDI message with a velocity between 1 to 127. (For a velocity of zero, then it won't sound at all!) Now you can think of this either as 'No Velocity Switching', or alternatively, as 'Velocity Switching with One Zone'. Whatever you call it, the sampler plays that sample, regardless of the incoming MIDI Velocity value in the Note On message, BUT it will play it louder or quieter depending on the Velocity value. 

For two zones of velocity switching, then there are two samples. Typically, one of them will be for the sound that you want when playing hard (high velocities!), and the other for playing softly (low velocities). So the loud/hard sample might play for MIDI velocity values of 127 to 64 (inclusive), whilst the soft/quiet sample would play for MIDI velocity values of 63 to 1 (inclusive). If you listened to the samples themselves with the same velocity value, then they would be similar volumes, but the timbres would be different. (One interesting thing to explore is to reverse the samples for a velocity-switched instrument like a piano, so that the hard samples play for low velocities, and the soft samples for high velocities. The result is a very strange piano...)

One important thing here is those two values where the sample switch over: the 63 and 64 numbers.  I chose these values because they are approximately half-way between the 1 and 127 limits of velocity value: 64-1 = 63, and 127-64 = 63. So, really, 63.5 is half-way, but MIDI 1.0 doesn't work like that, so convenient ranges for the two velocity zones are 1 to 63, and 64 to 127. The full range from 1 to 127 is covered, and there is no overlap. If the ranges were 1 to 64 and 64 to 127, then both samples would play for a MIDI Velocity value of 64, which would probably make that single sound much louder (by about 3dB, but there's another whole story about how that would work...) and that would sound silly. So 1 to 62 and 63 to 127 would also work, and this would mean that there would be a very slight bias to the hard sample instead of the soft sample - assuming that I could play a range covering all the available MIDI Velocities. 

For two zones, then it is quite easy to look at the 1-127 range and figure out that 63 or 64 is about half-way. When you have more zones, the it isn't quite so obvious. For three zones, then the starting point would be to use 127/3, which is 42 and a bit. For four zones, then 127/4 is slightly less than 32.  For five zones, then I decided that I would use a spreadsheet.

I also decided that since my fingers don't do precise MIDI Velocities anyway, then the nearest 10 or 5 was probably going to be fine. So here are the ideal values, which are absolutely not very memorable numbers in most cases:

Remember that the values show are for the low (Lo) and high (Hi) thresholds of the velocity split points. So the two zone section on the left hand side has 1 to 63, and 64 to 127. 

And here are those values converted to the nearest 10 and 5:


More than 8 zones of velocity switching is probably only relevant to very high quality piano samples, and would probably require some quite sophisticated mechanical systems to play notes with consistently repeatable MIDI Velocities. If you need more zones, then a spreadsheet, or even paper and pencil, is all you require, plus some time. Of course, based on some of the posts I have seen on various music-oriented Facebook groups, then you could just ask there, and I'm sure someone will say 'Buy a PC!', someone else will say 'DAWless rules!', and someone else will say 'Here's a spreadsheet with all of the values for zones from 2 to 127, and if you could just subscribe to my YouTube channel...'.   

For me, the 'nearest 10' values suffice for the two, three and four zones of velocity switching that are the limits of my patience. When I recorded the samples for my 'VacuumTap' Pianobook.co.uk Virtual instrument, then I did 8 zones, and I am not keen to repeat the process! If you look at the Decent Sampler XML file, then you will find that I used a variety of different velocity splits. Consistent: me?


Linear?

All of the velocity splits shown here assume that the 1 to 127 range needs to be split linearly into zones. Human beings tend to interpret many things with non-linear scales: frequency doubles for every octave you go upwards in pitch, sound gets quieter with the square of the distance from the source, and so on. Most MIDI keyboards have a way to adjust the 'Velocity' 'Law' or 'Scaling' or 'Curve' so that it feels right to your own preferences, and so after setting that so it suits my playing style, then splitting the output into linear ranges (same sized!) feels right to my hands and ears. There's nothing (pencil & paper, or a spreadsheet) to stop you calculating your own custom non-linear zone split values, if you want.   

---

If you find my writing helpful, informative or entertaining, then please consider visiting this link:


Synthesizerwriter's Store (New 'Modular thinking' designs now available!)

Buy me a coffeeBuy me a coffee (Encourage me to write more posts like this one!)


Sunday 12 September 2021

Repairing a Vintage Expression Pedal

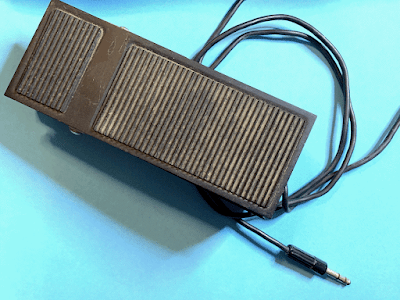
I've had my Casio VP-E Volume Pedal (which also works as an Expression pedal) for what is probably well over 30 years. So I wasn't hugely surprised when it started to get a bit noisy. Now it is very robustly constructed, with lots of aluminium extrusion, and it is a classic mechanical foot pedal, so it seems as if it would be a very good candidate for trying to fix - probably by replacing the potentiometer inside.

There are quite a few designs of foot pedal, ranging from simple passive mechanical designs (with levers or gears) through to sophisticated active electro-optical or magnetic circuits. The Casio VP-E wasn't crazily expensive when I bought it (to go with a Casio CT-1000, if memory serves me...), and you can see a white plastic lever when you move the top plate of the pedal, so it looked like it was a straightforward mechanical design.

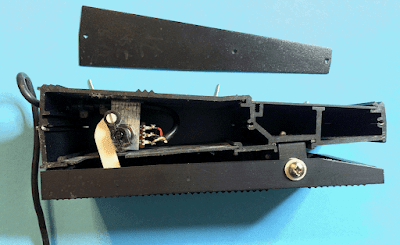
Opening the VP-E is easy - there are three self-tapping screws that hold the metal end-cheek in place. 

Self-tapping screws into aluminium extrusions was a standard way of making guitar pedals back in the 70s -  I can remember a Carlsbro Flanger pedal built exactly that way from the late 1970s the was built that way. Not exactly an EHX Electric Mistress, but I'm sure it was cheaper... You can see one of the Carlsbro Flange pedals here...  and (closer up) in this eBay advert (over $600!), although it will probably be gone by the time you read this... and here (from an effects database)... It's interesting to see that the Carlsbro pedal is now worth more than the CT-1000, although the Casio was a very early 'almost a synth' from Casio, but only two and a half years before the CZ-101 et al, which were definitely synthesisers! 

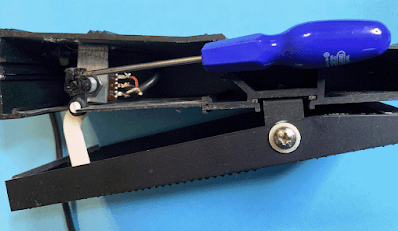
So here's the mechanical arrangement. A bent (probably white (natural) nylon) lever, with a pivot underneath the foot plate on the top of the pedal, a second pivot close to the potentiometer, and result is that the potentiometer rotates a lot more than the foot plate. The 15 or so degrees of rotation of the foot plate is converted to something like 130 degrees of the 270 or so in a typical potentiometer. There are designs with gears that can do more, but this design is robust and has lasted decades for me so far. 

It all looked very straight-forward, and so would be easy to fix myself. Remember that I've been doing this stuff for decades, so I have lots of experience. If you aren't sure, then go to an authorised, approved, qualified repairer or service centre and get a quote for what you want doing... Keep safe and carry on!

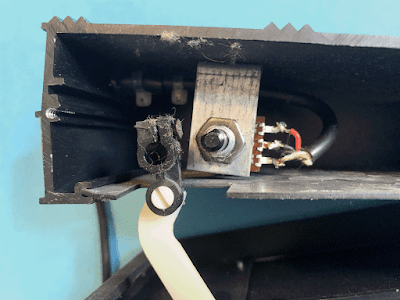
The short black piece of plastic (at the end of the white lever) is wrapped around the potentiometer shaft and tightened with a grub screw. Loosening this screw allows the lever to be moved out of the way. 

Yep, as suspected, it is just an ordinary (for the 1970s or 80s) potentiometer - and easy to replace. 

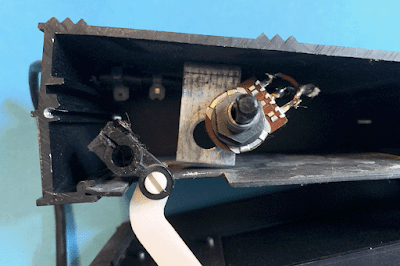
Now that it is exposed, the potentiometer nut can then be removed and the potentiometer unsoldered. Note how the wires are connected to it - take a photo with your mobile phone!

It is a 47 kOhm Logarithmic pot (short for 'potentiometer' - can't think why anyone would want to shorten that word!), indicated by the 47K and LogB labelling. European pots of this vintage are usually marked A for linear, and B for log, which is different to the rest of the world, where A often means log, B linear, and C anti-log. 

Linear means that the output of the pot changes as you might expect when the shaft is rotated, so it outputs half when half way round. A logarithmic pot doesn't do this - some things just aren't linear. one example might be a frequency control - human beings hear octaves when a frequency is doubled, so if you had a linear pot, then going from 110m to 220 Hertz would be fine, but the next octave up is 440 Hertz (A3 or 4, and that's another story), and the next one is 880 Hertz, and the 1760 Hz. So if we used a linear pot to set frequency, then the low octaves would all be squashed up at one end, and the high octaves would be widely separated at the other end. A log pot would space the octaves out evenly as you rotated it.

Even though the intention is to get a control voltage from our expression pedal, the lever doesn't convert the rotation of the foot plate into rotation of the potentiometer shaft perfectly linearly, and so a log pot is used to give a 'compromise' that feels okay when you use it. Some high-end optical or magnetic expression or volume pedals have a much better relationship between the foot pedal movement and the output, but then they don't have pots inside...

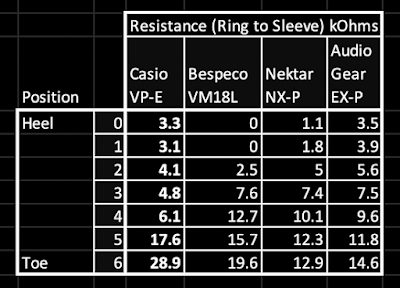
If you feel like becoming a scientist, then you could try plotting the output of the pedal against the foot plate rotation. It ought to be linear-ish. Here's what I found with some of my 'basic' expression pedals:


I should point out here that I don't calibrate my expression pedals, and this is the first time that I've done any comparison process. I'm now wondering if I should do some work on getting them more closely aligned / linearised, although I don't use them interchangeably - they are each usually assigned to a specific role with a particular guitar pedal or synth. I haven't included my Yamaha FC-7 pedals because they are only ever used with my SY99 and Montage. If I was to try and align the pedals detailed here, then that would probably require some custom hardware and software, and that could easily turn into something expensive and time-consuming. I have worked on International Standards (I was one of the Editors of an ISO-MPEG standard...) and I'm not aware of a formal standard for expression pedals - but there are definitely two different ways of using the Tip and Ring connections. As always, my advice would be to use the expression pedal that is recommended by the manufacturer of what you are plugging the expression pedal into. So for my Yamaha synths, then that is the FC-7. 

There are other types of resistance law as well, with various special audio tapers that are found in some amplifiers. If in doubt, then measuring the end-to-end resistance with a multimeter and then plotting the resistance from one end to the wiper, will quickly show if it is linear or logarithmic (or something else!).

There are several different types of potentiometer that are available: ranging from the expensive Cermet track material that has good thermal characteristics, through more modern 'plastic' materials, and finally to the cheap carbon tracks of ordinary 'basic' potentiometers. There are wire wound pots, but these are coarse and noisy, and would not be my first choice for a pedal. 

eBay.co.uk rapidly provided a replacement pot, and this was quickly fitted. Well, I say quickly, but the soldering to the pot was very much 'old school' soldering, maybe from a person used to valve circuitry, because the wires were threaded through the holes in the three terminals tags, then wound around and soldered. This sort of arrangement doesn't fall off, even when all the solder is melted. Pulling at the wire, especially with molten solder present, isn't very good at removing the wire either - and it can spray molten solder everywhere. One effective technique is to cut the wire with cutters, close to the tag, and then to remove the remaining copper wire and use a solder sucker to clean it all up.

(One thing that the InterWeb has revealed to me is that the British pronunciation of 'solder' says the 'L', as in 'sole' 'duh', whereas the US pronunciation drops the 'L', as in 'sodder'.) 

When replacing old pots, then don't forget that pots from the 70s will probably have 1/4 inch shafts (6.35mm), whereas modern pots are more probably going to be 6mm or even smaller in diameter...

Once the old pot was out, the replacement potentiometer shaft was cut to length, was soldered to the cable, was securely fastened in place with the star washer and the nut, and the lever and grub screw were tightened again to grab the pot shaft. Finally the end-cheeks were put back and the pedal tested with the multimeter again. The pot measured 50k as expected (tip to sleeve), and the wiper (ring) to ground (sleeve) varied from 28.9k to 2.2k. Not perfect for a volume pedal, but fine for CV/Expression use... and I could always adjust the angle of the pot shaft if I needed to...

I did contemplate buying a dual-gang pot so that I could have two separate outputs, but decided, based on the astonishing price of the decade-older Carlsbro Flanger pedal, that it would be better to leave it unmodified. 

I now have a slightly smoother and less noisy Volume/Expression pedal!

Theory - Expression Pedals

Expression pedals, and in fact, any foot pedal that provides a Control Voltage that is used to control Expression or Volume in an electronic musical instrument, all tend to have similar designs, particularly at the budget end of the market. Although note that there are at least two different (and incompatible) ways to wire up the stereo jack plug (OK, the balanced jack plug commonly known as a 'stereo' jack), and specifically note that higher-end pedals might well have very different circuits and pin-outs because they use electro-optical or magnetic foot-plate rotation sensing methods. 

Of course, you should always use the Expression pedal recommended by the manufacturer of the guitar pedal or instrument that you will be connecting the expression pedal to... but if there isn't a specific recommendation...

The circuit is very simple. The potentiometer (the fancy word for the electric component that a Roary control or Knob adjusts) has a voltage at one end, and ground at the other. The 'Wiper' then outputs a voltage between the voltage and ground, depending upon how mucho it has been rotated. At one extreme of rotation it will be the voltage, whilst at the other it will be ground. Most volume/expression pedals do not rotate the potentiometer through its full 270-ish degrees of rotation, and so the output never actually reaches the full range from voltage to ground. 

As a side note, this is why many guitar pedals get you to use your Expression pedal when you set up the knobs that are going to be controlled by the expression pedal. By getting you to set the expression pedal to the two extremes (Toe and Heel positions) and then set the knobs where you want them for each extreme, then the guitar pedal knows exactly what the range of control voltages from the expression pedal are...

Some pedals have a switch that swap the ring and tip connections, so that the two main variations are covered. Most of my equipment seems to have the ring as the CV/Wiper connection, the sleeve as the Ground connection, and the Tip as the positive Voltage connection (which can vary from 3.3V (or lower) to 5V, depending on what it is powered from... As always, if you rewire anything, then you do so at your own risk. 

Anyway, the 'swap' circuit uses a DPDT switch (Double Pole, Double Throw) and the circuit looks complex when the two positions are shown (above). The DPDT switch has two 'Either/Or' switches: so One input and Two Output (of which only one can be connected to the Input at any time). But if you think about how you would actually solder the wires to the DPDT switch itself, then the wiring is lots simpler - the input is on one side, the output is in the middle, with a pair of wires crossing over to give the 'swap' function. And that's it. Drawing the circuit out in full kind of makes it look more complex than the actuality.

I didn't add a switch to the Casio VP-E pedal, and I didn't add in the missing series resistor between the potentiometer and the CV point. I decided to keep the pedal 'as supplied'. If I was being technical, then my defence would be that the cable and the plug/socket have some inherent resistance, and so I would just be adding a bit extra.

Modding / Customisation Warning

Of course, you should always use the Expression pedal recommended by the manufacturer of the guitar pedal or instrument that you will be connecting the expression pedal to...  Also, if you modify / change / rewire anything, then you do so at your own risk. If you are not confident of your ability (or your equipment is still covered by a warranty or guarantee) then you should go to an approved, qualified repairer or service centre for any repairs, modifications or customisations. Safe, not sorry, is the correct attitude to have.

*** 8th November 2021 ***

I have added a few minor corrections here and there, and will add a 'voltage output' chart as well in the next couple of days...

---

If you find my writing helpful, informative or entertaining, then please consider visiting this link:


Synthesizerwriter's Store (New 'Modular thinking' designs now available!)

Buy me a coffeeBuy me a coffee (Encourage me to write more posts like this one!)