3rd Hand was inspired by a ‘drone’ concert that I attended. The opening ‘build’ took about 10 minutes, and was astonishingly effective - there’s something about a big sound that starts out quiet and gradually gets louder and louder! So I wondered how to do this in Ableton Live, and 3rd Hand is the result…
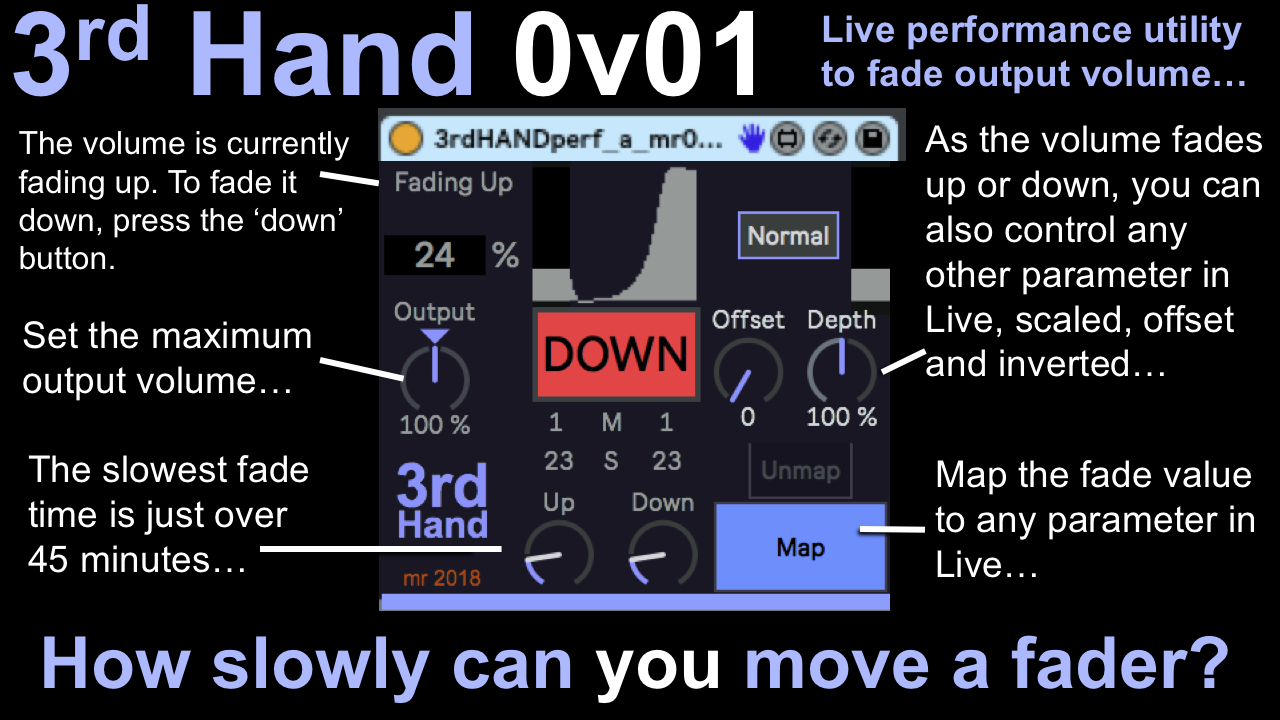
3rd Hand is a timed volume control. You press the ‘Up’ button and the volume goes up. You press the ‘Down’ button and the volume goes down. If you change your mind, then pressing the button again reverses the direction! You can set the time that it takes to go from silence to full volume from a few seconds to over 45 minutes. Yep, three quarters (fourths) of an hour. (For people who like to really let something build at its own pace…)
Because 3rd Hand is a volume control, then the first control, labelled ‘Output’ is a… volume control. It lets you set the maximum output, and has quite a lot of gain for maximum flexibility. Just set the Up time to a short time and press the ‘Up’ button, and wait until you get to the 100% ’Maximum volume’ level, and then adjust the Output control to the loudest you want to reach. 3rd Hand alters the volume of anything that you pass through it, so you should put it at the end of your effects processing chain.
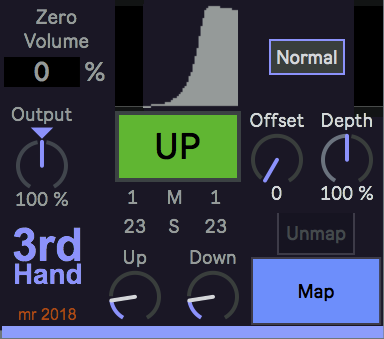
The Up and Down time controls have a big range. Note that they don't have normal parameters shown underneath - instead the parameters are shown ABOVE the rotary controls. You can see this by altering the rotary controls - The Minutes and Seconds should change. If nothing seems to be happening when you press the Up/Down button, then make sure that the ‘M’ setting isn’t several minutes… The bug reports that I got from the beta versions were mostly along the lines of: ‘Doesn’t work. No output.’, followed by ‘Ah, I see!’ later on when they found that ‘M’ means minutes (and ’S’ means seconds). There are four states. Starting from zero volume, they are: Zero Volume. Ready to Fade up. Press the 'Up' button to start fading upwards from zero.
Fading Up.
Note that the button has changed to 'Down', so you can press this at any time to abort the fade up, and 3rd Hand will fade the volume back to zero again. If you don't press the 'Down' button, then the fade up will just continue upwards.
Maximum Volume.
The fade will slow down and stop as it gets to 100%. Note that the 'Down' button is still available, so you can fade down now if you want, or leave it at Maximum volume for as long as you like... You can think of the Max volume state as 'Ready to Fade Down'...
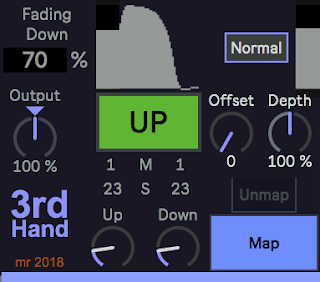
Fading Down.
The fade down gradually slows as it gets near zero volume. Note that as soon as the fade downwards starts, the button changes to 'Up, so that you can abort the fade down (if you pressed the button by mistake, foe instance) at any time.
When the fade down is complete, we are back in the 'Zero Volume' state, where we started.
And that's mostly it. 3rd Hand is probably the most sophisticated simple device you have seen, but it is intended to do it properly, reliably and flexibly.
Because just changing the volume is a bit limited, the remainder of the device is a standard parameter mapping controller. You use the big ‘Map’ button to choose a parameter in Live that you want to control, and the you adjust the ‘Depth’ to set how much effect it will have on the parameter, with maybe some Offset added. You can invert the way the parameter follows the volume change - Normal tracks the volume, Invert goes the opposite way. So, for example, you could start out with lots of revert and gradually remove it as the volume grows, or pan from one sid to the other, or add chorus/echo as the volume rises… Whatever works in context - I'm sure you can find something awesome to control as the volume builds...
3rd Hand is meant to be used in live performance - in the above example, it is being used to control the output of BankOSCmr 0v02, which kind of fits the 'drone' genre I mentioned right at the start of this blog post. You could use it otherwise, of course. (One immediate thought is to have one 3rd Hand on several tracks and to use them to bring stuff in and out slowly.) Anyway, enjoy big slow builds!
In terms of modular equivalents, then reproducing this simple functionality in my modulars involved 2 VCAs and an Envelope Generator, plus a Button trigger, and a Utility voltage processor, so I would rate this version as being about 5 ME.
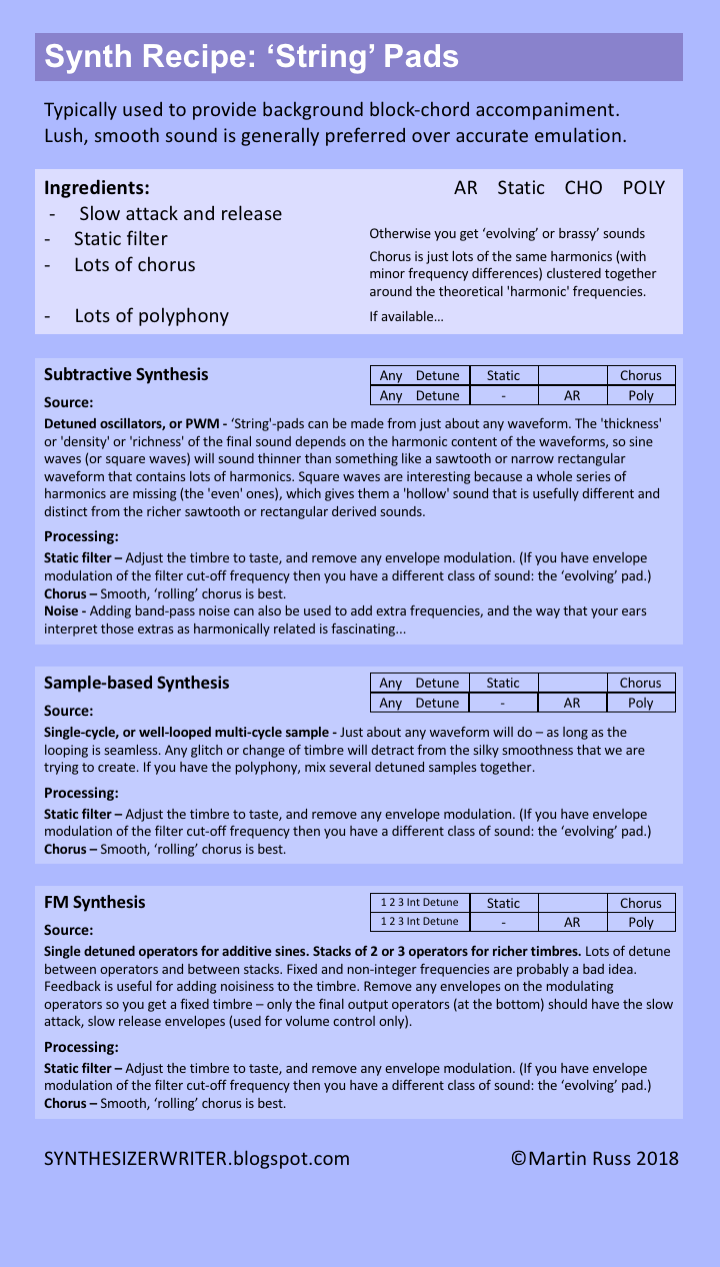
For some time, I've been wondering about doing single page summaries of sounds, and a conversation on a forum persuaded me to do something about it. So here's an experiment - let me know if you find this useful and want to see more of this type of guide.
I have always been fascinated by sound generators. Over the years, I have done a lot of dabbling into FM, AM, Ring Modulation, Granular, FFTs and many other techniques, and what I have found is that the interesting stuff is often in the detail. So my previous forays into Reaktor produced large numbers of generators exploring lots of ideas, and I sometimes reach back into that abandoned era to provide inspiration for MaxForLive devices. This brings me to my latest sound generator, whose name tells you just about everything about it: BankOSCmr0v01.
A Bank of Oscillators...
Any sound generation method that uses large numbers of oscillators has a basic problem that can be boiled down into a simple question: How do you control all of those oscillators?' Additive synthesis is a good example: lots of harmonics means lots of things to control, and creating a powerful and appropriate 'high-level' user interface can be a difficult challenge. But my current research interest is in inharmonics, and so I wanted to explore ways of working with non-harmonically related frequencies.
After poking around in some of the quieter parts of the Max object world, I found ioscbank~, and decided that this might be suitably inspiring. The Max documentation showed filling the paired frequency and amplitude controls with random values, but I like my sound generators to produce dynamic evolving sounds, not boring static timbres. So I added scanning that swept across the bank of oscillators, gradually changing the frequency and amplitude of each oscillator, and slugged the interpolation of these parameters so that they changed slowly - and I got an interesting 'big bank of oscillator' sound that had a lot of promise.
One of the techniques that I learned when creating synth patches was to explore the extremes of the available parameters, and so I experimented with the rate that updates happened, with the interpolation time, and with the range of frequencies and amplitudes. Messing about with the amplitudes did not seem very interesting, and so I abandoned that and moved to the other parameters. (Anyone who is shaking their head at this point needs to move to the follow-up article to this one, where I realise that I nearly missed something big and went back to controlling the amplitude.) After adding some filtering and some additional tweaks, I had an interesting result that could make a quite broad range of not-so-ordinary sounds: BankOSCmr0V01.
BankOSCmr0v01's user interface is dominated by the large display in the centre, and this is not interactive at all. It is purely to show you what is going on for each of the 32 sine-wave oscillators that this version uses. The display shows the 32 oscillators from left to right, and each vertical shows the frequency as an orange square and associated bar underneath, and shows the amplitude (the volume...) as a purple square and associated bar underneath. Low frequencies and amplitudes are at the bottom, and high frequencies and amplitudes are at the top.
To control the oscillators, the controls on the left affect:
- the Rate at which the update sweeps across the oscillators from left to right
- the High and Low extremes of the frequencies of the oscillators
- the Time for the frequencies and amplitudes to change to the new values from the scanning
- a 'New' button to generate a new set of random values for frequency and amplitude (If you send a MIDI note to this device when the Rate is set to the slowest time (...all the way clock-wise: 'Run' changes to 'Stop'), then this triggers the 'New' button.)
On the right, there is a simple state-variable filter that provides low-pass, high-pass, band-pass and notch transfer functions, and has Frequency and Q controls, an finally an Output control that has a deliberately large range to partially compensate for having no controls over oscillator amplitude (and I should add a second hint about the next version here as well).
And that was that. A simple bank oscillator that generates a range of sounds using a small number of controls. Nothing particularly special so far, but then there's more coming up next time... and plans beyond that as well.
Media
Several people have asked me why I never post videos of my MaxForLive devices on YouTube, and I never had a really good reason why not, so I'm posting a simple video to my YouTube channel, which is really going to surprise my 34 subscribers! I will also do my usual SoundCloud example as well.
In terms of modular equivalents, then reproducing this functionality in my modulars either involved 32 VCOs and four 8-step sequencers, or advanced oscillators banks or sequencers that I can't count as 'basic' modules, so I would rate this version as being about 40 ME (or 10ME if bank oscillators are allowed, or 6ME with fancy sequencers!).
LFOLFO is an experimental 'Multiplying' LFO. It is based on the idea that being able to switch the range of an LFO can be used to generate a number of interesting audio effects, and so the design is optimised to enable easy control of the Rate and Multiply controls. The prototype was produced as a response to a question posed by Russell Alderton on the 'Max For Live Users' Group on Facebook, and it has undergone extensive development since then.
The Rate (Frequency) of the LFO can be modulated via two controls: Rate and Multiply. The Rate control is a conventional frequency control, whilst the Multiply control has four modes that provide several ways to affect the frequency. A multiply value of 'x 1.' produces an output frequency as shown on the Rate control, whilst a multiply value of 'x 0.5' produces an output frequency of half the value shown on the Rate control, and a multiply value of 'x 2.' produces an output frequency of twice the value shown on the Rate control.
The Rate and Multiply controls both have their own dedicated Sub LFOs, which can be used to modulate them, and this is shown graphically in a display underneath the controls. The LFO output waveform is shown as a backdrop to the whole MaxForLive device, thus providing a 'history' of recent changes to the waveform.
Each Sub LFO has multiple output waveforms, and the waveform selection of Sub2 can be controlled by Sub1. The output waveform of the LFO itself can be selected using a vertical selector, or via two modulation modes: one that counts the number of cycles that have been output, and a second mode that uses a third Sub LFO (Sub3). Both modulation modes use a probability grid that can provide sophisticated control over the sequencing of output waveforms.
The output waveform can be further processed by three controls: Smooth, S&H and Decimate (which do what their titles suggest). Finally, Offset and Depth controls. plus an Invert button allow fine tuning of the range of effect on the controlled parameter - which is selected using the 'Map' button.
Sync
Conventional Digital Audio Workstation (DAW) LFOs are either free-running, or synched to the DAW transport. LFOLFO provides a different type of sync that is intended to explore an alternative approach. A selection from a number of timing sources can be used to reset the LFO waveform, and this provides an 'Event Sync' that gives a number of interesting ways working with musical events instead of being rigidly locked to a timebase.
The UI from left to right
LFOLFO has a lot of controls that it uses to provide a wide range of advanced functionality. The settings above are a good starting point for learning - they are a kind of 'Neutral' setting. From left to right, the controls are:
Storage
LFOLFO provides 9 'memories' that can be used to store and recall the state of all the controls. To store a setting, hold down the SHIFT key and click on one of the 9 boxes. Grey boxes are empty. Purple boxes contain a saved setting. The white box is the currently selected setting. If you over-write a box then the previous contents cannot be recovered - this is colloquially known as a 'face-palm' error.
Event Sync
The large selection box enables the selection of 'events' that can be used to reset the LFO output phase. The reset phase is set using the 'Phase' retry control that is underneath the selection box. The top selection is '=Not-Synched=' and this is the Free-Running mode. The next selection options are for MIDI Notes in the track clip:
- AnyNote resets the phase for any MIDI Note.
- AnyChange resets the phase for any new MIDI Note. Any repeated notes are ignored.
- Note0 only resets the phase for Note 0, the lowest MIDI Note. This note is not used very often...
- Note0Velo1 only resets the phase for a Note 0 MIDI Note with a Velocity of 1. A velocity value of 1 is very quiet.
The next selection options use the Sub LFOs. Sub1, Sub2 or Sub3 can be used to reset the phase of the LFO, as well as a special reset that uses Sub3 and the waveform cycle Count (shown on the far right hand side).
The reset happens as soon as the event is processed by the device, and the value can be set using he 'Phase' control. If the event frequency is less than the 'Rate' then one or more cycles of the output waveform will be output. If the event frequency is higher than the 'Rate' then cycles will not be completed because the reset will happen before the cycle can complete.
Sub1
The first sub LFO can be used to modulate the 'Rate' control. The 'Sub1' rotary control affects the rate of the Sub LFO, whilst the 'Depth' rotary control affects the amount of modulation. The selector box sets the output waveform. When Sub1 is used to modulate the 'Rate' control then a graphical display behind the rotary control will show the modulation.
The Sub1 LFO can also be used to control the output waveform of the Sub2 LFO. If the frequency of Sub1 is greater than Sub2, then Sub2 will output incomplete cycles of its waveform. The selection of the output waveform is in sequence, from top to bottom, and then repeats. No other waveform sequences are available in this version... The button has two settings: 'Off' has no effect on the Sub2 output waveform, whereas 'Mod' will repeatedly sequence through the four waveforms.
Sub1's modulation of the 'Rate' control can be used for a number of effects. Using a Sine waveform produces traditional smooth 'up and down' variation in the frequency of the LFO. The triangle waveform gives a more abrupt change of direction and gives a more synthetic effect. The two sawtooth waveforms are particularly good when Event Sync is used, because they can produce a number of 'rise' or 'drop' effects, where the frequency of the LFO rises or falls linearly. Note that one of the advantages of using Event Sync is that when the frequency of the events is less than the LFO 'Rate', then several cycles of the output waveform will be produced, whereas if the event frequency is greater than the 'Rate', then less than cycle of the waveform will be produced. So by adding MIDI Note events into the track clip, very precise control of the LFO output can be obtained.
Sub2
The second sub LFO can be used to modulate the 'Multiply' control. The 'Sub2' rotary control affects the rate of the Sub LFO, whilst the 'Depth' rotary control affects the amount of modulation. The selector box sets the output waveform. When Sub2 is used to modulate the 'Multiply' control then a graphical display behind the rotary control will show the modulation.
There are four modulation modes for the Multiply rotary control, selected using the horizontal selector box on the lower edge of the device:
- Linear is a conventional modulation where the modulation increases linearly.
- Power increases the modulation in powers of 2.
- PowerHalf increases the modulation in quantised half powers of 2.
- PowerQnt increases the modulation in quantised powers of 2 (0.25, 0.5, 1, 2, 4 8, 16...)
Rate
The Rate road control is the main control of the frequency of the LFO. The output frequency is shown in Hertz. The modulation is shown graphically underneath the control.
Multiply
The Multiply control is a secondary control for the frequency of the LFO. It is rather like a 'range' control, but it can be modulated, and the rate and character of the jumps in LFO frequency can be controlled via the waveforms and the Sub1-Sub2 modulation button. Careful use of the Multiply control is the key to making the most of the functionality provided by a Multiplying LFO. Yes, you can use LFOLFO to vary a parameter with slow, smooth up and down changes, but this does not exploit the device to its full potential.
Try increasing the Multiply rotary control in each of these modes to see the effect on the 'Multiply' value. The 'PowerQnt' mode is specifically designed to change the rate in powers of 2: x .125, x .25, x .5, x 1, x 2, x 4, x 8, x16...
Vertical bar
The vertical bar shows the LFO output at the current time, and is not a control.
Waveform
The large selector box in the centre of the device serves two purposes, dependent on the mode set by the 'Waveform Mode' selector on the right - which has three modes: Select, which allows direct control of the LFO's output waveform via the selector box; plus Count and Mod3, which both use the grid in the middle of the device to choose waveforms, and the selector box then becomes an indication of which waveform is currently being output. In the Select mode, the grid, plus the Columns, Sub3 and Count rotary controls all do nothing. In the Count mode, the Columns and Count controls set the number of columns in the grid, and the number of cycles of waveform output that need to happen before the waveform changes (controlled by the cursor moving across the grid). In the Mod3 mode, then the Columns and Mod3 rotary controls are active, setting the number of columns and the rate at which the cursor moves across the grid.
The Grid
The grid is only active in Count and Mod3 modes, and allows the sequencing of waveforms to be specified. White squares indicate which waveform will be output when the cursor is in each column, an the vertical Waveform selector box shows which waveform is currently being output. If more than one square in a vertical column in the grid is white, then the output is randomly chosen from the white squares. So if there are two white squares in a vertical column, then the corresponding waveform will be chosen 50% of the time, on average. If there are three white squares, then each waveform will be output 33% of the time, on average. In the example shown above, there is just one white square in each of the two active columns, and so the corresponding waveform is chosen 100% of the time. This means that in Count or Mod3 modes, the first waveform to be output will be the Saw Down, followed by the Saw Up.
If you draw a line of white squares from the top left hand corner of the grid to the lower right hand corner, then each waveform will be played in sequence, just as in version 04. If you draw the opposite line, then the sequence will be reversed. The grid allows you to specify any sequence of waveforms, plus it allows probabilistic control over waveforms, which allows long complex waveform outputs. In summary, LFOLFO provides humungous power for creating output waveforms!
Once the waveform has been controlled using one of the three modes, then further processing can be carried out on it. This happens in the darker vertical box containing the 'Smooth', 'S&H' and 'Decimate' rotary controls.
Smooth
The Smooth rotary control is a low pass filter that removes the sharp edges in the output waveform, but it also reduces the amplitude - so you may need to use the 'Depth' control to increase the size of the LFO output waveform. Remember that the 'Depth' control affects the output amplitude of the LFO waveform before the Smooth control.
S&H
The S&H rotary control adjusts the rate at which the LFO outputs its waveform. This has the interesting side effect of slowing down the scrolling speed of the background waveform display - but it does not change the rate or frequency of the LFO!
Decimate
The Decimate rotary control adjusts the resolution of the LFO output waveform. In the '0' position, then the LFO waveform is smooth, whilst increasing decimation values makes the output increasingly jagged until at '2.0' then there are only two values (maximum and minimum). You can still use the Smooth and S&H controls on a decimated waveform, so these three controls should be seen as a flexible way of adjusting the output waveform to your specific requirements.
Once the final waveform has been set, then the final section (on the right) does the mapping of the LFO waveform to the parameter that is going to be controlled by the LFO.
'Normal' or 'Invert' button
This button controls how the parameter is controlled by the LFO output. 'Normal' is the same as the vertical bar, whilst 'Invert' is turned upside down, so that high values of the vertical bar give low parameter values.
Offset
The Offset rotary control adjusts the output of the LFO. Normally this will be left in the default '0' position, but some parameters and other settings may require it to be changed. The output waveform display that forms the background to the device is the key to using the Offset control - you should adjust the offset so that the waveform is not clipped at the top of the bottom. (although you can use this as a deliberate effect if you wish)
Depth
The Depth rotary control adjusts the size of the LFO output (which is why it is the right-most control!), and 100% is at the middle position, so you can deliberately output larger values that will be clipped. The Depth and Offset controls will often be used together to get the exact parameter changes that are required.
Unmap and Map
The Unmap button is only available when a parameter has been mapped using the Map control. The Map button is easy to use - just click on it and then select the parameter that you want the LFO to control. A good starting point is filter cut-off frequency in the 'Auto Filter' device. When you have correctly mapped a parameter then the name of the parameter will replace the 'Map' text in the button, and the 'Unmap' button will become available. If you click on the 'Unmap' button then the mapping to that parameter will be lost - and the only way to remap it is to carry out the mapping process again.
In terms of modular equivalents, then reproducing this functionality in my modulars took anything from 10 to 14 separate 'basic' modules, with lots of patch chords (and some limitations and compromises), so I would rate this version as being about 12 ME.