For the whole month of August, I've been voted into the prestigious role of 'Samplist of the Month' for Pianobook.co.uk by the eponymous Discord community, and I wanted to mark it with something special...
So on the 1st of August, I published two new sample packs of virtual instruments on Pianobook.co.uk: 'Deimos Strings', and 'Fairy Piano Extras'. The following day I published a second experimental sampled choir virtual instrument called 'Dan Time 2', but that's another story entirely.
Deimos Strings
Not one of the moons of Mars...
Deimos Strings is string pads produced digitally, but with a lot of the characteristics that people normally associate with analogue synthesis. At its heart are a dual filter and a quad chorus effect, and there's a bug in the filter control XML, but it sounds interesting, so I have left it in! The quad chorus also has a slight volume dip as you increase the modulation depth, but this is easily compensated for by using the Expression control. There are quite a few presets, and there's an amazing demo from Bemused on SoundCloud.
But the 'special' bit is the other release:
Fairy Piano Extras
I've been doing a lot of reviewing at the quieter end of the Pianobook.co.uk review queue - where the sample packs of virtual instrument with no or very few reviews live. I try to review any Decent Sampler submissions, and I have now done quite a few reviews!
One thing that I often do in my reviews is suggest little additions or modifications to the XML file that is the .dspreset file that defines a Decent Sampler preset. Often this is just turning on looping so that you get interesting syncopation during the release phase of the envelope, but sometimes I get inspired and do lots more modifications. And then I had an idea...
Why not make these 'Extra' presets available to everyone on Pianobook.co.uk?
Which is what 'Fairy Piano Extras' is - three additional presets for my pre-existing 'Fairy Piano' sample pack, but going slightly beyond just making a few changes to the values of the controls. In an 'Extra', anything is allowed, except changing the samples, and you need to get the permission and final approval of the original publisher of the sample pack, of which more in a moment... So you could do things like:
- Transpositions in round-robins for Victor Borge soundalikes, automatic inversions, and more,
- Micro-tuning in round-robins for subtle detunes or crazy 'honky-tonk' wobbles,
- Dynamic tweaks, inversions, layering and other sample playback modifications,
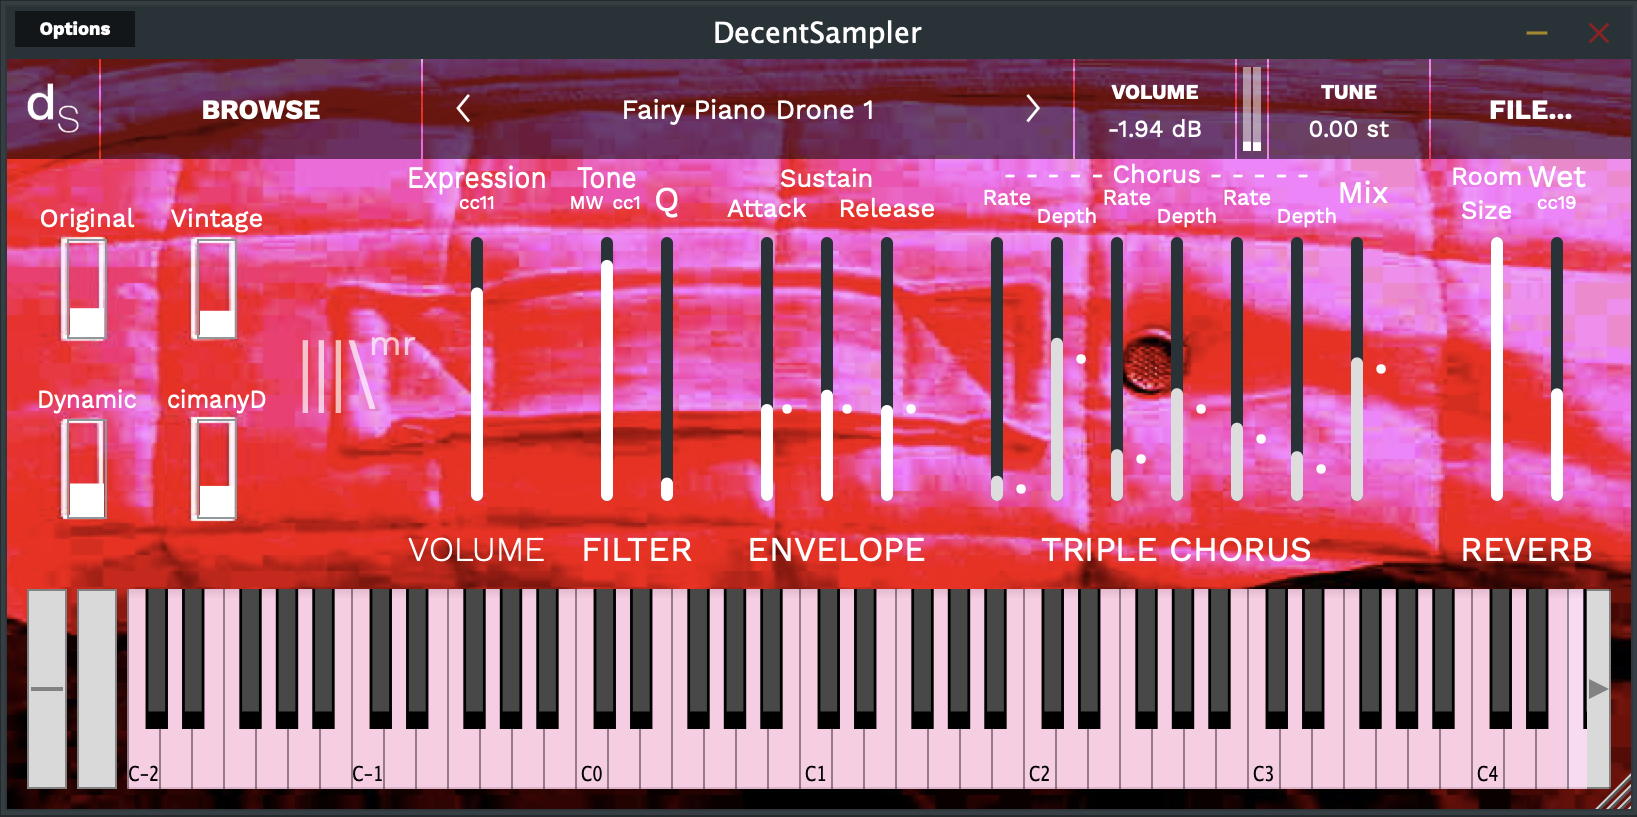
- New controls for new features! Want to add a High-Pass Filter? Easy! Want to be able to change the Reverb Room Size? Easy? Make a menu to turn looping on and off? Needs a bit of care, but do-able! In Fairy Piano Extras, the 'Drone' preset has new additional controls that weren't needed in the original Fairy Piano:
The Fairy Piano Drone User Interface - can you spot the design influence?
Because it makes drone sounds, the percussive, fast attack and slow decay envelope that works for piano, isn't really suitable, so I replaced it with and ASR (Attack-Sustain-Release) envelope, where the attack and decay are linked together. The triple chorus is a step towards the quad chorus used in Deimos Strings - remember that I do everything in little steps... Anyway, Fairy Piano Drone is a very different instrument to the basic Fairy Piano...
So that's what Extras are all about - remixing, customising, tweaking, and sometimes, completely reworking the user interface, functionality and sound of a sample pack or virtual instrument!
Now my Fairy Pianos Extras is unusual, because it is me 'remixing' my own sample pack, so it works slightly differently to the more usual case - where another person produces an Extras pack for a samplist's sample pack, so let's look at that scenario first...
How Do Extras Work?
Extras are just ordinary .dspreset files, but made by someone other than the original samplist. They are in an additional folder/directory inside the main sample pack. So for a Decent Sampler sample pack called 'Piano Buck', then the ordinary main folder/directory would look like this:
An ordinary Decent Sample folder/directory...
So there is the 'Piano Buck.dspreset' file, that is used by Decent Sample to define the basic preset for the virtual instrument, the README.txt file, and the two folders: Samples and resources. If this was a Native Instruments Kontakt-compatible folder, then there would be some additional folders and files inside as well, but for clarity, I'm just showing the Decent Sampler files.
For Extras, then you will find an 'Extra' folder/directory inside the main one:
A Decent Sampler folder/directory with Extras inside
All of the extras are in the '<name> Extras' folder/directory - synthesizerwriter (of course!) in this case. If you get Extras from other people, then this keeps them nice and tidy. Note that the additional presets all end with initials ('sw' for synthesizerwriter in this case). Also notice the two JPEG files - these are the background graphics for Decent Sampler (probably saying something like: 'An Extra from synthesizerwriter'), and you will need to make sure that the 'bgImage=' path in the .dspreset points to that graphics file - it isn't in the resources folder/directory!
The background graphics are in the same folder as the .dspreset files...
One more thing needs to be done during the development of the Extras presets. You need to add a modification to every path= element in your .dspreset files:
Add ../ to the start of the paths...
Adding '../' to the start of every path (before the Samples/ bit), tells Decent Sampler where to find the samples! This is because the Extras presets are in a sub-folder/directory to the main one, and so the '../' goes up one level and then back into the Samples folder/directory. So an Extras pack contains just the .dspreset files and the background graphics. You can add a README.txt file if you want, although the best place for any information about the presets in the Extras pack is inside the main README.txt file, so all that the samplist needs to do is add the contents of your README.txt to their main README.txt file.
And that's it. You have made an Extras pack, and people who download it will now have access to all of the new 'Extra' presets!
Permission
The first thing that you need to do if you want to make an Extras pack is to contact the original samplist and ask for permission to use their samples to make a 'derived work'. Yep, that sounds like a legal phrase because it is - the original samplist of the samples owns the copyright on the audio content in those samples, and so it is only polite and proper to get their permission in order for you to use their material. And remember, the samplist needs to add your Extras folder to their download, so they are in control! If they don't like your Extras, then they don't get added to the download...
(For samplists, then they retain final control over what Extras are published, and when, and by whom. Plus, best of all, once a sample pack has been published, then you can upload a new zip file at any time, so the samplist decides when to do an update, when to add Extras, etc. Once the sample pack is published by Pianobook.co.uk, the samplist has control over what is in it.)
If you don't get permission, then don't even start to make an Extras pack - try another samplist!
Inside Fairy Piano Extras
As I said earlier, doing your own Extras is slightly different. It doesn't really make sense to have a separate folder - unless you have very different .dspresets. In the case of Fairy Piano Extras, then the Drone version, the reverse version and the inverse version are all very different, with major changes to the functionality. Luckily, the samples are tiny, and so they can be included, but if the samples were large then this would be a problem and the approach described above would be better.
Special!
So that's Extras. I think they are pretty special! I think they give Pianobook.co.uk new functionality that turns it into something even more interesting...
I have been gradually refining my live rig, and something unexpected has started to irk me. So I made a workaround, maybe a fix, and now I'm going to share it with you.
Power Switches
I was going to say that everything had them, but one of the interesting features of many guitar pedals is that almost all of them do not have power switches - instead, you insert or remove the (more or less standard) barrel connector that carries the power.
But apart from that, then I am very used to having to reach behind gear to access the power switch, which is usually (but not always, of course) on the right hand side (from the front), close to the power input connector (which isn't standardised very well at all...). Yep, muscle memory means that my hands know where the switch is, and all I do is reach over and around and down and... ah, there it is!
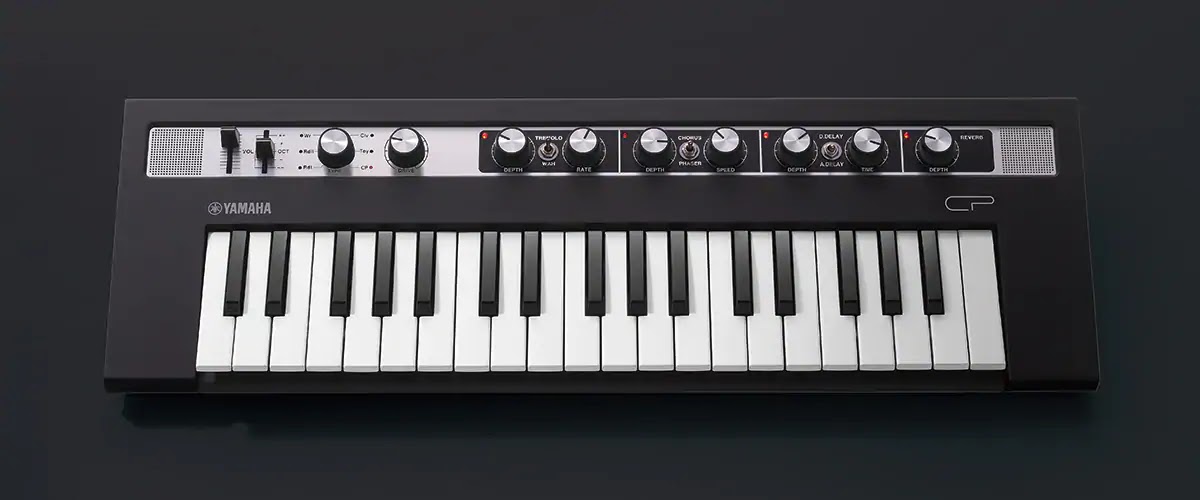
Which is fine, except when it isn't. And after putting it off for ages, I finally succumbed to the amazing piece of modern-take on vintage classic gear that is Yamaha's Reface CP .
I'm not going to do a full review here, but... Whilst sturdily built, it is considerably lighter than a vintage electric piano, and way, way lighter than three electric pianos! It is lots smaller than a Clavinet or a CP-70 electric grand piano! It doesn't need tuning. It is very quiet and very low noise in terms of the audio output! It has built-in effects that are perfect and contemporary with the keyboard sounds! Oh, and 128 note polyphony! The digital delay is like a looper! The sounds are very authentic, imho.
I would say that it can be battery powered as well, but that is completely out of context for this blog post!
(I have to say that the Reface CS is also very appealing as well, for many and different reasons.)
Anyway, it has a power switch on the rear panel. But unfortunately, having shoe-horned it into exactly the perfect place in my keyboard rack, there's a problem. The 37mm aluminium tube above it, which has my mixers and sub-mixers on it, is so close that it isn't actually possible to get my fingers up and over and around and down to access the power switch. I've done all sorts of little incremental shuffles, like anyone with a tube-based keyboard stand does whenever they get new gear, but all in vain. I can't get enough of a gap to get at the power switch!
I considered buying a remote-controlled mains switch for the wall wart power supply, you know, the sort of trendy 'smart home' device that is used for controlling things like lights or hi-fi, or for saving power when standby consumes too much electricity, but these all seemed expensive, and awkward (Do I really want to use a mobile phone to turn a musical instrument on and off via Bluetooth or WiFi?). And they all seemed to use energy in stand-by mode as well, which seemed like a recursive trip into a sustainability hell.
At moments like this, resorting to old fashioned technology is often worth considering. A quick search told me that you could get single-ended 'pigtail' cables intended for security camera installations that had male or female barrel connectors on them. Combined with a switch and a tiny box intended for electronics, I had everything I needed to make a device that is 'electrical' rather than 'electronic', and all that it does is move a switch from the rear panel of my Reface CP to the side, where my fingers can get to it very easily.
Simple, easy to make, and it improves the usability of my keyboard rig immensely. I'm considering making a few more...
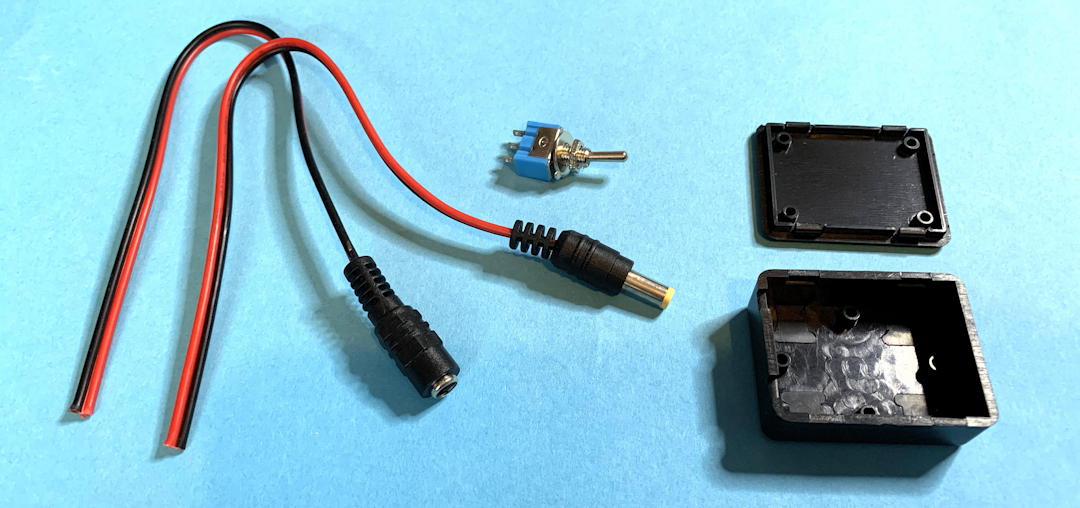
The Components
It's a very short list. Two pigtails, one of each gender. A SPST switch (for some applications, then a DPDT switch would isolate both power rails), and a tiny black plastic box. I also used some heat-shrink tubing to cover all the soldered joints.
Three small holes need to be drilled in the box for the switch, and the two pigtails. I didn't put grommets on the pigtail holes. I used a Dremel to remove some of the plastic on the lid so that it was not held proud by the body of the switch.
Here's the completed switch, all sealed up in the box (snap-fit).
And the final assembly, on one side of the Reface CP. I used Blu-Tak (other slightly sticky stuff is available) to hold the box in place. The barrel connector that connects to the power connector was inserted, and a multimeter was used to check yet again that I had the correct polarity on the switched barrel connector. Once I was happy, then I connected the new switched barrel connector into the Reface CP, and turned the new switch on. After a few seconds, the Reface CP powered up and worked as usual.
Success!
As with any user-modification, even one like this where the device is not opened up or altered in any way, you should still take care, check everything at least twice, and make sure that polarities are the same (don't reverse anything.) You do anything like this at your own risk!
---
If you find my writing helpful, informative or entertaining, then please consider visiting this link:
Loops in audio seem to confuse people, based on the questions that I get asked... The problem seems to be that people have got very used to a world in which looped audio is very common, but the way that it is produced is not very common. If you look at the humble WAV file as a multi-platform, generic way to store audio, then what it contains is just a digitised version of the audio. Playing back that file just reproduces the audio from the beginning to the end - if this was the previous century then a good analogy would be a tape recorder (or even a cassette recorder), where the audio is stored electro-magnetically on a long piece of magnetic tape.
Plain ordinary WAVs don't have loop points, but you can add custom 'chunks' inside the WAV file that add information about the loop points - Wavosaur or Endless Wav2 are just two examples of the many ways to add loops points that get stored as chunks in a WAV file...
Most of the basic players that play WAVs just play the audio from the beginning to the end - because that's how most people are going to want to hear the audio inside the WAV file. The important numbers that you need to know are how fast the samples happen (so you know how to reconstruct the audio), and how many samples there are (so you know when to stop!). So for a short fragment of digital audio that samples the audio 44,100 times per second (CDs use this rate, for example), then a WAV file containing that one second of recorded audio is going to have 44,100 samples. In a minute, then that's going to be 60 x 44,100 samples (which is just over 2.6 million), and for an hour, then that's 60 x 60 x 44,100, which is nearly 160 million samples.
The 44,100 number comes from a requirement for digital audio to be compatible with the PAL and NTSC television systems - see this Wikipedia article for more detail. Sampling at 44.1 kHz means that the highest frequency that can be recorded is at just over 20 kHz, which is the highest frequency that young humans can hear (this frequency reduces with age, exposure to loud sounds for long periods of time, and other factors...).
One second of digital audio
In 2022, most of the digital audio that you will encounter in electronic musical instruments will probably have been sampled at at least 44.1 kHz (44,100 times per second), or 48 kHz, but some audio is sampled at higher rates: twice (96 kHz) and four times (192 kHz) the 48 kHz rate. If you are going to be working with samples, then that 44.1 kHz and time relationship is very important to know when you are trying to get your head around the length of samples, because it links the numbers of samples with time:
One second of audio sampled at 44.1 kHz is stored as 44,100 samples...
The resulting bandwidth is always less than half the sampling rate - see Nyquist, Shannon et al for more details. But basically, you need at least two samples to be able to reconstruct one cycle of an audio waveform, and so for a 44.1 kHz sampling rate, you can get a bandwidth from DC to about 20 kHz.
Bandwidth is less than half the sample rate...
It is worth thinking about the scale of digitised audio. A single cycle of 11 kHz (okay, a very high pitched sound!) will only contain 4 samples when it is sampled at 44.1.kHz, but it is also very short in terms of time. You need to zoom out about 11,000x to get to one second of time. You can see this when you are doing audio editing: When you have a few seconds of audio displayed on the screen, then you have to do a lot of zooming (tens of thousands of times) if you want to be able to see the individual samples in a waveform (and vice-versa).
A single cycle is very short in comparison to time...
More sophisticated WAV players and samplers will need additional information beyond the sample rate and length numbers in order to provide more sophisticated control over the playback. One of the basic things that can be controlled is looping. At its simplest, a loop is just the same piece of audio, repeated over and over again. So a one second piece of audio sampled at 44.1 kHz will repeat every one second (1 Hz). But if you only play the last half of that one second, then because it is half as long, it will loop twice as quickly, and so will repeat at 2 Hz. In order to specify exactly what is meant by 'the last half', then we need some additional numbers: in this case, it is the start of the loop. Since we specified half way, then that is going to be 22,050 samples from the start. The end of the loop, in this case, is going to be at the end of the piece of digital audio, and so will be at 44,100 samples. So the numbers that specify this looped piece of audio will be:
Sample Rate:44.1 kHz
Sample length: 1 second = 44,100 samples
Start of loop: 22,049 samples
End of loop: 44,099 samples
End of sample:44,099 samples
A half second loop...
Note that because samples are numbered starting at zero, then the numbers are actually 1 smaller than you might expect!
One use for loops is to play a sound continuously when a key is held down on a keyboard - known as the 'sustain' part of the sound. Without looping then you would have to store very long pieces of audio so that you could hold a key down for a long time. But with looping, then a portion of the audio can be repeated continuously whenever a key is held down, and the audio that needs to be stored can be much shorter. So the numbers used to specify where this 'sustain' loop starts and end would be, are known as the start and end points of the sustain loop.
If we wanted to loop just the middle part of the one second sample that we have been using as an example, then the start and end point might be 11,025 samples, and the end of the loop might be 33,075 samples. Note that the start and end points for the loop have to be 'inside' the total sample length, so those numbers can't be less than zero, or bigger than 44,100 in this case.
More sophisticated sample players can have additional loops - one use might be to produce audio when you release a key on a keyboard - known as the 'release' part of the sound. Again, you might want that sound to take a long time to fade away, and having a loop of audio means that you can have the long fade without having to store very long pieces of audio. The numbers used to specify where this 'release' loop starts and end would be known as the start and end points of the release loop.
Loop start and end points have to be 'inside' the sample!
Note that the release loop points also have to be 'inside' the total length of the sample. Also note that the sustain and release loops could be the same piece of audio, which would loop during the sustain part of the sound, and then loop again during the release part of the sound.
Without the loops, the audio in this example would play for just one second. With a sustain loop, then it would play for as long as the key was held down on the keyboard. For a release loop, then it would play for as long as the release time is set.
It is also possible to have 'attack' loops, where a portion of the audio is looped when a key is first pressed, and the sound goes from zero to maximum volume - this is called the 'attack' part of the sound. Some sounds drop down from that maximum to a lower 'sustain' level - pianos are a good example: they start out loud, but then slowly drop down to a quieter level. This 'decay' part of the sound can be produced using a 'decay' loop.
A sound recorded to use loops for the attack, decay, sustain and release parts of a sound could be very short in actual length, but the loops would enable the attack, decay, sustain and release times to be as long as required. In the 1980s, several manufacturers of electronic musical instruments used this way of storing samples so that the playback time could be changed (so you could have long attacks and releases, or long decays, or long sustain), but the actual sample lengths could be kept very short because the memory required was very expensive. Sample rates were also much lower in the 80s - 22.05 kHz was quite popular in some musical instruments and especially computers, and 11.025 kHz was also used (which will have an audio bandwidth of about 5 kHz - only slightly better than a telephone). The basic sample rate for telephones back then was 8 kHz, and the audio bandwidth was from 300 Hz to 3.4 kHz... not ideal for music! In 21st Century devices, storing long samples is not expensive, and so loops tend to be used mostly for the sustain and release parts of a sound.
It is worth reiterating that without loops, then digital audio replay happens without any flexibility of the length of the sustain or release time for a sound. It is only the widespread use of sample replay technology that has given us a world where an ordinary person expects that a sampled digital audio sound will keep playing for as long as you hold a key down on a keyboard. For people born before the middle of the 20th Century, for an electro-mechanical instrument like a Mellotron, which uses lengths of magnetic tape (not loops) to replay sounds, then it is obvious that the tape length has to be finite, and so you can only hold the keys of a Mellotron down for something like seven or eight seconds. In contrast, organs could (and still can) sustain a note as long as necessary, because the sound is generated inside the organ rather than being replayed from a stored (non-looped) recording.
Decent Sampler
Dave Hilowitz's Decent Sampler is a software sample player that can play back WAV files, and can play back sustain and release loops from inside those WAV files. The sustain loop start and end points can be specified inside the WAV file, or as part of an XML .dspreset file that Decent Sampler reads in order to know how to play the samples for a specific sound.
Decent Sampler is designed to read two different types of WAV file:
- multiple single WAV files containing a single sample, or
- one big continuous WAV file (made up of concatenated audio samples) where the WAVs inside are referenced as start points, plus end points. This is what Christian Henson (and Pianobook.co.uk) calls a Monolith file - you have a template on your DAW, and a voice track prompts you to play notes (on a piano, for example), and so you end up with a series of audio samples separated by silence (or whatever your recording system records when there is no audio, which probably is just the noise floor - so it is actually useful to have these gaps between samples because they are the raw material for Noise Reduction...), where the start point of each sample is gong to be close to wherever the voice prompt was (plus reaction time and any latency in the piano or synth...), and can even be partly or completely automated (do all of them assuming the reaction times and latency are going to be consistent). So if you look at a .dspreset XML file intended for use with a Monolith file, then there will be one sample file, and the start points will be the offsets into that file, whilst the lengths will be the length of each of the samples (minus 1). Yep, samples start at zero.
Inside a 'Monolith' file
Monolith files are great for people who want to automate as much of the sampling process as possible. So, if you want to sample a piano with a small interval (for example, thirds), how many velocity layers you want, how many beats you want to hold the note down (sustain time), etc., then you can use a template file that tells you when to play a specific note, and you just record everything as one large WAV file. The Monolith file that you get at the end has all the separate samples inside it, one after the other. There are various ways to edit files like this that enable multiple edits to be made at once, which can reduce the preparation time a lot!
Decent Sampler can also use .AIFF files...
The '1, 10, 100, 1000...' principle
For smaller projects, then individual WAV files can be used instead. If you have a Kalimba with 12 notes, then twelve sample files are pretty easy to manage. There's a principle called the '1, 10, 100, 1000 principle': if you are asked to, for example, sort 1 number into numerical order, then it is trivial - it is already in the right order. Sorting 10 numbers is going to take you a few seconds, but it won't be very difficult. However, sorting 100 numbers into order is going to take you a while, and you might not be very enthusiastic about doing it. But 1,000 numbers is rather different again - you aren't going to want to do it for free, it is going to take a while, and you will need to do some planning and work out a system to make it easy and reduce errors. A lot of people just don't want to do the 1,000 sort, and some are equally uncooperative about the 100. So 1,000 is some sort of built-in human limit. As for sorting 10,000 numbers, then almost everyone won't even start the sorting process without strong motivation of some sort (money, fame...)
So a project with more than 100 samples is going to need to be sorted into groups, which could be notes, or velocity layers, or some other parameter. Finding an approach that reduces that big number to something more manageable (like, nearer to 10-ish) becomes very important.
If you think about it, the Monolith system kind of hides the actual number of samples, or doesn't make the actual number quite as obvious because there's a single file with all of the WAVs inside it. And there are various 'do lots of edits at once' shortcuts that can be applied in a pro audio editor to make processing all of those WAVs easier.
How to Improve Noise Reduction...
Noise Reduction
One thing that you can do with a Monolith file (or actually, any directory/folder of individual samples) to make it easier for you (or other people) to process it with a Noise Reduction Utility, is to record one extra sample - of nothing! Yep, just record nothing as the very last sample, and this can then be used as the 'reference' background sample by the Noise Reduction Utility. In a Monolith file, it can be the very last sample, whilst in a directory/folder structure of individual samples you could have a directory/folder called 'Background Noise' with a sample called 'Background Noise.wav' inside it.
When you record this nothing file, you should make it in exactly the same way as the previous samples, except that you don't play the actual note, hit the piano key, blow the trumpet, bang the drum, etc. But remember to record several seconds of nothing - this helps the noise reduction to work better. Also, don't adjust anything when you do this recording of 'nothing'. Don't turn the microphone you were using off, don't turn that buzzy light off, don't turn that ever-so-quiet fan off, don't turn the fridge off where you store the drinks, don't change any levels or EQ in the mixer or the audio interface... In other words, don't change anything from how you recorded the actual samples. What you want is all the background noise that is lurking behind the actual samples, so that the noise reduction can then remove it. If the noise reduction software doesn't have a good reference of what the background noise is like in your recording environment, then how does it know what to remove?
Inside Decent Sampler
I started out calling this section 'In Decent Sampler', but that doesn't read well! To control loops inside Decent Sampler, there are a few parameters that you need to add to the <group> element.
The basic <groups> element looks like this:
<groups>
<groupvolume="0.0dB"
pan="0"
trigger="attack"
loopCrossfade="4000"
loopEnabled="true"
loopCrossfadeMode="equal_power">
<samplepath="Samples/sample1.wav"
tuning=" 0.000"
rootNote="60"
loNote="0"
hiNote="105"
loVel="1"
hiVel="127"
start="0"
end="440999"
loopStart="0"
loopEnd="440999"
tags="0"/>
</group>
</groups>
I have deliberately wrapped the text so that it works well on a narrow 'blog' layout! In a normal text editor, the lines of XML will be much wider, and without all of those line feeds!
The <groups> element is the container for all of the samples, which are in one or more <group> elements. All of the parameters that are in the <group> could also have been in the <groups> element, and then they would apply to all of the <group> elements inside the <groups> element. This time I have greyed out all of the parameters that are important, but not relevant to looping. So it now looks like this:
<groups volume="0.0dB"
pan="0"
trigger="attack"
loopCrossfade="4000"
loopEnabled="true"
loopCrossfadeMode="equal_power" >
<group>
<samplepath="Samples/sample1.wav"
tuning=" 0.000"
rootNote="60"
loNote="0"
hiNote="105"
loVel="1"
hiVel="127"
start="0"
end="440999"
loopStart="0"
loopEnd="440999"
tags="0"/>
</group>
<group>
More samples... (ending in tags="1" )
</group>
<group>
More samples... (ending in tags="2" )
</group>
. . .
</groups>
So you can apply parameters to either everything (<groups>) or to just a single <group> element.
You can have multiple samples inside a group, of course.
The relevant parameters for looping at the <group> or <groups> level are these:
trigger="attack"
loopCrossfade="4000"
loopEnabled="true"
loopCrossfadeMode="equal_power"
loopStart="0"
loopEnd="440999"
Which control if you want to have a sustain loop (triggered by a MIDI Note On message/event being
received
by Decent Sampler), or a release loop (triggered by the release), the cross-fade length (in samples), if
looping is enabled, and the way that the cross-fading is done ('equal power' keeps the apparent volume
constant during the cross-fade).
The relevant parameters for looping inside a sample are:
(Well, obviously the Sample itself!)
start="0"
end="440999"
loopStart="0"
loopEnd="440999"
Which set the start and the end of the loop. You can have multiple samples inside a group, of course.
And each of those samples can have different start and end points...
If the sample was a Monolith WAV file, then the start and end parameters might well be very large numbers: in the hundreds of thousands, millions, or even tens of millions of samples. In this example, the sample is ten seconds long, and so contains 441,000 samples. Remember that because the first sample is sample zero, then the last sample is sample 440999, and the length is 441,000 samples.
A one second sample being played back...
So far, the loop has been the whole of the sample. This is easy to set up and edit - but a loop can be part of a sample (and only a party of it - you cannot have the loop start and end points outside of the sample itself!)
In the example shown above, the sample starts at 0, and ends at 440,999, so it is 10 seconds long. But the start of the loop is at 221,000 samples and ends at 400,999 samples. So it plays almost all of the second half of the sample - just under 5 seconds. For a lot of sustained sounds, this is often the sort of arrangement that you will find - the first half of the sample is the 'attack' sound, possibly with a pitch change up to the final pitch (brass or strings can do this, for example), whilst the second half contains the sustain sound, which is mostly looped. Pianos and other instruments that have long decays can be tricky to loop because they do not always end up at a steady sustain level - they just keep getting quieter when you hold the keys down. You can set an envelope with a very low sustain level, and a very long decay to emulate this behaviour, but the sustain loop will need to be edited to keep a constant volume (a long cross-fade is one technique that can be used, compression is another). Note that the sample is being altered here, so that it can then be modified by the envelope. The ultimate result of this would be samples that have constant volume, and where the volume over time is controlled solely by the envelope - which is how synthesizers work. In a synthesizer, the oscillators make a sound the whole time (you could think of them as always being in loop mode!), and the only way to stop the sound is to apply an envelope and a VCA (or the digital equivalent.)
As mentioned above, one extreme approach, that was used in the past, was to have samples as 4 (or more) loops, one for each stage of the envelope (Attack, Decay, Sustain, Release), and this blended together sampling and synthesis into a hybrid form. Modern sample players tend to just have looped sustain segments.
You probably saw the 'loopEnabled="True' parameter. This is just an on/off switch for looping. But loopCrossfade and loopCrossfadeMode are more geeky parameters, and people often find crossfades confusing. So here goes with trying to make a simple explanation...
A cross-fade is exactly like that side-to-side slider that DJs use - it fades between two different audio sources. Because in the real world, solutions are rarely as straight-forward as they might appear, then trying to keep the volume constant as you blend from one to the other is tricky - especially because it depends on the audio itself. What works for sine waves is probably not going to work quite as well on heavily compressed audio.
But in a sample, there's an added complication - the time that it takes to go from one audio source to the other. Engineers tend to name things for what they do, so this is called the crossfade time. The thing is, how can it possibly do that? If I have two samples that are both 10 seconds long, how do I fade from one to the other (and later on, back to the first one again, and repeat...) - However long it takes, whilst both audio tracks are playing, then they must be overlapped - otherwise the fade can't happen. As a result, the time for the cross-fade to happen has to be stolen from the audio samples... (Strap in, because this is going to be mind-warping...)
So if it takes a second for the crossfade to happen, then that has to start one second before the initial sample finishes, which is at 9 seconds through the first sample. The second sample then plays for one second, until the initial sample is completely faded out, and the we get 8 seconds of the second sample, before the initial sample needs to start fading in again. So even though we have 20 seconds of audio, we can't play more than 9 seconds of the initial sample before we need to start fading to the second sample, and after 9 seconds of the second sample, we are starting to fade back to the initial sample again. So that's only 18 seconds out of twenty that are looped.
A one-second cross-fade...
If the crossfade time is longer, then the actual time playing just the samples gets shorter and shorter. With a crossfade time of 5 seconds, we get five seconds of the initial sample, then a crossfade for 5 seconds, and then we immediately need to start crossfading back to the initial sample. So the only pristine bit of audio is the very first five seconds of the initial sample. Everything after that is just pure crossfade, all the time.
A five-second cross-fade...
If we wanted a cross-fade that was longer than 5 seconds, then we would need to overlap three samples instead of just two... (which can get complex) In most ordinary applications, the cross-fade is limited to half of the sample length. So for a ten second loop, this will be 220,500 samples, and since we need to subtract one because of the sample numbering starting at zero, then we would have a start of 220,499 samples, an end of 440,999 samples and a length of 441,000 samples.
So here's that XML fragment again:
<groups volume="0.0dB"
pan="0"
trigger="attack"
loopCrossfade="220499"
loopEnabled="true"
loopCrossfadeMode="equal_power" >
<group>
<samplepath="Samples/sample1.wav"
tuning=" 0.000"
rootNote="60"
loNote="0"
hiNote="105"
loVel="1"
hiVel="127"
start="0"
end="440999"
loopStart="0"
loopEnd="440999"
tags="0"/>
</group>
<group>
More samples... (ending in tags="1" )
</group>
<group>
More samples... (ending in tags="2" )
</group>
. . .
</groups>
Sample Lengths
If you don't specify the start and end of a sample loop, then Decent Sampler looks inside the WAV file for a chunk that specifies the start and end loop points. If it doesn't find that chunk, then it uses the start and end of the sample itself. If Decent Sampler doesn't know where the start and end of a sample or a loop are, then this can be bad. It seems that one of the problems with DS versions 1.5.0 to 1.5.5 was connected with start and end points...
One mitigation that I try to remember to use is to add the length of the sample (minus 1) to the end of all of the samples in the 'Samples' directory/folder. If I am going to be using looping then I also move some of the loop parameters into the sample element as well. So if we now look at the modified XML fragment:
<groups volume="0.0dB"
pan="0"
trigger="attack"
loopCrossfadeMode="equal_power" >
<group>
<samplepath="Samples/sample1_440999.wav"
tuning=" 0.000"
rootNote="60"
loNote="0"
hiNote="105"
loVel="1"
hiVel="127"
loopCrossfade="220499"
loopEnabled="true"
start="0"
end="440999"
loopStart="0"
loopEnd="440999"
tags="0"/>
</group>
<group>
More samples... (ending in tags="1" )
</group>
<group>
More samples... (ending in tags="2" )
</group>
. . .
</groups>
It now becomes much easier to seer what the highest number that can be used for the end point is (440999!), but also keeping the cross-fade time below half of that is easy. Also, you can turn looping on or off 'per sample'!
Looping Samples for Sustained Pads
I'm now going to enter dangerous territory, because there are lots of ways of doing this, lots of opinions on the 'correct' way to do it, and lots of myths and pseudo-science. But this is what I do to prepare samples for looping - specifically, pad sounds. There can be a different approach for percussive sounds (I may have mentioned my big split of sounds into two categories: percussive and sustained?)
A 'silent' loop join for a sound with 2 sine waves...
So the above composite screen capture shows a waveform of two sine waves, slightly detuned from each other - see the DC bump in the spectrum on the left... The sample is 1 second long, and the two ends are shown in the two boxes on the right. So the loop 'join' is between the end and the start - in that purply-grey area. Note that both waveforms are at zero. If you were to print out the image, then you could cut out the two waveforms and they would join up smoothly across the join.
(Just a brief aside here, on numbers and representations of audio. I'm going to be jumping back and forth between audio waveforms and their digital equivalent, as you would find inside a computer or synthesizer. I'm also going to treat the numbers in the digital waveform as if they were an actual waveform - so when I talk about a 'zero crossing', then it could be in an actual audio waveform, where there really is a horizontal zero volts axis, or a digital audio waveform (just a bunch of numbers) where there is still a zero axis, but it is just numbers and no real voltages are involved. After spending a lot of my life jumping in and out of real audio and digital audio, I am rather comfortable in both domains. In the end, samples of audio waveforms are just numbers.)
Ah, zero crossings. Not magic, and not special, imho, but... convenient. So below is what lots of people will tell you is how to do a glitchless loop:
A 'zero-crossing' loop join...
In this case, then both ends of the waveform are at crossing the zero axis (the horizontal line cross the diagram), and so have the same value. But this time the join is not smooth - there's a sudden change in direction: a discontinuity. Does this matter? Let's artificially generate a discontinuity and see what happens:
A single discontinuity..
The waveform above is several seconds of zero, but with two samples nearly at maximum. The resulting spectrum is pretty much white noise. This is when you get a click in audio, but happening all the time....
A double discontinuity..
When the waveform is several seconds of zero, and then a maximum negative sample followed immediately by a maximum positive sample, then you have the worst possible mismatch of signals (+ to -), and this time, the spectrum is high frequency noise at around the half sample rate = 22.05 kHz.
So, sharp changes/corners in the waveform are not good. They create bursts of noise in the audio - which usually sound like clicks. So how do you get rid of these sharp changes or corners? You match the slope of the waveform at that point. Here's a diagram that shows, in bright purple, the direction (slope) that the waveform would continue in if it stopped bending as it passed through zero. it's a bit like a tangent to the curve at the zero point.
Where do the waveforms want to go?
As you can see, the end of the sample, on the right, wants to go upwards at a very steep angle. In contrast, the start of the sample, looks as if it expects the signal preceding it to be much lower. When they meet at the zero crossing, the mis-match of directions means that lots of frequencies are needed to suddenly change direction, and this causes an audible click.
Ideally, when two waveforms are joined, then the two curves should join up as if they were one continuous curve. Here's a diagram showing that:
Waveforms going in the same direction at the join...
Now the two direction arrows are going in opposite directions, and so not only is the join at the same voltage (zero), but the curve is smooth as well. This sort of join does not click. Well, it clicks a lot less!
However, finding a place where the two waveforms are zero AND are going to join up as a smooth continuous curve without any sharp changes or corners, is not easy!
I use a simple trick to get around this problem. I do a fast fade from one waveform to zero at the zero crossing point, followed by a fast fade up from zero to the other waveform. This forces things so that the direction of both waveforms is horizontal - that is, they are almost at zero volume at the join, and they are pointing in the same direction as each other. Here's what this looks like:
A fast-fade
The two triangles are the the volume envelopes of the fast-fade, and the two bright purple arrows are now horizontal, so the waveforms are very smooth as they join. Also, when you have added a fade like this at the start and end of a sample, then you don't need to worry about the direction that the waveform is going in - you just need to fade it to zero volume for long enough for the direction of the curve to be horizontal, and that is easy - just fade it to zero volume at the join. So the curve is smooth at the join, and there is no click. Again, you may get a very quiet click because there's still some relatively high frequencies required to get those sharp bends around zero.
One final thing to think about is the phase of the waveform. Note that the end of the sample (on the left hand side) has a positive half-cycle, followed by a negative half cycle. Then there is the join, after which the start of the sample has a positive half-cycle, followed by a negative half-cycle. So the half-cycles go positive, negative, positive, negative, and so on. This means that everything is symmetrical around the join, and this also helps to prevent any clicks.
Fast fades at the start and end of a sample...
And that's how I join two waveforms. I do a fast fade out at the end (a few milliseconds), and a fast fade-in at the start (a few milliseconds). I also make sure that the slopes of the two ends are the same - pointing in the same direction. I also look backwards and forwards in time so that I make sure that the phase is opposite: a positive end connects to a negative start, and vice-versa. So the start is at zero, and the end is at zero, both waveforms are pointing horizontally, and the phases of the half-cycles either side of the join are opposite. What your ears hear is a cross-fade that is faster than the human hearing system can respond to (the human ear needs something like 10 milliseconds to detect an event), and so you don't hear anything. So there is very little to create a click, and your ears would not be able to hear it even if there was!
This is not a perfect solution to looping a sample! If the start of the sample and the end of the sample have very different timbres, then your ear is going to detect the sudden change of timbre at the loop point. For this, you need to slowly cross-fade (the time must still be less that half the sample length, of course!) from one sample to the other, so that you smear the change in timbre over time, and your ear will not hear it - because the timbre will be the same on either side of the join! When the timbre is similar on either side of the join, then you can do a fast-fade...
If you look at most of the samples that I use for pads in Decent Sampler, then they will have fast fades at the start and end, exactly like this. In fact, I do exactly the same for percussive samples, because if you loop a percussive sound, you do not want a click just as it loops! The only time that I don't use these fast fades is when I have a waveform that exactly fits into the sample length with an integer number of cycles. You can see this in the 2 sine wave example at the beginning of this section - the two waveforms are both at zero, and are both travelling in opposite directions, so the bright purple arrows would be pointing in exactly opposite directions, and so there is no need for a fast fade! The join is silent, seamless, and inaudible!
Some looping scenarios
Now that you know how to loop samples, here are some scenarios for using looped samples:
First, two samples used for the sustain and release segments of a sound:
<groups volume="0.0dB"
pan="0"
loopCrossfadeMode="equal_power" >
<group>
<samplepath="Samples/SampleA_440999.wav"
tuning=" 0.000"
rootNote="60"
loNote="0"
hiNote="105"
loVel="1"
hiVel="127"
trigger="attack"
loopCrossfade="220499"
loopEnabled="true"
start="0"
end="440999"
loopStart="0"
loopEnd="440999"
tags="0"/>
</group>
<group>
<samplepath="Samples/SampleB_440999.wav"
tuning=" 0.000"
rootNote="60"
loNote="0"
hiNote="105"
loVel="1"
hiVel="127"
trigger="release"
loopEnabled="false"
start="0"
end="440999"
attack="0.1"
decay="2.0"
sustain="0.0"
release="2.0"
tags="1"/>
</group>
<group>
More samples... (ending in tags="1" )
</group>
<group>
More samples... (ending in tags="2" )
</group>
. . .
</groups>
Sample A is used for the sustain loop, so it is triggered by the start of a MIDI Note On event, which
is the start of the 'attack' segment of the sound . Sample B is used for the release loop, so it is triggered
by the end of a note event, when a MIDI Note Off event is received, when the 'release' segment of the
sound starts.
Sample B can be set to loop - but I could not find out how to get the envelope to reach the Release stage, so
it plays the loop for a long time if you set the Sustain to 1.0... So I resorted to specifying a complete
envelope ADSR and turning off looping. (This does mean that you can make DS instruments that play
until you load another preset, or quit them...)It also means that release samples should be percussive rather than sustained sounds...
I have not been able to find out how you can control sample B's ADSR parameters...
Alternatively, a single sample might contain two different loops inside it - let's keep calling them sample A and B for simplicity. This time the XML code looks like this:
<groups volume="0.0dB"
pan="0"
loopCrossfadeMode="equal_power" >
<group>
<samplepath="Samples/SampleA_881999.wav"
tuning=" 0.000"
rootNote="60"
loNote="0"
hiNote="105"
loVel="1"
hiVel="127"
trigger="attack"
loopCrossfade="0"
loopEnabled="true"
start="0"
end="440999"
loopStart="0"
loopEnd="440999"
tags="0"/>
</group>
<group>
<samplepath="Samples/SampleA_881999.wav"
tuning=" 0.000"
rootNote="60"
loNote="0"
hiNote="105"
loVel="1"
hiVel="127"
trigger="release"
loopEnabled="false"
start="441000"
end="881999"
loopStart="0"
loopEnd="881999"
attack="0.1"
decay="2.0"
sustain="0.0"
release="2.0"
tags="1"/>
</group>
<group>
More samples... (ending in tags="1" )
</group>
<group>
More samples... (ending in tags="2" )
</group>
. . .
</groups>
This time, the sustain loop has no cross-fade, and so there will be fast fades at the start and end of that part of the composite Sample A&B sample, whereas Sample B doesn't loop, and instead is just a percussive release sound...
Note that I said that the sustain sample starts when a MIDI Note On event occurs, and so an ADSR envelope starts as that sample plays. But when the end of the note happens, and a Note Off event occurs, then the envelope moves to the release segment for the sustain sample, but a new envelope starts for the release sample, which has now started playing. So there are two envelopes, and they can overlap...
Release samples are interesting. They are normally used for the sound made when the mechanics producing a sound stop - when you 'release' the key and let it go back to its quiescent state... In a piano, it is the sounds made by all the levers in the 'action' as they return to the default position, ready to propel the hammer at the strings when the key is played again. In a harpsichord, it is the sound made by the jack as it comes to rest against the string when you let the key spring back up. So these are often quite short, quiet sounds in real instruments - which doesn't mean that they have to be!
There does seem to be a limitation on the sort of envelopes that you can use for 'Release' samples in Decent Sampler. I have only been able to get AD envelopes to work correctly - it seems that the Sustain part of the envelope does not end, and so you never get to the release segment of the envelope. For most samples that you will use for release sounds, then this should not be a problem - just set the sustain to 0.0, and the decay so that it lasts long enough form the release sound to be audible.
So how do you control the envelope of a release sample? You probably don't need to have full ADSR controls in the UI, and maybe even no UI controls at all? Here's a quick fix - put the envelope controls inside the <group>:
<group>
<samplepath="Samples/SampleB_881999.wav"
volume="-30.0dB
attack="0.1"
decay="1.0"
sustain="0.0"
release="5.0"
tuning=" 0.000"
rootNote="60"
loNote="0"
hiNote="105"
loVel="1"
hiVel="127"
trigger="release"
loopCrossfade="220499"
loopEnabled="true"
start="44100"
end="881999"
loopStart="0"
loopEnd="440999"
tags="1"/>
</group>
Remember that the name 'release' really means 'Note Off' - a sample that plays when a MIDI Note Off message is received by Decent Sampler. So the 'release' in the envelope, and the 'release' in the 'trigger=' are two different things!
If you do want to have UI controls then you will need to add them in the <tab> section inside the <ui> section. Here's some experimental code for the decay parameter, which I seem to use a lot for release samples...:
The 'position="1"' in the <binding> needs to match to the 'tags="1"' in the <group> for this example. Notice that the type is 'amp', and the level is 'group', and so the tags= becomes the position.
So that's a slightly longer 'quick look' at looping in Decent Sampler. I'm planning to do more about how you control samples via UI controls, because that's a related subject that seems to confuse people.
---
If you find my writing helpful, informative or entertaining, then please consider visiting this link: