I've always worked according to the principle of 'Never the same thing twice'. Whilst most important for things like drums, I try to apply it to most sounds - although I also like flams, which kind of goes completely against the principle! Maybe 'Be inconsistent' is a better way of putting it?
(Just to be consistent, I have added in the updates made to MIDIdifferentONE version 0.02 into this blog...)
In Ableton Live, there's an obvious way to control the parameters that are one major way of changing sounds on the fly: the 'Clip Envelopes'. The name is slightly misleading, because clip envelopes are just a way to draw parameter values onto the piano roll. Anyway, the clip envelopes are normally hidden by default, and you need to click on the 'E' inside a round button to open up the overlay in the piano roll pane. Selecting a device and a parameter from the two pop-up menus then lets you draw lines and curves either with a rather blocky pencil tool ('Steps') or with a 'lines and breakpoints' ('Ramps') tool. I prefer the 'lines and breakpoints' approach...

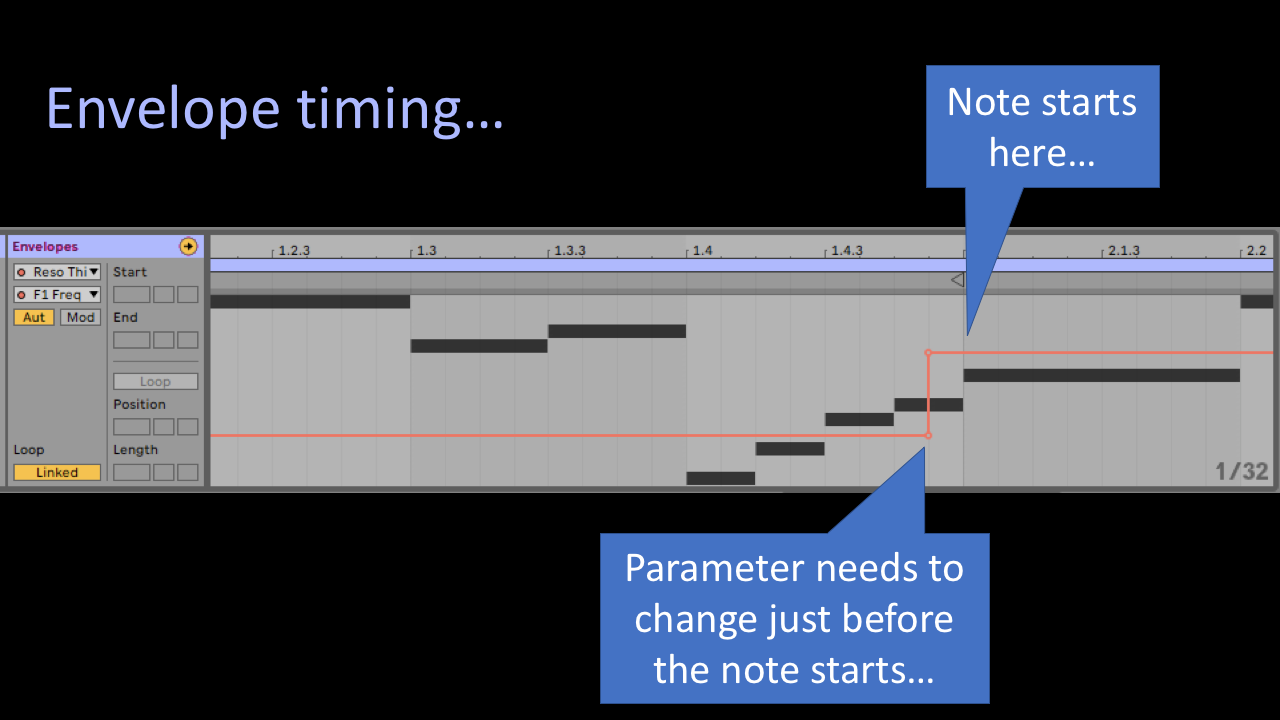
One of the 'classic' parameters that is controlled this way is filter cutoff (with an appropriate level of resonance) and I have spent quite a lot of time zooming out from a clip, setting the cutoff frequency for a bar, then clicking to get a new point and dragging it up and leftwards to get a new parameter level for the next bar, and so on. It requires quite a lot of clicking, but once it is complete, then editing each of the levels is quite quick to adjust. However, if you want to change the timing, for instance, to a change every other bar (or an arbitrary length), then it can require more clicks. There's also another non-obvious thing to consider that requires more clicks - you need to have the parameter set before the fist note on in the bar. This is why the orange clip envelope line is shown in the diagram as changing just before the first note in the next bar - if you don't do this then you hear the note start and then the filter cutoff change, which sounds like a mistake.
What this means is that you start off zoomed out, setting the parameter levels for each bar (or other interval), and then you need to zoom in to each of the ends of the bars where the parameter changes, the nudge the parameter change a little bit earlier in time. Then you zoom back out again. For me, there's a point where repeated mouse clicking gets a bit tedious, and I've never found any keyboard shortcuts for some parts of the clip envelope editing. So setting up several clip envelopes for a few parameters, and then changing the timing, starts to exceed my trigger level, and I stop and go looking for alternatives.
LFOs are the obvious alternative, and I've explored all sorts of variations of Slow Oscillators, including quite a lot of my own MaxForLive devices. The trouble with LFOs is intrinsic: they want to change, slowly; whilst for parameter changes I'm really looking for sudden changes followed by long steady fixed values. Lots of LFOs come with various 'Random' or 'S&H' (Sample and Hold') outputs that do give the stepped change, but then the values aren't under my direct control. Okay, so S&H on a filter cutoff can sound cool, especially a quarter note intervals (of which more later), but when you are controlling a build then you want to be able to set the parameter value for each bar. So LFOs are 'almost' the solution, but what would the ideal look like?
My ideal would have a LFO like 'Rate' control, followed by some way of controlling the parameter setting for each time period - from quarter bars up to every 8 bars or so. Which kind of sounds a bit like a weird step sequencer... but one that that enables each bar (or other interval) to have different parameters!
MIDIdifferentONE
MIDIdifferentONE is a deliberately 'different' step sequencer for parameter values that works a bit like an LFO, except that it is always synced to the sequence timing, and it is optimised for setting parameter values and then replaying them at various rates. Best of all, it always changes the parameter value
just before the end of the bar, so you don't get the note followed by the parameter change!
It turns out that the requirement for something to happen 'just before' something else is one of those programming tasks that keeps cropping up again and again in electronic music, and I've struggled many times with getting it to work correctly. So this time, I was determined to spend some time solving the problem, and then some time showing how I came up with my solution. As always with these things, there's probably a much better, cleverer, shorter and neater way to do it, but I will leave that to other programmers!
LFO timing and step sequencer design is all standard 'home territory' for MaxForLive, but the requirements for the timing of the parameter change are more interesting - we need the parameter to change 'just before' the end of the bar (or some other interval). 'Just before' might be loosely defined as something like 'after the last beat, and as late before the end of the bar as we can manage without the parameter change happening in the next bar'. I decided to simplify 'as late as' to mean ' the last 16th note tick before the end of the bar, which is probably going to work with most situations - although if you put very short notes right at the very end of a bar then MIDIdifferentONE might start to change the parameter to the value for the next bar as your last note of the bar plays...

For 16th note quantisation, Live's transport outputs bars as numbers, beats as the numbers 1 to 4, and 'ticks' as the numbers 0, 120, 240 an 360. If you don't quantise the timing, then you get tick numbers like 205.74 and the processing is more complex. For MIDIdiffrentONE, making sure that the parameter changed before the end of the bar was the most important thing, so I kept things simple and applied quantisation, but only to the timing for these parameter changes! So MIDIdifferentONE will not affect the quantisation of any other timing in your music.
The definition of 'after the last beat and when the last tick happens' translates to beat=4 and tick=360, so all that is needed is a bit of Boolean logic in MaxForLive... Now the easiest way to do this kind of goes against the 'visual programming' metaphor that MaxForLive uses, and uses the 'if' object and requires some typing! Suddenly MaxForLive is going a little bit 'programmer'y! What you type in the Max object is something like 'If ($i1=4 and $i2=360) then 1 else 0', which means that when input 1 is equal to 4 (beats) and input 2 is equal to 360 (ticks) then output a '1', otherwise output a '0' (zero). Yep, that's a traditional text programming 'if statement' inside a MaxForLive object. Some of you may need to sit down at this point...
That covers how to make something happen at the end of every bar - whenever the beat=4 and tick=360. Other times like every other bar or every quarter bar just require slightly different 'if' statements and additional processing. I hid the end result inside a patcher box to keep things neat and tidy:
So you can see the 'metro' object that provides timing from the master clock source, a 'transport' object that outputs bars, beats and 'ticks' into those three number boxes, and then the 'before_mr' object that contains all of those hidden-away 'if' statements. The 'switch' object selects the desired timing, and after a special 'counter' object, you can see the top of the 'step sequencer' object.
Inside the 'before_mr' patcher? I'm not one to hide stuff away, so here goes:
If you look across the lower part of the patch, then you should find the 'every bar' output, (fourth from the left) and above that a blink object, some tidying up, and then an object with 'if $i1==4 && $12==360 then 1 else 0' inside it. This is the 'just before the end of the bar' requirement turned into an 'if statement' using MaxForLive terminology - so '&&' means 'AND', and '==' means 'is equal to'. You might like to try and work out how the other outputs are generated as well.
There's a trap with this 'just before' approach, and it happens in the very first step. As always, you should consider the 'edge effects', and this is one case where I didn't think enough about the initial step. The 'before_mr' patcher outputs a 'bang' event just before the end of the set time period: from every 8th bar to every quarter beat. So what happens in the first step? If we take the middle case of 'every bar' then the 'bang' event will not happen until just before the end of that first bar. This means that until that happens the counter is in the 'reset' case, which is a count of zero, so the step sequencer stays on whatever step it was before we started Live's transport running. Only when it gets to just before the end of the bar will a bang event occur, and the counter will increment, and step 1 will begin - almost a whole bar late! What actually need to happen is that the counter needs to be set to step 1 at the beginning of the bar, not just before the end. This can be achieved by using a 'timepoint 1 1 0' object, which produces a bang event when Live's transport starts running, and if this resets the counter, then step 1 starts correctly. This means that the first step is slightly less than a bar long in this case...
That's what is happening inside, now let's look at outside.
Using MIDIdifferentONE
The plug-in has has three sections, and from left to right, these control the setup, the step sequencer, and the value output and mapping. On the left hand side, the top shows the beat indicator and count, where the blinker can also be clicked on to reset the sequencer. Underneath that, the pop-up menu allows selection of the step sequencer rate: from every 8th bar, down to every quarter note (slow to fast, with the fast setting being the 'classic' S&H filter modulation effect). The cluster of thirteen buttons are used to fill the step sequencer, and the 'Random' button generates a different pattern each time. The 'Scramble' button jumbles the sequence of the values, and below it is an 'Undo' button that will restore the last edit you made - it isn't very sophisticated and there's only one level at the moment.
The middle section is the step sequencer. Every fourth step is highlighted in white instead of light purple, and the bar at the top can be used to set the length and looping points. The default is 16 steps from 1 to 16, but you can vary it to anything to 2 steps from 1 to 2, to 16 steps from 1 to 6, and back to 2 steps from 15 to 16. When you stop Live, then the step sequencer area can be edited 'live' using the mouse - just hover the mouse near the top of one of the step 'circles' in the middle 'step' section, and that value will be displayed. Click and you can change the value of the step. If you move the mouse across the step sequencer area then you can 'draw' in the values very quickly. - the background of each step will go grab as the mouse selects that step...
So the workflow for setting the controlled parameter is now very simple: Stop Live playing, and then you can set the step values as you want with the mouse and they will be saved. Note: If you select one of the preset patterns, then you will lose your edits!
The right hand side shows the output value for each step, as well as a vertical bar indicator. The 'Normal'/'Invert' switch inverts the value, so high values become low and vice-verse. The 'Offset' and 'Depth' controls allow the value to be adjusted to suit the target parameter. Finally, the 'Unmap' button undoes any pre-existing mapping of the value to a parameter inside Live, and the 'Map' button allows you to mp the value to any available parameter inside Live.
Here is the 'classic' LFO S&H filter mod setting, except that it repeats, the steps can be edited, and it can be slowed down to as slow as once every 8 bars. This example is set for every other bar, and so the end effect sounds like a different setting (or different preset) every 2 bars. And switching to quarter beat cliche is just a single pop-up menu selection, whereas you would need to edit the timing of every value in a clip envelope.
Here's the output remapped to an instance of Analog inside Live, where the controlled parameter is the octave for Oscillator 1. The Offset control is set so that the centre position is no stave transposition, whilst the depth is set so that the oscillator goes up and down by one octave. LFO modulation of the octave control with an 'S&H' type of waveform would not give you any way to edit the waveform, but MIDIdifferentONE lets you set when the octave transposition happens.
Something that you may not have tried before is to change the filter type. Doing this every half beat is quite extreme, and the sound of a filter jumping from his-pass to band-pass to low-pass quickly is unusual. Remember that unlike an LFO doing Random or S&H waveforms, you can edit every step of the sequencer, so you can get exactly the results you want for each step.
ONE?
After a long run of 'hex' MaxForLive plug-ins, you might not be surprised by the 'ONE' suffix to the name of this device. I can neither confirm nor deny the future existence of any multi-channel versions of this utility...
Getting MIDIdifferentONE
You can get MIDIdifferentONE on
https://www.maxforlive.com/library/device/5805/mididifferentone-mr
Here are the instructions for what to do with the .amxd file that you download from MaxforLive.com:
https://synthesizerwriter.blogspot.co.uk/2017/12/where-do-i-put-downloaded-amxd.html
(In Live 10, you can also just double-click on the .amxd file, but this puts the device in the same folder as all of the factory devices...)
Oh, yes, and sometimes last-minute fixes do get added, which is why sometimes the blog post is behind the version number of MaxForLive.com...
Modular Equivalents
In terms of basic modular equivalents, then MIDIdifferentONE 0v01 would probably require an LFO plus a step sequencer, and a Utility module to do the scaling, giving a total of about 3 ME (without all the stored patterns, of course).
And here's a link to click on if you find my writing informative: