Thursday 24 December 2015

Waverne development = Waivy

For a while, I've been working on a new version of my Waverne synthesiser. Waverne takes the Laverne synthesiser example from Max (by Cycling'74) and replaces the waveform-based synth engine with a swept segment wavetable that provides very complex sounds instead of static ones. Kind of 'effects within' rather than 'at the end of the' audio processing... If you've ever used the Tide synthesiser from Christian Kleine, then that is Waverne expanded in several directions! But what about making Waverne simpler and smaller?


Waivy is a teeny, tiny version of part of the forthcoming new version of Waverne. I now have a more powerful wavetable tool to work with (Wave Creator) and this simplifies the job of creating the large wavetables that the engine requires. For Waverne I used Audacity a lot to generate the custom wavetables, but for Waivy I have used the Wave Creator 512 tool, and the results are very encouraging.

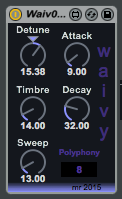
Waivy has a minimalistic set of controls. But don't let this fool you: Waivy is a powerful little plug-in, with lots of sound generating capability.

[Detune] allows you to tune the two oscillators to 'in-tune' by clicking on the triangle (or setting it to 0.00. Moving th control away from 0.00 detunes the two oscillators symmetrically, so there isn't any overall pitch change, but it does mean that the direction you move in does not matter - the tune sounds the same if you move the control to the left or the right. I considered putting the detune so that 0.00 was on the left hand end, and full detune was on the right, with clockwise rotation giving more detune, but this felt all wrong - 'in tune' had to be in the centre of the control, so that's where it is.

[Timbre] allows you to select the part of the wavetable that you want to use as the basic sound. You have complete freedom of where you choose within the range. There are 28 basic waveforms, plus ll the overlaps, so there are a lot of different starting points to explore.

[Sweep] allows you to control the amount of movement through the wavetable that the envelope causes. At the 0.00 position (left-most rotation), you get the basic wavetable itself: static and boring), but rotating it to the right causes more and more envelope modulation of the wavetable sweeping, and this gives a nicely animated feel to the sounds. There is a bit of interaction between the Timbre and Sweep controls at the extremes of the ranges (I'm still learning about the wonderfully-named 'pong~' function in Max) and so you may need to do some tweaking to get solid sounds.

[Attack] and [Decay] are a very simple 'contour'-type AD envelope, where there is no sustain, and once triggered, the envelope does its thing with no re-triggering or release complications. Just about as basic as envelopes get, but because the wavetable sweeping is intimately linked to the envelope, the Attack and Decay controls are very much part of the timbral control set, so don't just think they are controlling the amplitude.

[Polyphony] is the final control, and this gives away the roots of this instrument: the ever-popular Pluggo 'Big Ben', possibly one of the most edited M4L examples ever created, and the core of many M4L giveaways from lots of online sources, including, now, me! (It will be interesting to see if any 're-skinned' variants of Waivy turn up in the next few months...) Click on the number and move it up or down to set the polyphony limit, after which note stealing will occur. 8 is okay for most purposes, but long decays might need more to avoid sudden loss of audible notes.

And that's it. Simple but rather effective for some sounds, and it seems to be reasonably light on CPU resource, which is useful in some circumstances! Enjoy.

Waivy is available from MaxForLive.com.


Here is an early version of Waivy in a typical chain: Waivy first, then echo, then reverb...

Saturday 19 December 2015

Sine3Generator

I've just published a new sound generator on the MaxForLive.com web-site. Here's the usual extended user guide...


Sine3Generator is a sound generator - and yes, I've done them before, and this is another one. Currently in a 'light' version with purple trim, I will update it to a 'dark' version over the next few weeks, and I may be unable to resist making a few tweaks too. 


This sound generator does not respond to MIDI inputs - it just sits there and makes noises continually...

What seems like a long time ago now, I wrote a series of 15 generators in 'Reaktor', and this represents a revisiting and updating of those ideas in M4L. There is lots of history to this type of stand-alone 'sound generator'. Modular synthesisers lend themselves quite well to this type of FM chaining, particularly if there are only a few VCOs... Back in the 1970s I built cascaded relaxation oscillators using injunction transistors, and discovered that frequency ability and tuning were very important, which is very apparent in some synthesisers of the time - the vernier dials on the EMS VCS3 are a good example, and the VCS3's matrix interconnection panel lends itself very well to complex chains of devices... 

More recently, Noisedrone .1 and Noisedrone2 have used Max For Live (M4L) to make sounds using cascaded chains of oscillators, and these have been popular downloads on the MaxForLive.com web-site. Another popular generator is my Noise Generator 0.4... So with 15 designs languishing on my hard drive, it seemed like a good time to blow the dust off them and try publishing them again.

The basic idea is very simple. A sine wave oscillator with LFOs that can modulate the pitch and the output is frequency modulated by another similar oscillator, which is modulated by another similar oscillator. It's a simple FM generator with a lot of controls, and a flexible output stage. The output allows mixing of three harmonically-diverse outputs: the third modulated oscillator itself ('Sine'), the ring modulated output of the third and second oscillators ('Ring') and the output of the second oscillator 'sample & hold' processed by the third oscillator, with LFO modulation of the mixing, plus LFO panning as well. 

A good way to start is to turn all the controls to the leftmost minimum position (and save this as a preset of course!), and then to select the Sine button, adjust the volume to your preference, and choose the pitch you want in Oscillator 3 (there's just a Pitch control there, so it is easy to find!). This is a good place to learn the output options: LFO modulation of volume, plus LFO panning. A lot of my M4L has similar approaches to things, so if you've seen one of my 'Pan' sections, then you will recognise the same controls across many of my devices. One variant here is that my 'usual' LFO has the ability to free-run or to sync with the Live timing, but for Sine3Generator, then you only get free running LFOs. 

Once you have the basic Oscillator 3 under your control (some ping-pong echo is very often applied to the output of this type of generator...) then there is the LFO modulation of the pitch of the oscillator to try out. 'Under control' is an interesting phrase. When I worked in a music shop we used to do listening exercises: someone would play a chord and the rest of us would say what it was, or someone would make a sound on a synth and everyone would have to recreate it from scratch. Rick Wakeman was famous for being able to set up a sound on a MiniMoog just by adjusting the knobs, and then playing it without the incremental audition/edit cycle that you often see, and of which I'm often a big user, particularly for FM synthesis. Which neatly brings me back onto the topic...

When you are comfortable with all of the controls for Oscillator 3, then you can try moving to the left and try exploring the pitch and modulation controls for Oscillator 2, then the LFO pitch modulation for that oscillator, and so on. (There's a bit of a theme here too - my devices often start in the middle and move outwards, but just to keep your awake, some of them start on the left and move to the right. Which format I use usually depends on the workflow...)

Because Oscillator 1 is at the top of a stack of FM then it can cause big changes to the oscillators underneath it, so be cautious at first with the pitch and modulation controls. If everything gets too much, then just go back to the 'all leftmost' preset that you saved and start again from Oscillator 3.

There's a lot to explore in Sine3Generator, and a lot of sounds waiting to be created. Recording the output and processing it further is thoroughly encouraged! Audacity is my editor of choice here, although mine is very customised...


(As always, my M4L stuff is a 'work in progress', so it may not be perfect (in fact, it probably won't be, because perfection is a rare thing indeed!), and early versions tend not to have very much help on controls included in the M4L. I know that this is a good thing to have, but I'm short on time an speed gets you fun things quickly, and none of my stuff is supposed to be professional, with timely support and detailed help inside. But please feel free to report bugs via the comments on MaxForLive.com, and I will try to fix them when I can find time. )


There is now also a 'dark' version...
Related articles