Monday 31 August 2020

Decoding a 'ParamName Value' control string in MaxForLive...

Over time, Max and its 'Ableton Live' cousin, MaxForLive, have iteratively added functionality to do music, MIDI and audio-related tasks. 

Me, I'm not so good with new functions. I tend to use the same Max objects over and over again, because I know them, I'm familiar with how they work, and so I use them. 

The problem is, sometimes this means that I struggle to solve problems when there's a perfect solution just waiting, not hidden but overlooked, already in Max. This happened recently when I wanted to decode a 'ParamName Value' control string, and string processing is not one of Max's greatest strengths. I have used quite a few of the 'zl.' list processing functions, but there are a lot that I've never used as well. Searching through the 'zl.' help pages, I found 'zl.sub', where the example shown isn't very exciting:


Okay, so for the first number, '1', then it will output the number '1' indicating the first position in the list. And 2 for the second item, and so on. But then I realised that the numbers were distracting me, this is a list processor, and so it could be any 'symbol': numbers or text. It suddenly dawned on me (Duh!) that the 'sub' in the name meant 'Sub-set', and it all became clear. All of those convoluted 'If' objects that I had struggled with previously to process text strings were instantly rendered obsolete. 

Yep, a face-palm moment.

So here's an example that should make it much clearer what you can do with zl.sub in a more musical  'MaxForLive' type of context:


At the start is a control string: a parameter name, followed by the value of that parameter. The sort of string that is human-friendly... The 'fromsymbol' object turns it into a list containing a string symbol ('Cutoff') and an integer ('100'). This is then split into two separate fragments by the 'unpack' object. The symbol goes into zl.sub, which reports back that 'Cutoff' is the 5th item in the list, and the integer is the value of that parameter. 

Human-readable input becomes programming-friendly name and value pair. It's not a click-bait headline, but it makes quite a few of my abandoned projects much more possible now. 

So that's a face-palm turned into a light-bulb moment. Not bad for a Max command I'd always overlooked. My Day: Made. Happy face.

(Yep, one of the shortest blog posts so far, I think...)

---

If you find my writing helpful, informative or entertaining, then please consider visiting this link:


Synthesizerwriter's StoreSynthesizerwriter's Store
 (New 'Modular thinking' designs now available!)


Sunday 30 August 2020

Customising a Yamaha RM1x Groovebox Floppy Disk Emulator

Vintage gear can develop a number of problems. There is already a lot of material available online about replacing electrolytic capacitors, which heat and age can dry out causing them to lose capacitance. Unsoldering capacitors is fiddly work, really needs a good quality desoldering station, and can take a lot of time if there are lots of capacitors to change (replace with higher temperature rating and higher voltage if there is space...) Backlit LCD displays are another common problem, where the electroluminescent backlight drivers fail over time, and the LED backlights gradually seem to go dim. If you can find OLED replacements then these are arguably the best, but I haven't been able to find out much about the real-world long-term life of them - after all, 90s gear is nearly 30 years old! And then there are 3.5 inch floppy disk drives - particularly the ones which use belts instead of direct drive. It seems that old drive belts go loose, or go sticky, or go brittle, and all of these tend to result in a floppy drive that doesn't work. 

I've been gradually replacing the backlit displays and floppy drives on my vintage gear. To be more accurate, I mean 'what used to be backlit' displays. When you start replacing displays, you quickly discover that the difficulty of doing it varies enormously. Some synthesizer expander modules (the Yamaha TX7, for example) are very easy, whilst some keyboard workstations can require quite extensive amounts of disassembly. Here's a link to a pretty detailed description from a blog post describing the process for a Korg Wavestation: https://jaryic.livejournal.com/11778.html . As it says, 'not for beginners'. I couldn't find any way to backlight my Roland TR-505, though, so if anyone has any ideas, just let me know...

Floppy drives tend to be easier to replace, but there are sometimes complications. For example, the Yamaha SY99 uses a 26 pin floppy drive interface cable, rather than the more usual 34 pins, and that has long been a topic of much discussion on the relevant Yamaha forums. Most of the better companies that sell floppy drive emulators are well aware of this complication, and have their own reliable, verified and tested adapters. 

My own description of the pinouts of the 26 and 34 pin connectors is still available on the Interweb: http://www.martinruss.com/sy99adapter.html Then there is also my description of replacing a failed SY99 floppy with the long-discontinued official Yamaha replacement, complete with Yamaha adapter board: http://www.martinruss.com/sy99.html This article is probably rapidly becoming 'vintage' in its own right!

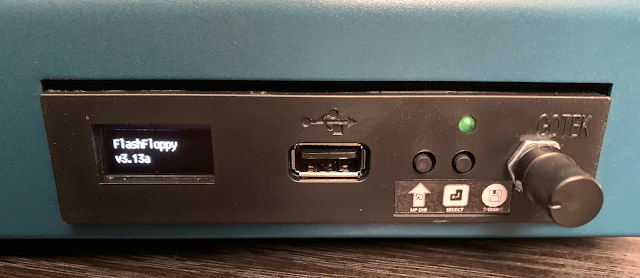
But my Yamaha RM1x floppy drive proved to be a different type of challenge. The floppy drive is accessed via the front panel of the RM1x, whilst the main control surface of the RM1x is the top surface. 

When the only control on the floppy drive was the 'Eject' button, and the writing on the floppy label was easy to read as it ejected, this was fine, but for modern floppy emulators, there are more controls, and a display. The simple 7-segment LEDs are not my recommendation - OLEDs which show file names are much better, if a little tiny. But the display is on the front of the floppy emulator... 

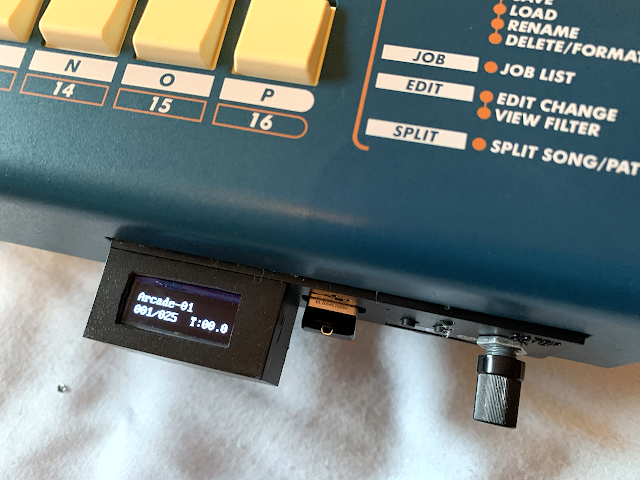
This means that the OLED display of the floppy emulator is not easy to see when you are using the RM1x. You only need to bend down and lean back a few times so that you can see the display before you realise that it is very awkward. So I moved the display so that it was easy to read when you are using the top 'control' surface of the RM1x!

But, first things first. I got my floppy disk emulators from CPMagneticMedia on ebay.co.uk: https://www.ebay.co.uk/usr/cpmagneticmedia , who are very knowledgable, and have a wide range of floppy emulators, backlit LCDs, and lots of other useful stuff for customisers/upgraders, etc. 

The first thing I did when I had the floppy emulator installed and working was to remove it, open it up and thus void the warranty! The OLED was held in place with hot glue, which is easy to remove if you have a hot glue gun...


But before removing the OLED display, I got a 'potting box' of about the right size and worked out how much I needed to cut it down with my trusty Dremel...


Then I removed the OLED display (Carefully! They are very delicate - note the black foam used to hold it in place...) and removed the remaining hot glue with snipe nose pliers.


Then I cut the potting box to size and cut out a window in the top surface the correct size for the OLED display - using the existing hole in the floppy emulator as a guide. 


One of the actions to keep doing when making mods like these is to check and re-check. So I now checked that the OLED, the mounting foam and the new potting box all fitted together nicely.

I then extended the four way cable to the OLED, so that I could push it through the hole in the floppy emulator front panel.


I then mounted the OLED display in the potting box, using the mounting foam and more hot glue, then glued the potting box to the floppy emulator front panel.


And from the top, things are a lot neater in appearance.


From the remains of the potting box, I then made a cover for the underside of the box, to hide the extender cable... and glued it in place.


The finished result looks very nice!


Now you can easily see the display when you are controlling the RM1x.


Full disclosure: before I extended the display into the potting box, I did explore using a prism to try and twist the display so it would be visible, but this suffered from the 'mirrors only swap one direction, not both' problem and I got reversed text on the display.

I would like to thank CPMagneticMedia for all their help with this project!

As with any mod, you are almost certainly going to invalidate warranties, and you may break rare or custom parts that are hard to find. So you do any mods at your own risk! Only do mods if you are confident and experienced. 

Postscript

Some people have asked me if I could send them the FlashFloppy FF.CFG file for the drive, as well as the jumper settings. I did not buy a generic Gotek drive, flash it and configure it - I bought a custom  RM1X-specific drive that was already flashed and pre-configured, with a rotary encoder and an OLED display. 

If you want to use FlashFloppy on a generic Gotek drive, then the GitHub site is at: 

https://github.com/keirf/FlashFloppy/wiki/FF.CFG-Configuration-File 

---

If you find my writing helpful, informative or entertaining, then please consider visiting this link:


Synthesizerwriter's StoreSynthesizerwriter's Store
 (New 'Modular thinking' designs now available!)


Friday 21 August 2020

Customised Synthstrom Audible Deluge

One of my background tasks for the past few months has been researching mid-to-high-end 'grooveboxes'. Whilst the marketplace has lots of low cost (sub $500~) examples of 'single portable boxes that can create music using MIDI and samples' (aka grooveboxes, although there are much more sophisticated and complex definitions), from Teenage Engineering's Pocket Operators, OP-1/Z, the Roland MC-101, Novation's (hard to beat) Circuit, Korg's Electribe 2, Elektron's Digitone/Digitakt and Model:Cycles, Polyend's Tracker, the 1010 Music Blackbox, plus many more, the next level up is significantly more sparsely populated and much more diverse in approaches. Doubling the budget ($500-$1000 and more) can get you a much more capable device, but I wanted to know which one was best suited to my way of thinking? 

(The title of this post kind of gives away the end result, of course!)

Many years ago, I remember being greeted with a certain amount of disbelief when I expressed my opinion that the major deciding factor in choosing a DAW should be the workflow and its alignment with your own internal mental model of how to make music. It seemed that brand-name, who else used it, resolution, number of tracks, latency, bundled plug-ins and many other factors were far more important to many people. My opinion hasn't changed, although I have found that I have increasingly moved to the 'boutique' end of the market: small, independent manufacturers who tend to be musicians and technologists. As an example, my most sophisticated pedal is a Poly:Digit, which isn't exactly mainstream...

The other vitally important word in that brief definition is 'single'. When I go away from a DAW with access to external hardware synths and effects, into the 'live performance' scenario, then I'm looking for ideally one box, and probably three boxes maximum. I've played the game of having lots of equipment to set up and tear down, and like most people who have done that more than a few times, I have decided that:

Simplicity Means Less To Go Wrong! 

But back to those 'next level up' grooveboxes. So what are the main contenders? I whittled the list down to these:

- Elektron Octatrack (mk1 or mk2 (mk2 is a makeover that is probably more like a 1+))

- Roland MC-707

- ModDuo X

- Synthstrom Audible Deluge

- Akai Force

- plus a few others that were fighting for attention (MPCs!), and I even considered a few no-longer-current devices - even though trying to find second hand gear can be stressful... 

As always, your favourite is probably missing from this shortlist. Note that I deliberately rejected these whole categories:

- hardware 'sequencer-only' devices (no Squarp Pyramid or Polyend Seq or Social Entropy Engine...) 

- hardware controllers that require a DAW or computer (NI Maschine, Ableton Push...)

- modular 'sequencers plus a few modules'. (Creeping module purchases means your rig is never quite finished...)

My opinions

After months of careful research, here's my personal opinions:

- Elektron Octatrack. 

The Octatrack has been bubbling under on my GAS list for a long time. And that's probably the main issue - it has been around for so long that it may be about to be replaced, and I hate buying something which is immediately replaced by something much better for less money! 

Pros. Flexible sample playback, a song-mode sequencer (the Digitone and Digitakt lose points because of their lack of song support), and some neat processing. The eight channle scan also be used as a mixer, which is interesting. Looping support is also good. The Mark II's slider control is definitely a good reason to go for this in preference to the Mark I.

Cons. Seems to be difficult to learn. This might be the classic 'I will say it is hard to use because that makes me look good!' situation, but the YouTube video's of people using Octatracks seem to reinforce the amount of learning that is required. Is complexity what I want in a live environment? Probably not. Also, most people seem to use other gear with an Octatrack, so that's a concern. Finally, there's the nagging doubt that there's probably a Mark III in the pipeline, or maybe even a total revision.

- Roland MC-707

My first album was recorded using a TB-303, a TR-606 a Sequential Pro-One and a Casio CT-1000, and I've currently got a heavily modded TR-505, so I'm no stranger to Roland gear. The MC-707 is kind of what I reckon an Elektron Octatrack 3 might be like, although with a different workflow...

Pros. Ableton Live-style grid is a plus. Lots of immediately editable sounds without any need for a computer (probably the top feature request for the Novation Circuit 2). 

Cons. No song-mode is a major disadvantage. At the sub-$500 price-point then this is acceptable, but I've spent too long with old school drum machines to want me to be constantly controlling what is happening. No way to send MIDI CCs might also be a problem if I was going to use it with anything else... No 'Scale' mode for the buttons is weird when most of the sub-$500 group have this! Having to effectively sacrifice a track to sequence external MIDI is strange, but again, for a single box then this is not as important as it might be if I was using this as the centre-piece of a studio. 

- ModDuo X

I've been trying to buy one of these for over a year now, and it seems to be permanently out of stock, with pre-orders all being consumed in a few seconds of the site accepting them. So I've more or less given up on this one. I talked to Mod at one of the Ableton Loop events, and they seemed very confident, maybe not in a good way. Given their apparent supply chain problems, maybe my gut feeling was correct... 

- Synthstrom Audible Deluge

Definitely a 'boutique' device, this goes against the grain in all the right ways. No display - well, not a display in the conventional sense, although if you scaled up a Novation Circuit, it could well look a lot like this. An interesting design, with unusual/novel controls that make a lot of sense. 

Pros. Small, light, song-mode (plus arranger functions), Subtractive and FM synths, sample replay, and looping. Comprehensive features and a very good firmware update policy (frequent!). Seems to think the same way that I do!

Cons. Using the display as the main control means that you can spend a lot of time jumping in and out of song mode. As with the Octatrack, there seem to be a lot of shortcuts that require muscle-memory to learn. 

- Akai Force

I immediately thought of a 'DAW in a box' when I first saw this, and this is too much like a Push and Ableton Live. I would struggle to say that I was 'DAWless' if I used one of these.

The result?

I went for a Synthstrom Audible Deluge (a 'Deluge' from this point onwards). It offered the features I wanted, the size and weight and convenience, and a pretty good 'single box' solution. When it arrived, the adapter envelope had a note on it:

So I took the 'Martin :)' and turned it into a label for the top panel:

So if you ever see a 'Martin :)' where you were expecting a Deluge, then that will be me!

---

I will report on my progress with the Deluge as I get familiar with it... So far, I'm definitely enjoying it!

---

If you find my writing helpful, informative or entertaining, then please consider visiting this link:


Synthesizerwriter's StoreSynthesizerwriter's Store
 (New 'Modular thinking' designs now available!)