Ok, so ever since Pianobook.co.uk was launched on the 29th of March, 2018, you’ve spent ages sampling your piano, and then more time editing the samples, then taken a photograph that you are happy with, then decided on using Decent Sampler as your sample player, then edited your ‘MyDecentSampleStuff.dspreset’ file so that it works correctly (and you’ve struggled with the instructions, read Dave Hilowitz’s 'format documentation' numerous times and you still don’t quite understand all of it, and more…). But, finally, you think that you are finally ready to submit it to pianobook.co.uk!
Not quite.
There’s just one more hoop to jump through… Preparing your Decent Sampler Sample Pack for uploading to Pianobook.co.uk.
Actually, this bit is quite simple, with just a few easy steps…
I have done this quite a few times now, so this blog post contains a lot of tips on how to do it and get it right, and avoid problems.
( I’ve screen-shotted a Mac for this tutorial document, but the process should be very similar on Windows or Linux. I’ve tried to remember to say folder/directory each time I use the word… )
Preparation for submission:
(In everything that follows, I am using the convention that your Instrument / Sample Pack is called: MyDecentSampleStuff, and that this will be abbreviated to MDSS. So for Decent Sampler development, all of the working files will be in a folder / directory called MyDecentSampleStuff. I will be highlighting important file-names in orange!)
If you have not signed up with with the
pianobook.co.uk web-site, then you will need a few other files and bits of information that will be used to personalise your experience, and to customise your
profile on Pianobook.co.uk:
[ ] A banner photo or graphic of 2000 x 500 pixels, which can be in colour, and can be a .jpg or a .png. This will be faded to white by the web-site when you scroll down. I called this file: profile-banner-2000x500.jpg, which makes it easy to get the right size of photo or graphic, and easy to find when you upload it to the web-site and into the banner in your profile. There is a maximum size of 2 MBytes for this file, which is shown in the dialogue as 2mb (a typo), which is millibits, which equals 2/1000th of a bit. You can't fit very much graphical information in that amount of data...
[ ] A photo of you, or some graphics that you wish to be identified with. If you do not provide a photo, then
pianobook.co.uk will use a default picture of Christian Henson’s
Neumann KU 100 binaural head microphone (used for
Head-Related Transfer Function recordings for binaural audio, ambisonics, 3D audio...), which he calls ‘Dave’, will be used instead, and you do not want that to happen, do you? This time, the picture has to be a .jpg, in colour, and should be at least 500 x 500 pixels in size. It seems that .png files are not accepted…so beware! The web-site will switch between the colour version and a derived black-and-white version of this photo (or graphics), so choose your colours wisely. (The ‘suspicion turned up to 11’ cyber security person in my head tells me that the reason for this being converted to monochrome by the
pianobook.co.uk volunteers might be because it is possible to have hidden messages in colour photos that only appear when they are automatically converted to black-and-white (or monochrome)). I called this file:
profile-photo-500x500.jpg, which makes it easy to get the right size of photo or graphic, and easy to find when you upload it to the web-site and into your profile.
[ ] Some text that you might need to think about beforehand.
- Name
- Email address
- Username
- Display Name
- Password
Your Name and Email address should be easy. But you might want to consider your User Name (used for logging in, and any spaces will be removed...), and your Display Name (how you want to be known on the web-site) early rather than when you get to the dialogue box, and the pressure to be smart and subtle and cool starts to build…
Let's think about the Username first. The name itself is a clue - notice that there is no space between User and name. This name will be used to log in to Pianobook.co.uk, and so it can be anything you want because it will never be seen by anyone else. In fact, it is best to keep it private because it makes it more difficult for someone else to log in and pretend to be you. So in my case, I would avoid anything with 'synthesizer' or 'writer' in it, and I might go for something like 'gasresister' or 'toomanyfx'. Again, you should choose your own, and you can use CamelCase capitalisation to make it easier to see words: 'GasResister' or 'TooManyFX'. One thing to not do is to make it the same as your Display Name, because that is the first thing an attacker would use to try and break into your account.
Since I have mentioned Display Name, then that is the next thing to think about. In this case, this is the way that you will be referred to inside Pianobook.co.uk - so I was completely obvious and chose 'synthesizerwriter'! But there's nothing to stop you using another name if you want - unless you have a standard online identity like I have. As I said in Part 1, you should think about what you want for your Display Name before you get to this dialogue box, because it is much easier to be creative when you don't have the pressure of filling in the field in the dialogue box.
Finally you need to provide a password, twice. That cyber security guy in my head says that you should use a password manager (an app, not a web-based potential leak source) and use a ‘Sweetener plus words’ template. So the ‘Sweetener’ bit is something like ‘ABC123+++’ to provide capital letters, numbers and symbols, and I’m sure that you can come up with something better than my example! What follows the Sweetener are four or five words. Plain ordinary words are fine. So you could use ‘trainbananazippershake’, although again, you need to do the creativity bit here.
So the resulting password (different for every app, remember, which is why you need that password manager) looks like this: ‘ABC123+++trainbananazippershake’, which is 31 characters long, is going to take a very very long time for bad people to crack, and is easy to type if you ever need to. If you always use a password manager, then you can have fun replacing the vowels in the word list and trying to avoid rude words, or maybe trying to get to rude words: ‘treanbinonezupporshike’ which sounds like an exotic bird of some sort. Oh, and for a while, you may find yourself giggling when you say ‘binone’ (pronounced maybe as something like: ‘bih noh nay’) instead of ‘banana’…
Password managers come in two main flavours: on-line and off-line. I prefer to use an off-line one on my Apple devices (
Strongbox), but that needs a bit more looking after, and so most people will use on-line ones that work in a browser. A Google search is going to throw up quite a few, but one of the long-established names is
LastPass, while
Keeper is another well rated one that is enterprise-oriented but also does 'personal' use... As always, when doing your comparisons, you will need to check that it supports your operating system - but there's an added complication with a password manager, because ideally, you want the same one to run on ALL of your devices that might require passwords to be managed, which could be a desktop, laptop, mobile phone, tablet... (Trust me, having different password managers for different devices is not a good idea!) Pricing-wise, you will have to make the usual agonising decision between free (with some compromises), and paid (which is probably going to be a monthly subscription these days, possibly with a discount for a whole year). My personal rule of thumb is that I never go for a subscription option where it says: 'For less than a cup of coffee!', but that's just me...
[ ] Additional information that will be used on your Profile web-page. You will probably need to look up some of these names and URLs:
- Your web-site URL (https://...)
- Your Twitter name (@yourname)
- Your Instagram name (@yourname)
- Your YouTube Channel URL (https://...)
- Your SoundCloud URL (https://...)
- A highlights video from YouTube, or a highlights playlist from SoundCloud )https://...)
Note that you do not need to have any of these! It is okay to leave them blank. But if you do have any of these names or links, then people will be able to visit them from your Pianobook.co.uk Profile web-page...
As you can see, there is a lot of information on your Profile web-page. This is because it will become your catalogue - where you display all of your Instruments / Sample Packs, and where people will go to download them.
1. The starting point.
It might be a good idea to make a tick-list of all the files that you will need:
[ ] A plain text file, called README.txt, containing:
- The name of the Instrument / Sample Pack (avoid copyrighted and trademarked names, please) (40 characters max)
- The ‘tag line’: about 10 words, approximately, that encapsulate why your Instrument / Sample Pack is special… (140 characters max)
- The ‘Story’: why you made the Instrument / Sample Pack, how you made it, how to use it, how the user interface works, what presets are included, how the MIDI CCs are mapped… This is a long piece of text, in many cases… It has to be at least 150 characters, but should ideally be considerably longer - there should be a lot to say about your instrument / Sample Pack! One useful tip is to put a version number at the end of the text, so that you know which version is currently on Pianobook.co.uk - I have a tracking spreadsheet that I use as well... Another tip is to write the 'Story' in a text editor or word processor, and then just copy and paste it into the text field in the dialogue...
[ ] Samples recorded by you from your piano or kalimba or toothbrush… or other source, and then probably edited to clean them up, possibly processed, and named with an identifier, a note value (as per A#, not Ab) - all stored inside folder called 'Samples' (Or 'NR' if they are noise-reduced samples!). I also tend to add the number of samples in the sample (minus 1) to the filename, so that it is easy to set the ‘end=‘ parameter inside the Decent Sampler .dspreset XML file. This can make looping samples much easier to manage, so it is strongly recommended. So a typical sample file might be named: 'MDSS A0 10123.wav'.
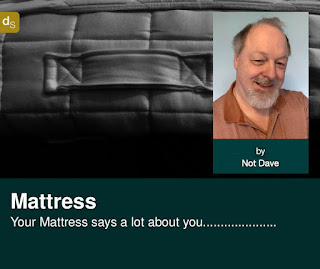
[ ] A photo of your piano, kalimba, recorder, or other source (Some of mine are a bit abstract!). This should be at least 1000 x 500 pixels, (or it could be 1624 x 750 pixels, if it is a double size version of your Decent Sampler background picture), in monochrome (black and white), and be a .jpg (JPEG) or a .png (PNG) file. If you submit a colour picture, the the Pianobook people will turn it into black and white, but you will not have any control over how they do the conversion. So, remove the middle-person, and do the greyscale conversation yourself. I tend to call this by an abbreviation the name of the Instrument / Sample Pack, plus ‘-photo’, which isn’t original, but is easy to find when you are searching for it to add it to a dialogue box. So, for ‘MyDecentSampleStuff’ the file would be called ‘MDSS-photo.jpg’.
[ ] A photo or graphic of 812 x 375 pixels, that will be used as the background by Decent Sampler. This can be a .jpg or a .png. A .png file is probably going to be larger than the equivalent .jpg in most cases. I tend to name this file starting with the Instrument / Sample Pack name abbreviation, followed by ‘-background’, so ‘MDSS-background.jpg’ etc.
[ ] A picture of the user interface of your Instrument / Sample Pack. The easiest way to do this is to capture a screenshot of Decent Sampler with your .dpreset file loaded into it, and then to crop it down to the edges of the Decent Sampler application/plug-in. Again, I tend to call this file with the Instrument / Sample Pack name abbreviation, followed by ‘-UI-user-interface’, so ‘MDSS-UI-user-interface.jpg’ etc. This can be a .jpg or a .png.
I can’t stress how much easier it is to find files when they are named consistently with names that still make sense several days, weeks or months later. Alternatively, if you are happy with trying to remember if it was ‘ZpOld34x.jpg’ or ‘ZdOlp43c.jpg’ that was the edited version of your background, then that’s fine by me.
2. In more detail…
Thinking about that main photo, the ‘MDSS-photo.jpg’ that will be the main way that people visualise your Instrument / Sample pack, then you might need to think about the composition a little bit:
Before the October 2021 update of the
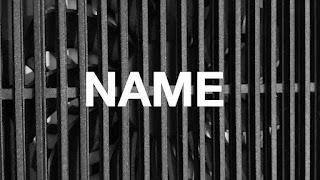
pianobook.co.uk web-site, one thing to be very aware of was that the photo would have the name of your Instrument/Sample Pack inbound white text in the centre of the photo on the wen-site, and in the ‘PianoDrop’ videos where 5 submissions from the previous month were showcased.
So any white parts of the photo would reduce the readability. In fact, this meant that the photos used tended to be quite dark. One way of looking at this is to use the ‘Levels’ graphs available in many graphics editing applications.
In the screenshot above, the levels graph has no white pixels, which is why the red ellipse is empty.
In contrast, in the screenshot above, the levels graph has white pixels from the 'NAME' text, and these are shown as the thin black line in the red ellipse - they are VERY white pixels! (Any less-than-very-white pixels would be shown as black across the the left of the thin black line.) You can clearly see on a 'levels' graph like this, that the the background is all greys and blacks, whilst the text is all very bright white.
However, after the October 2021 update of the
pianobook.co.uk web-site, the name of the Instrument/Sample Pack has moved to a dark 'racing green' bar underneath the photo (which is now a 2:1 aspect ratio), and the frequency of PianoDrop videos has dropped from monthly to irregularly. As you can see above, the new approach to displaying the name presumably reduces the need for photo editing, and so reduces the workload - which must be significant given the number of submissions that are being processed and the number of checks that are made on the submissions.
In fact, it seems that the
pianobook.co.uk web-site has been a victim of its own success, because in a few months, the number of instruments has more than doubled (828 Sample Packs on the 1st of March 2022), And, over time, there have been various rumours of long waits for submissions to be published. My own experience has been variable. Some Instruments/Sample Packs have been submitted and published in a few hours, whilst other have taken a few days, weeks, and in a couple of cases, months. This suggests that the workload is considerable.
The checking is very impressive and very detailed - I have had several Instruments / Sample Packs rejected by
pianobook.co.uk because of issues like clicks, UI inconsistencies and (the most embarrassing) incorrect pitching of samples (Where playing a ‘C’ on the keyboard produced an ‘A’ pitched note, for example). Actually, 'rejected' is the wrong word, because the email tells you the issue, and suggests how it can be fixed, so all you need to do is correct the problem, and re-submit.
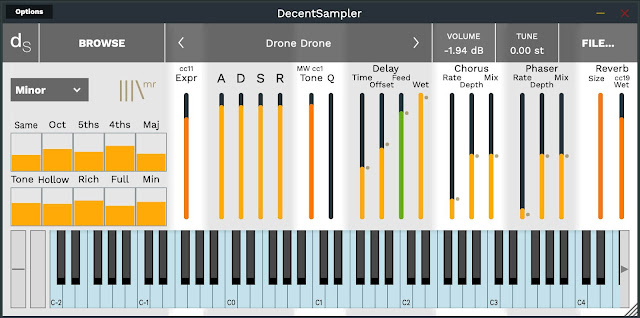
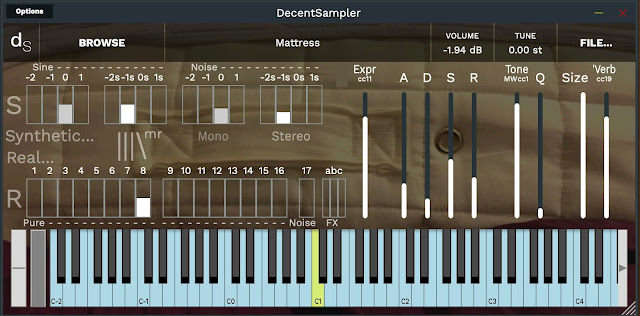
Anyway, the requirement for dark photos seems to have gone, although if you use the same photo as the background for Decent Sampler, then using levels to make sure that the UI text will be readable, is still a good idea. And on this topic of readability, here are two of my Instruments/Sample Pack UI screenshots from
pianobook.co.uk , one with black text on a light background,
and one with white text on a dark-ish background:
Remember that my UIs (User Interfaces) are notoriously busy - which means that your don't want a 'busy' background as well. So if you have a lot of controls, then you should reduce the contrast of your photo to avoid too much distracting detail from showing.
It probably isn't a great leap of the imagination to see that you should prepare two template .dspreset XL files: one with the text set to opaque white (#FFFFFFFF), and one with the text set to opaque black (#00000000), so that you can produce Instruments / Sample Packs with dark or light backgrounds and not have to swap colours in your XML.
Maybe I should do a blog post on programming for Decent Sampler?
3. Filling the folder…
Let’s look at the folder/directory named whatever your equivalent of ‘MyDecentSampleStuff’ is first - this is where you should have been storing the working files whilst you have been developing your Sample Pack (or Instrument). It really isn’t a good idea to have all the file spread across lots of different folders/directories or drives! But now is a very good time to consolidate all of these files into one place!
Now if you are like Christian Henson, you have probably used click-bait naming conventions, and so it might well be called: ‘BestPianoEver’, but in this tutorial, I’m going to use ‘MyDecentSampleStuff’. In all of the screenshots that follow, you will need to figure out what your names are for all the files, because there’s no way that I can know what they are… So, as always, these are suggestions for you to use or improve upon!
Inside the folder/directory you should have the MyDecentSampleStuff.dspreset file that you have been working on (and there is a backup on a separate drive or in the Cloud, isn’t there?), plus a ‘Samples’ folder/directory that contains all of the samples (CH has a specific way of naming samples that you can use, and details are given here: https://www.pianobook.co.uk/resources/how-to-sample/recording-your-piano/ ) that are used by MyDecentSampleStuff.dspreset. As I noted earlier, I also add the length of each wav file in samples (minus 1) so that setting the loop length is easier (and harder to get wrong!) when editing the XML .dspreset file).
For historical reasons (= maybe we did it wrong from the start) the 812 x 375 pixel .png background photo or graphics (called ‘MDSS-background.jpg here), is often found in the Samples folder/directory.
(Yes, there's a typo in the screen shots! The .dspreset file is called: 'MyDecentSamplerStuff'. Score one point and move on.)
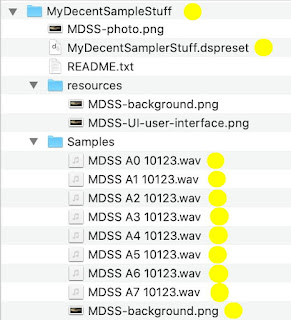
The files that you will normally have in your ‘MyDecentSampleStuff' folder/directory during development of a sample set and a Decent Sample .dspreset XML file are shown with yellow dots to the right. Now you need to add a few extra files, and duplicate one file.
From the top downwards, the first file you need to add to the folder/directory is the ‘MDSS-photo’ which can be a .jpg or a .png. The second file to add is the README.txt file, which is the plain text (.txt) file that contains the majority of the text that you will enter into the first submission dialogue box.
The next thing to do is to create a ‘resources’ folder/directory. This will be used to hold a backup of the background graphics used by Decent Sampler, plus the screenshot of the user interface of your Instrument / Sample Pack. You could also put a safety copy of the MDSS-photo file and the README.txt file in this folder/directory. (Many operating systems have a keyboard combination that will turn a mouse drag into a copy, which can speed up all sorts of file management tasks, and is well worth finding and learning...)
(Alternatively, and probably better practice, you could use the background in the 'resources' folder/directory as the master, and the one in the 'Samples' folder/directory as the safety copy. This way the code will always use the 'Samples' folder/directory for samples, and the 'resources' folder/directory for any other... resources.)
You can use the next picture as a tick list for filling the folder/directory:
(A quick aside here. This is the MINIMUM set of files that you should put into a Decent Sampler folder. One additional 'goodie' that you can add is a few extra 'Presets'. These are .dspreset files that you save by using Decent Sampler's 'File>Developer Tools>Save Preset...' menu option. Take the time to name and number these, so that users will know what they are, and also to make them easy to spot against the MyDecentSampleStuff.dspreset file, which is the default 'preset' file. One approach might be to use a naming template something like 'MDSS-Preset01-Best-Piano-Ever'... Note that the XML is formatted slightly when it is saved, so comments are removed, and the text is wrapped, so the process of saving presets should be a one-way process - this way you don't lose your beautifully commented, un-wrapped master .dspreset file that you have spent hours editing.)
Once the folder contains all the files you want to include, then select the top level folder/directory: MyDecentSampleStuff, and compress it using ZIP compression. There are a number of utilities that can do this. On a Mac, this is the native compression algorithm, so just select the folder and select ‘Compress…’ (Red box = Compress this folder!)
Unsurprisingly, the larger your MyDecentSampleStuff folder/directory is, the longer the compression will take to complete... When it is finished, you should have a .zip file called ‘MyDecentSampleStuff.zip'.
You will need to change the suffix from a .zip to a .dslibrary.
This doesn't change the file, it just changes the way that the Operating System thinks about the file. It can be used to automatically open Decent Sampler when you double click on a file, for example - and you wouldn't want it to open your UnZip utility. (Some Operating Systems will complain about this change of suffix, but just OK the change, and remind yourself that the Operating System is trying to protect you from problems.)
In summary: 1st Compression: Change the suffix from .zip to .dslibrary. Leave the filename alone.
This file should then be put inside the ‘MyDecentSampleStuff’ folder/directory…
Remember that the .dspreset file is just an XML (text) file containing only the instructions for playing the samples, and so is usually quite a small size file. In complete contrast, the .dslibrary file contains all of the files for the user interface and the samples themselves, and so will be much larger in size. Take care not to mix these two files up - they are very different!
(Yes, there's still a typo in the screen shots! The .dspreset file is called: 'MyDecentSamplerStuff'. Score one bonus point and move on.)
The next thing to do is to select the ‘MyDecentSampleStuff’ folder/directory again, and compress it into a .zip file. (Red box = Compress this folder!)
When the compression has finished, the result will be a ‘MyDecentSampleStuff.zip’ file. This time, you DO rename this file but you leave the suffix alone - this is the .zip file that you will upload at the end of the submission process, and so it needs extra information to help yourself and the people at Pianobook.co.uk. My suggestion is to use 'ReverseDate-InstrumentName-YourName-Vnumber.zip' using 'camel-case' for the names. The reverse date format (YYYYMMDD) means that your .zip files will sort in date order when you look at them in a computer. So the final .zip file name might look like: '20220226-MyDecentSampleStuff-YourName-V1.zip' for something uploaded by YourName on the 26th of February 2022.
In summary: 2nd Compression: Change the file name as per the template. Leave the suffix (.zip) alone.
4. Completed!
That’s it! All done! You can now fill in the series of dialogues in the 'Submit' tab on pianobook.co.uk, and when it asks you to upload/submit your ‘Zip file’, you just find the ‘20220226-MyDecentSampleStuff-YourName-V1.zip’ file and upload/submit that file.
And don't forget to change 'MyDecentSampleStuff' to the name of your project, and use your own name instead of YourName!
(More on the submission process itself will be in Part 2...)
Note. It may seem strange to zip things twice, but this is so that you have a single file that can be uploaded, and so that you have a stand-alone .dslibrary file which contains everything required by Decent Sample for ‘MyDecentSampleStuff’. (You can just drop it on Decent Sampler and you will get everything!) If you drop a .dspreset folder onto Decent Sampler, then it has to be from inside a folder/directory called ‘MyDecentSampleStuff’, from where Decent Sampler will look for various files in a folder/directory called ‘Samples’ and will need to load them in order to work..
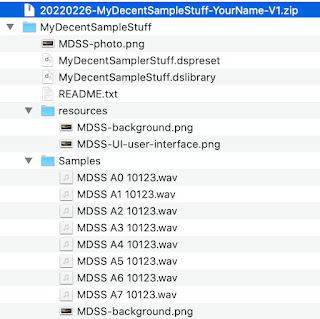
DO NOT stop after the first compress and think you have finished! Yes, I know it (temporarily) produces a .zip file, but you are going to immediately change the suffix so that you have a .dslibrary file that contains a complete set of instructions, graphics and samples for Decent Sampler. You need to have a .dspreset file, a .dslibrary file, and everything else in the final .zip file. You can use the following screenshot as a check-list and reminder:
The ‘20220226-MyDecentSampleStuff-YourName-V1.zip' file highlighted in blue on the top line contains everything in the 'MyDecentSampleStuff' folder underneath it.
In the next part I will go through the ‘Submission’ dialogues in the same level of detail. ---
If you find my writing helpful, informative or entertaining, then please consider visiting this link: