
So this blog entry is a rambling user manual for sFreez_mr...
sFreez_mr

There's a clear design decision here. DJs normally mix between and process (with effects) two main sources of sounds (vinyl, CDs, decks, sample players... (insert your favoured technology here)), and fly in additional sounds from other sources - and they do this live. This treats the sound sources as components in a music instrument that works at the level of samples of audio, and there's enough abstraction from the one detail (down at the sample level) to allow them to 'play' those samples expressively in a performance that has structure and connects at an emotional level. sFreez_mr removes just the mixing part and automates it, leaving the performer/DJ free to work with 4 separate sources of sound at once - and actually, by changing the LFO rate or using the On/LFO/Mute buttons, the mixing is controllable too. So you can think of the 4-phse LFO as a 'helper' that enables the assembly of more sound sources into a live performance by reducing the loading on the performer/DJ. I'm expecting great things from talented performers /DJs when they start to get the hang of what sFreez_mr lets you do...
Now this wouldn't be one of my M4L creations if it didn't have LFO-controlled panning, and here four separate LFOs are used to animate the four LFO-controlled samples components into a constantly shifting atmospheric sound. sFreez_mr is particularly good for slowly evolving background sounds, and it has a number of functions that are specifically designed for live use.
Let's look in detail at each of the sections that make up sFreez_mr:
Sample Players
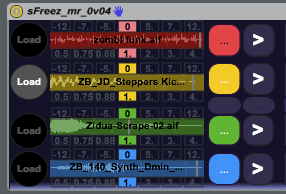
There are four looped sample players, which can be 'Load'ed with AIFFs (or WAVs), or you can drag and drop samples onto the four waveform displays. The four samples are each colour-coded: red, yellow, green and blue. Each sample player waveform display has several sections: there's the central waveform display, the sample name on top of that, and two rows of buttons (above and below). That's a lot of functionality in a small space!
Left-most are four big 'Load' buttons that allow direct loading of samples. On gFreez_mr, these were the record or 'capture' buttons for grabbing the source material for the granular players, and I did consider having the same functionality here, but eventually went for providing dedicated buttons AND drag & drop. These buttons cycle at the rate set by the 4-phase LFO, so you can always see which sample track is not currently in the mix. When the button is bright, then the LFO has set that tracks fader to off or very low, and so you can make changes to that track without being heard. So when the button goes bright, that is when you replace the sample (or drop a new sample in the waveform display - one technique is to grab the sample and hover over the waveform display, waiting for the button to light up!).
The top row of little buttons transpose the sample, whilst the lower row of buttons stretch or shrink it. The range of transposition is limited, so I made some decisions about the available settings, and so you get fifths purely for usability (a future version might allow these to be customisable). The centre setting is the 'no transposition, real time' setting, and either side of this the sounds get more and more altered. In the centre default, then you get a mildly conventional sample playing device that operates in what many people would class as 'DJ' territory, whilst away from the centre, you get more atmospheric and experimental sounds - but I encourage everyone to break through any barriers, recommendations or preconceptions of use. I debated for quite a while if I need a Play button, and eventually decided to leave it in, (although for me it stays on all the time, and so need not be there, but I wanted to leave the control there for other performance styles...). The 'Play' button is the rounded edge button next to the 'chevron' forward (to the right) or reverse (to the left) buttons. You can use the chevron buttons to change the sync of samples by reversing for a time and then going back to forwards. I use this for rhythmic samples where I want to change timing relationships , and I do it when the 'Load' button is bright so that the next time that sample track gets back into the mix it is different.
Track controls

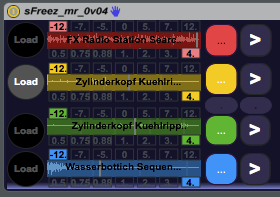
The next three buttons are linked and only one can be selected at any time for each coloured sample 'track': On (the sample plays all the time), LFO (the sample volume is modulated by the 4-phase LFO), or Mute (the sample audio is muted). These buttons fade the sound quite quickly, and so shouldn't cause too much audio hassle (like zipper noise), but they are intended to be 'played' live, so don't just dismiss them as being used in setup (especially since 'setup' can be happening live during a performance, not just beforehand).
The thin buttons in the middle are 'group' controls that affect all four sample tracks simultaneously - once again, this is intended for live performance use - so you can quickly stop everything happening by muting all four small tracks, or alternatively, you can blast all four tracks full on by using the 'On' button. Normally, the 'LFO' middle position is where the buttons will be set, and having a single button that restores this can be very useful. On you have learned this user interface, then you may find yourself wishing that other button-based UIs had similar shortcuts...
The final part of the track controls are the LFO displays, which show the 4-phase LFO as four colour-coded virtual faders. Left is off, no coloured bar) and right is full volume (full coloured bar) - just listen to a single track to get your head around this (press the thin central 'Mute' button, then the 'LFO' button for the sample track that you want to audition...). Remember that when the fader bar vanishes, then the 'Load' light will be bright, and you can make changes to that sample track without being heard in the output mix. In performance, your head needs to be in sync with the 'Load' buttons or the LFO fader displays.
Mixer
The next section is kind of a 'mixer', but very specific to what is needed in this context.
First, there's a display of the audio level for each sample, which helps you keep track of what is playing, and which can be very useful to all you if a track is playing a slow continuous sound, or a bouncy rhythmic sound. I'm never sure if this display should be part of the previous 'track control' section, or if it should be included in the mixer...
Then there are trims for volume for each sample track, and then the Pan LFO controls; frequency and phase. To fix the pan position in the stereo image, you low it right down and use the phase to set where you wan the pan position to be. Note that the phase does NOT map directly to L and R (i.e. All the way left on the has control is not necessarily hard Left panning) - watch the little pan display blob to see where the actual position is in the stereo image.
4-phase LFO
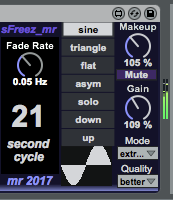
The 4-phase LFO has a rate control that is how you interact with the LFO, but the main number that is shown is how long it takes for a complete cycle (in seconds). The wo things are inversely related - the 'how long' display number is, again, designed for use in live performance. The LFO has additional 'waveforms' that set how the samples are faded in and out, and so I suspect that 'transfer function' is a more accurate description. Anyway, try the new waveforms out: they allow you to vary the number of samples that are mixed at any time. Each waveform gives a different 'feel' to that way that the sample tracks get cyclically mixed together.
Finally, the 'Makeup' control adjusts the overall output volume, whilst the 'Mute' button and 'Gain' control are inherited from gFreez_mr, and allow you to monitor the input audio - which adds to the live performance possibilities...
Practice
sFreez_mr is intended to be a live performance tool that can also be used in the studio. To get the most out of any tool when performing live, you will need to have spent time learning how to use it effectively. Also, don't forget that this is 'work in progress'...sFreez_mr can be downloaded for free from MaxForLive.com
SoundCloud demo1 - wind
SoundCloud demo2 - rain
SoundCloud demo3 - seq
SoundCloud demo4 - loop
SoundCloud demo5 - fx
SoundCloud demo6 - fx2
SoundCloud demo7 - drum
SoundCloud demo8 - drum


