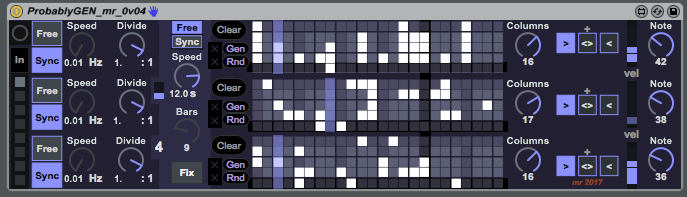
Wednesday 31 January 2018

Constraint-driven modification grids in asynchronous drum timing generator


The latest update to ProbablyGEN adds constraints to the grids, so that you can now control where beats can be placed (when editing manually) or where beats will be modified automatically using the 'every so many bars/seconds' auto modification system. The new grids are more intuitive and look sparser because of the 'missing' unavailable (locked) cells, and the previous preset 'Generative' pattern creation has been replaced by a completely flexible user controlled technique using the constraints. The previous 'Generative' functionality is now superseded and will be removed in a future version.

Constraints

The grids in previous versions were not constrained in any way, and so you could put white 'active' cells anywhere in the grid. If you leave the grids in 'Edit' mode, and never set any constraints, then this version will behave in exactly the same way as the previous versions.

But if you select 'Lock' mode, then the whole grid will change to show the 'constraints' and will be filled with white cells the first time that you go into 'Lock' mode.

 A white cell indicates an unconstrained cell. If you remove the white then the cell becomes 'constrained', (unavailable, locked...) and it will not be available (or visible) in the grid.

If you click or drag in the grid, then the cells will no longer show white, and the cells will no longer be available or visible. You will see the effect when you change the mode back to 'Edit' - all of the cells that were not left as white will have vanished, and you will not be able to put a white cell in them - and neither will the automatic modification options: Gen or Rnd.

The first thing to try is to remove all of the cells beyond the current length: 16 in the example shown on the right.

Here are constraints similar to the ones used in the 'Gen' generative functionality from previous versions. The lowest track (the 'Bass' drum track) just has four vertical bars on the beat, whilst the next track up (the 'Snare' drum track) has off-beat vertical bars, with extra time spreading for two of the off-beats. The top track (the 'Hi-hat' drum track) has busy 8th note vertical bars followed by a final block at the end of the bar.

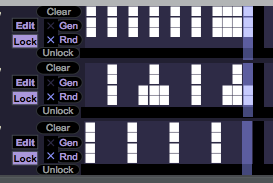
Remember that these white cells are just setting the constraints - they are not related to the probability controls that are present in 'Edit' mode.

Constrained patterns

You can see the result of setting the constraints grid when you go back into 'Edit' mode - the previous all-white cells now go back to the usual dark colour, and you can now manually add white cells wherever you want in the cells that are visible. All of the other cells are now 'locked' and aren't visible.


 The way to think about the use of the white cells in the constraints is that when you go into Lock mode, you want to have white cells wherever you want to be able to put white cells when you are in Edit mode.
 The per-track 'Change' controls allow you to set the effect of the 'Rnd' auto modification function. If Change is set to 0, then the random changes to the grid will (over time) not change the number of white cells. This isn't exact, and so you may not always get exactly the same number of white cells  present in the grids.


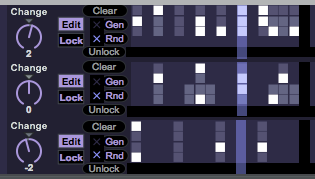
If you set Change to a positive number, then the amount of change each time the automatic modification happens will reflect the setting, and so for the maximum value of +20, then up to 20 of the cells might be changed to (or from) white. The three previous screenshots show the effect of four values of Change on what is inside the grids. The bottom track changes the least each time, which is okay for a bass drum, whilst the top track has the most changes each time. If you set Change to +20, then there will be a lot of changes to the white cells (and the grid may fill up over time), whilst if you set Change to -20, then there will be a lot of changes every time, and the grid may well empty over time.

The automatic modifications functionality has also changed slightly - you can now select '1' bar as the time interval, which means that you can now have a new random pattern every bar, if you want. Previously, the shortest value was 2 bars.

Applications

The constraints system is well worth spending some time learning. It allows you to have very precise control over the way that beats are generated, and can also speed up entering frequently used patterns like the bass, snare and hi-hat examples shown above.

Constraints allow you to disable the lowest 'dark' row of the grids by removing the white cells in that row when in 'Lock' mode. This means that you can no longer have a way of setting a single drum event with 50% probability - you can put two white cells in the grid above the lowest 'dark' row and they will happen with 50% probability.


The 'Unlock' button...

The lowest button for each track is the 'Unlock' button. This serves exactly the same purpose as the 'Clear' button at the highest position in the track layout, except that it works on the constraints. If you press this button then all of the constraints will be removed for that track, and when you select the 'Lock' mode, then the constraints grid will have white cells everywhere. There is no way to undo pressing this button, so be careful!

There is no way to undo the 'Clear' button either - it clears all the white cells in an ordinary 'Edit' grid.


The probability grids

As a recap, here's how the probability grids work in ProbablyGEN. Watch out for the lower dark bar!

Highest velocity happens 100% of the time.


Highest velocity happens 50% of the time. Upper middle velocities happen 50% of the time.


The Upper and Lower middle velocities each happen 50% of the time.


The Upper middle, Lower middle, and Lowest velocities each happen 33% of the time.


The Highest velocity happens 50% of the time. The Lower middle velocity happens 50% of the time.


The Highest, Upper middle, Lower middle, and Lowest velocities each happen 25% of the time.


The Highest velocity happens 50% of the time. No note event at all is generated for 50% of the time.


The Upper middle and Lower middle velocities happen 66% of the time. No note event at all is generated for 34% of the time.


The Highest, Upper middle, Lower middle, and Lowest velocities each happen 20% of the time. No note event at all is generated for 20% of the time.


Downloading ProbablyGEN 0.05

You can download ProbablyGEN 0.05 for free from MaxForLive.com.

Here are the instructions for what to do with the .amxd file that you download from MaxForLive.com:

https://synthesizerwriter.blogspot.co.uk/2017/12/where-do-i-put-downloaded-amxd.html

Updates:


Original blog: version 0.02: Complex timing generator for Max For Live in Ableton Live

Update: version 0.04: Asynchronous timing generator for Max For Live in ...


Buy me a coffeeBuy me a coffee


Monday 22 January 2018

AES@NAMM: Residuals Using Simple Separation

AES@NAMM 2018 Pro-Sound Symposium in Anaheim, California

My presentation: Thursday the 25th in Hilton Huntingdon A Level 4, 11am, 45 minutes, 

repeated Sunday the 28th in Hilton Huntingdon A Level 4, 11am, 45 minutes


Normally I just post personal research results in this blog (e.g. the MIDI Interfaces investigation), but when I’m presenting an academic paper at a real event, then this blog seems like a good place to gather all of the related information into one place...

For more years than I really want to think about, I have been looking into ways to use samples as the raw material for synthesis. Having spent my formative years during the rise of S&S (Sample and Synthesis (processing)), and with the E-mu Morpheus as one of my all-time favourite synths (or more correctly, sample replay devices with synthesiser-style post processing - and in the case of the Morpheus (and a few other favoured E-mu devices), that wonderful morphing Z-Plane filter!), then my aim has been to see just how far samples can be exploited in a synthesis context.

Research on 'Using samples for synthesis'...


The results of lots of thinking about how samples work, and how to make the most of them, particularly in a practical way. This is the topic of a paper that I’m presenting at the AES@NAMM 2018 Pro-Sound Symposium in Anaheim, California, on Thursday the 25th in Huntingdon A Level 4. I’m on at 11am for 45 minutes, and there’s a lot to try and pack into the time…

Supporting material (posted here as it becomes available…)


Demo video. First, here’s the 'teaser' ‘demonstration’ video that shows some of the results - using a single sample of an aluminium can (‘tin can’ is much shorter and easier to type, even though the metal is not tin!). This does not go into the theory or practice in much depth.

AES@NAMM. Here’s a link to the AES@NAMM web-site.

AES@NAMM Pro-Sound Symposium. This is a link to the event itself.

The AES@NAMM Schedule. Who is speaking when and where...

'Residuals Using Simple Separation'  The link to the presentation schedule - it’s an AES ‘Engineering Brief’. 


'Residuals Using Simple Separation' Powerpoint. Here’s a link to the slides from the presentation, where I talk about some of the background theory (there's more in the paper), and do some demonstrations. I’m going to post some more detailed audio demonstrations on SoundCloud and Youtube later too.

Now available... Here’s a link where you can download the Ableton Live Instrument Rack device that I used to do the demos in the video and the presentation. You will need to prepare two samples (or more) using the RUSS filters (below) and then drag^drop them into the two instances of Sampler inside the Rack. There’s lots of scope for a more intelligent front-end to doing this form of ‘synthesis using samples’. 

Now available... I have now partly tidied up the Nyqvist code for the sample processing routines that I used inside Audacity, the link is at the end of this paragraphl. They are released using a GPL licence. There are also a lot of possibilities to make the required sample processing smarter and more automated, and I hope to see some cool stuff released that makes the most of the creative possibilities. Filters etc are here...

I’m considering writing an M4L ‘assist ‘plug-in’, but I’m sure that a better coder than myself is going to beat me to it with something really cool and sophisticated.


I’m working on a ‘user manual’ for the techniques that are described in the paper and presentation, and I’m more than happy to talk to sample library creators about how they can use the concepts to enhance the flexibility and usability of their samples. 

Enjoy!


Buy me a coffeeBuy me a coffee


Saturday 13 January 2018

Asynchronous timing generator for Max For Live in Ableton Live

Previously, I introduced ProbablyGEN, a Max For Live device that produces MIDI note events on three channels - with quite a lot of control over the timing of each channel. Essentially, instead of being tied to a single timing source, the three channels provide independent timing, and I provided default mappings to drum sounds because that seemed like a good way for people to start to explore the polyrhythms that are produced.


The feedback that I got suggested that quite a few people were using ProbablyGEN as a generative polyrhythmic drum machine pattern creator utility, and so I have now taken the comments and added extra functionality to make it easier to use ProbablyGEN in this way.

Additional asynchronicity


ProbablyGEN version 0.04 adds a fourth source of timing, but this time it works across the channels, and allows any channel grid to be filled randomly, or filled using a generative algorithm. As with the channel timing, this 'Rnd/Gen' functionality can be clocked using a free-running asynchronous clock (the 'Free' mode), or synchronised to the Bar count from Ableton Live's transport (the 'Sync' mode). Synchronising to Bars is slightly different to the 'Divide' control used in the channel timing - it quantises to discrete bars, and so a new grid pattern is only produced when the bar ends. In contrast, the Free mode is just a free-running clock, and so the new grid patterns can happen at any time - and the display shows the time between grid changes and shows a vertical 'count' indicator that shows when a new grid will be created (when the bar reaches the top).


 Looking at each part of the new Rnd/Gen control section in detail:


Common controls

The mode switch at the top of the common control section allows one of the two modes to be chosen:

Free - the Rnd/Gen clock is completely asynchronous (not tied to Live's transport at all). The 'Speed' control sets the time between a new grid being generated (shown in seconds). The bar on the left hand side shows the progress towards the next new grid - when it reaches the top then  new grid is generated (and the bar then drops down to the bottom).

Sync - the Rnd/Gen clock generates a new grid after the set number of bars, and so is tied to Live's transport. The 'Bars' control sets the number of bars between new grids being generated - in this case, the control is set to 9 bars. The number on the left hand side is the bar count, currently showing 3, so in 6 bars' time, the grid will be reset. 

The 'Fix/Auto' button controls if the automatic Rnd/Gen controls are active. When in 'Fix' mode, the grids are not affected. Selecting 'Auto' will activate the automatic Rnd/Gen effect on the grids (using the Per-channel selections described next...)


Per-channel controls

The 'Clear' button works as in previous versions - it clears the grid on that channel.

Each channel now has channel-specific 'Gen' and 'Rnd' buttons. These are always active - regardless of the 'Fix/Auto' button setting.

If you click on the 'Gen' control then a generative algorithm will produce a drum pattern for that channel. Each channel has a different algorithm: the top channel is designed for hi-hats, the middle for snares, and the bottom channel for kicks. Each time you click on the 'Gen' button, a new different pattern will be randomly generated.

If you click on the 'Rnd' button, then two things happen: first, some random cells in the grid will be cleared, and then, some random cells will be set to white. The 'Rnd' button thus modifies any pattern in the grid - it does not replace it (unless you press the 'Rnd' button a lot of times!). So you can use the 'Rnd' button to modify any grid - even a grid produced by the 'Gen' button.


'Auto' mode


When the 'Fix/Auto' button is set to 'Auto' then the timing controls can affect the grids. There are six selection boxes, three for each channel. When an 'X' is lit up, then the button on the right hand side of the sector will be activated when the timing clock generates a 'Rnd/Gen' event. 

In the case shown on the left, the top channel will have a new grid generated, the middle channel grid will be modified with random cells, and the bottom channel will generate a new kick drum pattern, and then randomly modify that pattern. ('Gen' always happens before 'Rnd'...)

If none of the selectors has an 'X' in it, then the grids will not be affected, and the state of the 'Fix/Auto' button does not matter.


Downloading ProbablyGEN 0.04

You can download ProbablyGEN 0.04 for free from MaxForLive.com.

Here are the instructions for what to do with the .amxd file that you download from MaxForLive.com:

https://synthesizerwriter.blogspot.co.uk/2017/12/where-do-i-put-downloaded-amxd.html

Updates:


Original blog: version 0.02: Complex timing generator for Max For Live in Ableton Live

Update: version 0.05: Constraint-driven modification grids in asynchronous drum timing generator


Buy me a coffeeBuy me a coffee