Tuesday 3 January 2017

MIDI Interfaces and Modulation Wheel Messages

Sometimes, without any warning, an apparently trivial and simple task can suddenly explode into a major problem. Of these, the most interesting problems are the ones that can't be solved by merely researching the topic on the Interweb.

Modulation Wheel -> MIDI Controller Messages

So there I was, working on a new Max For Live (M4L) plug-in, and I needed to control a parameter from an external MIDI keyboard. Rather than force users to map a MIDI Controller to the parameter inside Live, I thought it would be easier to provide a dedicated pre-mapped controller inside the plug-in itself. But it didn't work in the way that I expected.


I was using the Modulation Wheel on one of my synths to provide the MIDI Controller messages, and these were supposed to be controlling a parameter in the plug-in with 32 values - displayed as several rows of buttons.  Inside Max, I scaled the range of the controller value to 32, and then moved the Mod Wheel, expecting the buttons to highlight in sequence. Instead, I found that the highlighting jerked around, and even when moving the Mod Wheel slowly and carefully, I couldn't select some of the buttons. Suspecting that the Mod Wheel value needed smoothing, I used Max's 'slide' object to provide some low-pass filtering, but the jerkiness and quantisation were still present. It was at this point that the 'This is interesting' light lit up in my head, and I started to gather more detailed information about what was happening. Here's what I expected:


There should be a linear mapping between the input values from the Mod Wheel, and the output values that are driving the button selection. Because I was using integer numbers to do the selection, then the making of 128 MIDI Controller Values to the 32 M4L buttons should be a four-to-one reduction. The graph on the right hand side shows the details of this. Input values of 0 or 1 (from the Mod Wheel) will produce an output value of 0, whilst values of 2, 3, 4 or 5 will produce an output of 1, and anything from 6 to 9 will produce an output of 2, and so on. 


So the nice straight line in the left hand diagram is a simplification - actually it is made up of lots of little flat segments that map 0 and 1 to 0, 2 o 5 to 1, and so on. This table shows the ends of the complete map - notice that 126 and 127 produce an output of 32.

Now, normally, when you use a Modulation Wheel, you are not looking for precision, and so I expected to have to smooth the values a little bit. But this was much worse than that. The jerkiness was stopping me selecting specific buttons, and that's exactly what I needed to be able to do. What was needed were a few tools, and that's what I wrote next.

Simulation and Analysis Tools

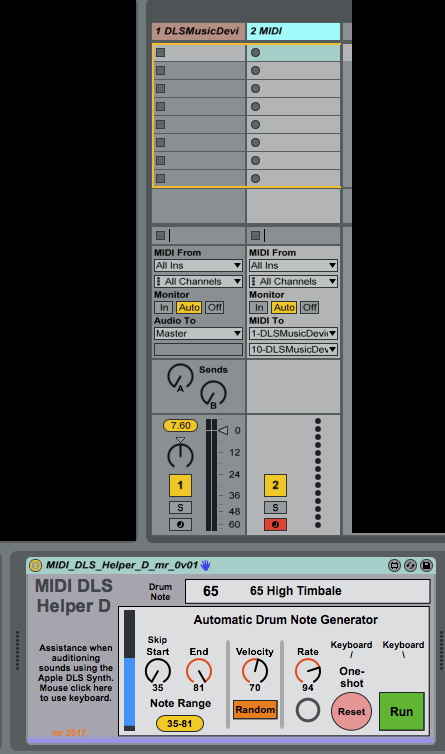
The first tool was a MIDI Continuous Controller simulator - a replacement for the Mod Wheel created using M4L. (To avoid putting MIDI Continuous Controller every time, I will use the shorthand of 'MIDI Controller' here - I could have used 'CC', but that's used in the tool-name!) Because I might use it again for something else, I made it reasonably general purpose, and so it allows the setting of any MIDI Controller Number, plus it has quick access to specific Control Change values.


As the screen-shot shows, the middle slider is the main controller, and it simulates a Mod Wheel with forwards and back (or typically up and down on the screen) mouse movements controlling the output values. The grid to the right is actually a 2-axis controller, so more a joy-stick than a Mod Wheel - you move the mouse over the array of dots, and the appropriate MIDI Control Change values are sent for the selected MIDI Controller Numbers. In the screen-shot, the horizontal axis (left-right mouse movements) are set to MIDI Controller Number 1 (Mod Wheel), whilst the vertical axis (up and down mouse movements) are set to MIDI Controller Number 16 (a general purpose controller). The buttons on the right hand side allow specific Control Change values to be sent (0, 31, 63, 95 or 127) covering the whole of the available 7-bit range. Now it is possible to use 14-bits to provide extra fine detail, but in this case, with only 32 buttons to control, I didn't need it. For user-defined special values, then the second row of buttons allows you to set your own values - in the screen-shot, I obviously wanted to have five different ways to output zero!

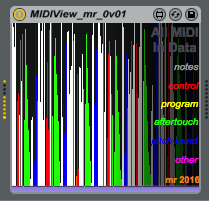
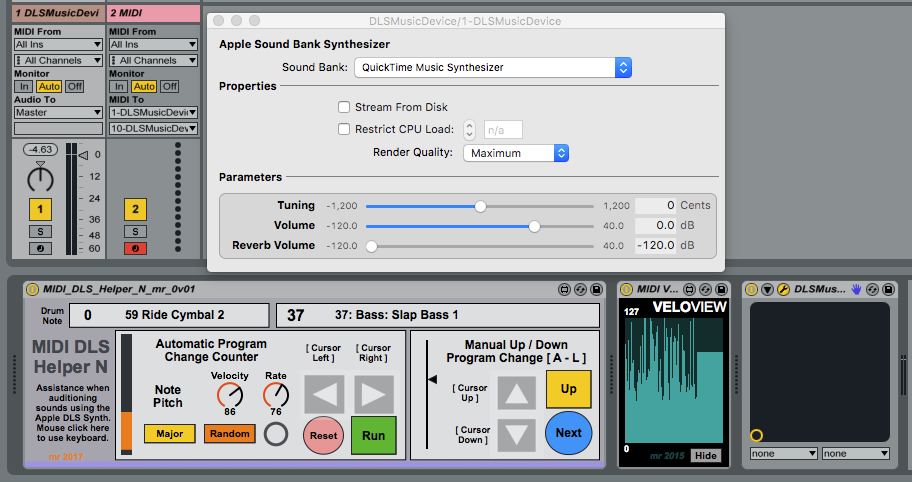
The second tool allows analysis of the values produced by the Controller simulator, and has lots of scrolling displays that provide plots of values over time. These are the same type of display as I used in the Mode Audio VeloView MIDI Velocity viewer that I've included on the right hand side of the screen-shot.


The main scrolling display allows the selection of the MIDI Continuous Controller Number, whilst there are separate scrolling displays for Data Entry (Controller Number 6) and Number 16. At the far right hand side, I have copied in the 32 buttons and the scaling and offset controls. Unlike the MIDIcc utility, this is much more a draft tool for my own use, and it isn't intended for casual users.

The Setup

Using the MIDIcc Continuous Controller simulator, the 32 buttons were easy to select with mouse movements, and substituting the Mod Wheel again produced jerkiness and difficulty in selecting a specific button. This meant that it wasn't my M4L processing that was causing the problem, but something else. Tracing back from the Plug-in, the MIDI signals went through Live, then through a USB cable to a MIDI Interface, and then to the synthesiser. The simulation worked okay, so Live was not the problem, which left the USB cable and the MIDI Interface... Changing the USB cable made no difference at all, and so that left: the MIDI Interface, or the synthesizer. Changing the synthesizer made very little difference, so it seems that the MIDI Interface is the major contributor.

I'm going to split MIDI Interfaces into three types, and use these to avoid naming any brand names in what follows. The three types are:

1. Low-cost, simple,  in-cable interfaces. These typically have a MIDI In and Out cable, a plastic 'blob' in the middle, and a USB cable.

2. Mid-range, robust, stand-alone interfaces. These typically have MIDI sockets for In and Out (sometimes a Thru as well), and a USB socket. Some USB audio interfaces also have this type of MIDI interface included as well.

3. High-end, professional, multi-MIDI-cable interfaces. These have 2, 4 or 8 MIDI I/O sockets, are often rack-mountable, are almost always rugged designs with metal enclosures, and often have time sync facilities.

Inside a MIDI Interface

Inside a MIDI Interface, there are two sections: one grabs incoming MIDI messages from the MIDI In and sends them to the computer via USB; the other receives outgoing information via USB and sends them out via the MIDI Out. Here's the route from the MIDI In to USB:


The UART is a device that converts the serial data for the MIDI device into data in a format that the Main Processing Unit (or microprocessor) can work with by stripping off the start and stop bits and buffering the MIDI data. AT the output, another UART converts the MIDI data into the right format for USB. The MPU loops around, grabbing incoming MIDI messages, and sending them out to USB continually.

Interestingly, inside the microprocessor chip itself there are additional conversions going on:


Most modern microprocessors have serial interfaces externally, but internally, it is much faster to have data in parallel, and so there are more UARTs to convert to and from serial and parallel.  

For MIDI Output, things just work in reverse in the other section. This time the MPU grabs outgoing USB data and converts it to MIDI data, with a UART formatting it correctly for MIDI transmission.

Inside a synthesiser

Just for reference, here's how the Mod Wheel typically works inside most synthesisers.


The left-most part is the Mod Wheel, which is just a modified rotary control where you move the edge of the knob, and this produces an output voltage. This is smoothed by the RC low-pass filter (just a resistor and a capacitor) and then converted into digital form by an Analogue-to-Digital Converter (ADC). Once in digital form, the processing is very similar to the MIDI interface: the MPU loops continuously, grabbing the Wheel position from the ADC, then converting it into a MIDI Control Change Message, and then outputting it to the MIDI Output with a UART.

Testing

I tried examples of each type of MIDI Interface to see if it made any difference to the controllability of he 32 buttons.

Unexpectedly, the type of MIDI Interface made a huge difference!

At this point, I should explain how the scrolling displays in the analysis tool work. Each time a new MIDI Control Change value arrives, it moves the display to the left, and draws a vertical line representing the new value. The result is that the display scrolls leftwards as new values as received by the tool. This removes any dependence on timing, and gives a pure mapping between the incoming values and the display. Just as with the diagram at the start of this blog entry, the output should be linear for rising controller values, and linear for falling controller values. Any missing values will appear as a vertical jump, any repeated values will appear as horizontal flat segments, and any zero values will appear as gaps.


A perfect MIDI Interface would produce neat straight-sided triangles as the Mod Wheel is moved up and down (and the MIDIcc tool produces perfect triangles (as above), of course!)

 
Low cost, type 1 MIDI interfaces give different slopes each time, with missing values. The low cost probably means that a slow MPU with just enough processing power is used, and this is fine for most of the time, but runs into trouble when lots of messages are received all at once - as with sending lots of MIDI Control Change messages when using a Mod Wheel! (One other time that processing bandwidth is important is when using System Exclusive messages, and so they may also cause problems for this type of interface... I didn't test this.) The warped triangles explain why the Mod Wheel was so difficult to use to select buttons!


Mid-range, type 2, MIDI Interfaces give very good results, with only a few missing values. In this type of design, the internal microprocessor is probably better specified to cope with demanding situations, and the result is a pretty linear triangle.


High-end, type 3, MIDI Interfaces give good results, but not quite as good as the Mid-range, and this might reflect the higher processing demands of multiple MIDI sockets and time synchronisation.

Here's a summary of the three types:


 For each type, the left hand column shows the biggest jumps between Control Change values (higher is worse), and then the right hand column shows how many different values were transmitted by the MIDI Interface. So the Low-cost type 1 only sent 25 messages with the largest gap of 13 when movie the Mod Wheel upwards, and only 32 messages when moving the Mod Wheel back to the resting position. In contrast, the Mid-range, type 2, MIDI Interface produced nearly three times as many messages (72) and had the smallest gaps (6).

The 'Min' and 'Max' values are interesting because they show the highest and lowest values sent in the Control Change messages. A Mod Wheel should produce a value of zero when it is in the resting position, but the low-cost interface only ever sent 3 as its smallest value. In my M4L application, this means that the first button could never be selected! (I cured this by adding an offset so that the Mod Wheel has 'dead'-zones as the two ends of its travel.

Conclusion

Choosing a MIDI Interface may affect your performance in ways that you don't expect!

MaxForLive Tools - downloads

The MIDIcc simulator utility and the CC Analysis tool are now available via MaxForLive.com.


In the course of developing the Analysis tool, I realised that the 'All MIDI Data' display was very useful, and so I have extended this into a separate stand-alone utility called MIDIview, where each type of MIDI data has a different colour.  This is also now available on MaxForLive.com.


Sunday 1 January 2017

Using the Apple General MIDI DLS Sound Bank Synthesizer in Ableton Live 9

This is an update and extension to my March 2010 blog entry...

The Apple General MIDI Down-Loadable Sound (DLS) Sound Bank Synthesiser is an Audio Unit plug-in that is provided in Mac OSX/macOS. The plug-in is referred to as the Apple DLS Music Device in Ableton Live. (Audio Units work in the 32 or 64 bit versions of Ableton Live.)

Here are some notes on using it:

Making Audio Units visible


My install of Live 9 did not show Audio Units by default, and so I needed to enable them. You may need to set the 'Use Audio Units' toggle to 'On' in the 'File Folder' Preferences pane.


(This is not where I'd immediately expect 'Plug-ins' to be managed, but this is where Ableton put these settings. Note that there are some other useful settings in this pane: the 'Save Current Set as default' can be a very productive time-saver if you have a complex standard setup...) 

Opening the 'Audio Units' folder shows a lot of sub folders (I'm running the 32-bit version of Live here, but this could be the 64-bit version with 32 Lives or JBridge/JBridgeM). You need to open the 'Apple' folder by clicking on the triangle...


The 'DLSMusicDevice' is right at the bottom of the list. All the other Apple Audio Units start with 'AU', and so the DLS Synth gets pushed to the bottom of the list. Depending on your screen-size, you may need to scroll down to find it.

Unlike all of the other Audio Units (which are audio effects), the DLSMusicDevice is an Instrument. It can produce multiple channels of polyphonic audio simultaneously, and can be a useful extra source of sounds, particularly when you start to re-assign the tracks in a MIDI file inside Live.


Mono-timbral use

Here is a MIDI Track with the DLSMusicDevice plug-in dropped into it. You can create a MIDI Clip containing a few note events to test out the DLSMusicDevice, or you could use a keyboard (or the virtual keyboard on a laptop) - the highlighted red 'Record' button at the bottom of the track-strip enables this. 

Ableton always uses MIDI channel 1 by default inside a track, so this will use the first one of the 16 available MIDI channels in the DLSMusicDevice plug-in, and so you can only use it for instrumental voices - there is no way to change the MIDI channel that is used when you use this way of accessing the DLSMusicDevice. So if you only need a single channel of basic General MIDI instrument sounds, then this may be all that you need. Note that if you create a MIDI Clip then you can use the 'Program Change' control to select the sound that the DLSMusicDevice produces.

To get the control window to appear, you just click on the 'Spanner' icon in the generic X-Y controller box that appears in the track detail view at the bottom of the screen.

Notice here that I've made the Inputs and Outputs visible by clicking on the I-O circle on the far right of the mixer, just to the right of the master volume sliders. What is interesting is that this MIDI Track is behaving exactly as it should - receiving MIDI inputs and converting them into audio outputs. Unfortunately, Live seems to always send MIDI information to the DLS plug-in on MIDI channel 1, and there is no control to change this in the I-O panel. In fact, for this simple example, you do not need to see the inputs and outputs at all.

The 'Reverb Volume' is highlighted because the default is to smother the audio in lots of reverb. You are advised to lower this setting! If you add any in-line effects in the track then having reverb in the source audio sounds strange anyway - so use a reverb plug-in at the end of the processing chain. My personal favourite effects plug-in for the DLSMusicDevice is the 'Auto-Filter', where subtle use can remove some of the 'General MIDI' giveaway sound footprint! [ And for non-subtle: SoundCloud example using just DLSMusicDevice as the sound source... ]

Sound Banks

Notice that the dialogue box for the DLSMusicDevice calls it an 'Apple Sound Bank Synthesiser'...  This instrument can be used to play more than just the default Apple General MIDI-compliant sound bank (this bank is confusingly called the 'QuickTime Music Synthesiser') - it can play any Soundfont sound file with a .sf2 suffix.

The 'Properties' section can be left alone. The 'Restrict CPU Load' control is a remnant from many years ago, when playing back audio was a considerable strain on a Mac's CPU. On a modern machine, leaving the render quality at maximum is fine.


To enable playback of additional sound banks on a Mac, you need to put some .sf2 files into your /Library/Audio/Sounds/Banks/ folder. (You may need to use the option key inside Finder to make the Library folder visible.) Note that the default Apple 'QuickTime Music Synthesiser' bank is not stored here, and so this folder will probably be empty the first time you open it.

Some .sf2 files contain complete banks of sounds, whilst others contain just one sound. By creating an 'Instruments' folder, you can keep these 'single sound' files separate. You may also find that some .sf2 files do not work, and the 'Don't Work' folder is there to hold these as a reminder to keep a lookout on the Interweb for an updated version. Sometimes when a sound bank file does not work, it can cause other banks or sounds to stop working as well, so you may need to delete the DLSMusicDevice from the track, and re-insert it to force it to restart.

Notice that the 'Sound Bank' selector now says '32MbGM stereo sound bank' instead of 'QuickTime Music Synthesiser'. (Remember, despite the name, this is just a sound bank!)  When you add .sf2 files to the audio folder they appear in this pop-up selector in alphabetical name order... so 'QuickTime Music Synthesiser' is often near the bottom of the list.

Folders placed inside the 'Audio' folder appear with a triangle indicator. inside the pop-up selector.  In this example, the Apple 'QuickTime Music Synthesizer' sound bank is just one of six available banks of sounds.

General MIDI sound banks have their sounds arranged in a specific order, where program change numbers map to particular types of sounds (0/1 is a  'Grand Piano' sound, for example, whilst 48/49 is a 'Strings Ensemble' sound. General MIDI sounds can vary considerably between sound banks. Some sounds banks do not follow the General MIDI mapping of sounds to program change numbers.

Some .sf2 files contain just a single instrument sound.


Many .sf2 files come with documentation. Putting these extra files in the 'Documents' folder keep everything neat and tidy.


----------

Auditioning .sf2 SoundFont files

A search for .sf2 using a search engine on the Interweb is going to produce lots of results, which then leads to the question of 'auditioning'. In this case, there's no need to commission a TV programme to find some suitable candidates...

What IS needed, to save lots of time and finger-wear, is a way of running through the sounds in a .sf2 file quickly, so that you can triage them into a few categories (and thus into named folders inside the '/Banks' folder...):

  • GM soundbanks
  • Non-GM sound banks
  • Individual Instrument sounds
  • Drum sounds

Inside Live, using the program change control in a clip isn't very convenient, so I have written two M4L utilities that make auditioning .sf2 files quicker and easier. You can get them from MaxForLive.com

DLS_Helper_N is designed to help listen to Note-based .sf2 SoundFont files to quickly learn about their audio contents. You just drop it into the track that has the Apple DLS Synth in it. There are two main modes of operation: manual and automatic.


In Manual mode, you can use the vertical slider control to select a specific sound by sending MIDI program change messages shown with the matching General MIDI Instrument name, and then playing on the [A - L] virtual MIDI keyboard inside Live, or on your external MIDI keyboard (or other instrument). There are two keyboard shortcuts: the Down cursor button is assigned to a 'Next' button, which changes the program, and the Up cursor button controls an Up/Down counter. The counter normally starts up in 'Up' mode, and so every time you press the Next button, the program change counter goes up by one. You can then play some notes to audition the sound. Remember that to keep the keyboard focus inside the DLS_Helper, you need to click inside it, and I've included some words that say this in the UI. If the focus strays outside the plug-in, then you will activate the Live keyboard shortcuts. (The workflow of 'Next' then play a few notes' is okay for the first few sounds, but I rapidly got bored, and so I added more automation...)

In Automatic mode, incrementing of the program change number happens automatically, at a rate controlled by the Rate rotary control, and each change of program is indicated by a flash of a red indicator (and by the changing of the GM name in the text window). Some sounds has slow attacks, and so setting the Rat control too fast may mean that you don't hear the start of some sounds. But for most sounds, automatic advancement through the sounds in the middle range of the Rate control should work fine. There are shortcut keys: the Cursor Right button is assigned to starting and stopping the counter, whilst the Cursor Left button resets the program counter (for the Automatic AND the Manual modes!). Once a new program change has been selected, four notes are played so that you can hear the sound assigned to that number in the bank. The default here is four notes from a C Major scale, played at a fixed MIDI Velocity. You can alter the Velocity setting with the rotary control. After a few minutes of hearing the same four notes at the same velocity setting robotically played by different sounds, then you may need to activate the two variation buttons: for Notes, then you can activate the 'Random' variation, which plays a variety of different scales, some more exotic than others; whilst for Velocity, then you can activate the 'Random' variation, which adds random variety to the Velocity setting. The variation controls can make an extended audition session much easier to carry out.

For auditioning drums, then you need to use the multi-timbral setup, which is described next.


Multi-timbral use

There is another way to use the DLSMusicDevice. It is more complex, but it allows you to utilise the full multi-timbral (several different sounds at once) capabilities of the Apple DLS plug-in.

You start in exactly the same way - create a new MIDI Track. (This screen-shot is from Live 8, and so the graphics may be slightly different, but the method is the same...)


This time, you definitely need to make the Inputs and Outputs visible by clicking on the I-O circle on the far right of the mixer, just to the right of the master volume sliders.

This I-O panel is the key to assigning MIDI channels to the DLS Music Device.


You then drop the Apple DLS plug-in into the MIDI Track. This sets up the DLS Music Device so that it receives MIDI Input and outputs audio into the mixer. But this time we are going to re-route where the MIDI Input is coming from...


The Track name will have changed to DLSMusicDevice...


And the Apple Music Synthesizer dialogue box will have appeared... Note that the three 'Parameter' slider controls ( tuning, volume and reverb volume ) are global, and so they affect all the DLS sounds.


You now need to add a second MIDI Track... This is going to be used to hold the clip containing the note events, and to control the MIDI channel of those events...


The I-O panel in this new MIDI Track contains this vital pair of controls, which aren't exactly obvious in what they do...


The upper pop-up list control shows a list of the Tracks that the MIDI output from this MIDI Track can be connected to. In this case, we want the output of this Track to go to the DLSMusicDevice, so we select the first Track that we created...

Any note events that we put into a piano roll Clip on this Track will now be routed as MIDI note events to the DLSMusicDevice, which will turn them into audio.


The lower pop-up list control lets you control the MIDI Channel of the note events that are sent to the DLSMusicDevice Track.


Here's a summary of what the two pop-up controls do...

Notice that the 1-DLSMusicDevice in the top pop-up refers to the plug-in being in Track 1, whilst the 2-DLSMusicDevice in the bottom pop-up refers to the MIDI Channel that the note events will be sent on... If the DLSMusicDevice was dropped into MIDI Track 3, then the top box would say 3-DLSMusicDevice. When you select the target Track with the top pop-up, then the DLSMusicDevice plug-in should be obvious - just make sure that you always look at the lower pop-up to check what MIDI Channel you are using.

You can now create a new Clip in the new MIDI Track...


Remember that the lower pop-up selects the MIDI Channel that the DLSMusicDevice will use for this Clip, and the Program Number controls on the left of the Clip piano-roll will select the sound for that MIDI Channel...


Here's the MIDI Channel pop-up control...


And here is the Program Number pop-up for selecting the sound or instrument. Note that you need to move the slider on the right to switch between low and high numbers, just like in any Live selector control with lots of options.

(Remember that for auditioning sounds, there are my M4L helpers...)


Remember that you can create several MIDI Tracks, assign them to different MIDI Channels (like Channel 10 for Drum sounds) and make the most of the multi-timbral capabilities of the Apple DLS Music Device.

In this example, the top pop-ups all route the MIDI events to the DLSMusicDevice plug-in on Track 1 (shown highlighted in Red), whilst the individual MIDI Channels (set by the lower pop-up) are shown highlighted in green.


--------

Auditioning Drum sounds

To audition the dum sounds on MIDI Channel 10 inside a .sf2 Soundfont file, you need to set up the DLS synth in one MIDI track inside Live, and then set a second MIDI track onto MIDI Channel 10. You then add the DLS_Helper_D M4L plug-in to the second MIDI track, and set this to be the 'Record' track with the little red button, since this is where you will be auditioning drum sounds.

Because there are lots of drum sounds, then manually playing all of them isn't really an option, and so the _D version of the DLS_Helper only has the Automatic mode. The counter this time is for Note Numbers: the default from 35 to 81 to cover the defined General MIDI mapping. The keyboards shortcuts are different from the _N Note version, and are designed for the  MacBook Pro keyboard layout. Backslash Runs or Stops the counter, whilst Forward Slash resets the count and replays that note. 

The Rate rotary control sets the rate at which the drums sounds play, and there is the same Fixed/Random MIDI Velocity control as before. The final two controls allow the start and end note numbers to be set, which means that you can choose a sub-set of the GM mapping range if you wish. A programming error by me caused the Start rotary control to gain an unexpected extra feature - it repeats notes instead of skipping directly to the start, but I have left this in because it allows all sorts of interesting drum patterns to be produced. Consider it a serendipitous accident.

 You might have realised that because the second track is just a reference to the main track that contains the actual DLS Synth, then the pop-up dialogue box is not visible when this track is selected (and this DLS_Helper_D is shown. To change the .sf2 Soundfont file that is playing, you need to go back to the 'DLS' track, change the sound selection, and then go to the second 'Channel 10' track to use the DLS_Helper_D plug-in. Once you get your he'd around the process, this isn't as hard as it seems. I have shown the two tracks as 'D' and 'N' in the accompanying diagrams.


Hopefully, you now have enough information to make the most of the Apple DLS Synth inside Ableton Live 9.