Wednesday 2 June 2010

'Childhood Remixed' by Pixelh8


I've always been fascinated by the mixture of mechanics and electronics that you find in toys, and so Pixelh8's first solo exhibition needed little introduction - plus I know Pixelh8 from the excellent Ipswich-based 'Curiosity Collective' technology/arts group.


Titled 'Childhood Remixed', the exhibition is all about making sounds with children's toys, and the complete encompassing project also includes related workshops and talks. I've been to one of Pixelh8's 'circuit bending' workshops before and it was totally brilliant.

The exhibition has several separate exhibits, linked by a common theme of revisiting children's toys as an adult and looking at them with very different eyes and mindset.


Warranty Void is an augmented Nintendo NES console from several generations before the the Wii and people waving Wiimotes took over the video games console market.


An Apple A Day takes toys and leaves the brightly coloured plastic exteriors alone, but subverts the audio internals in ways that range from subtle to extreme. It has to be said that one of the characteristics of circuit bending is that the resulting modifications tend to veer to the more overt end of the spectrum.

My personal favourite (a quote from Zorg, of course) was the chain-saw, possibly one of the most unusual musical instruments I've seen as a children's toy, although some heavy metal rock bands have used angle grinders in performance, more for sparks than sound, and I noticed that this year's Eurovision Song Content featured a robot with an angle grinder in one of the performances too, so perhaps this type of industrial ephemera is becoming more mainstream.


Beat Un-boxed took cute and turned into into a beat-box. A 16-step sequencer driving a multi-instrument percussion set via solenoids - gorgeous!


The centre of the exhibit is dominated by a piece of musical autonomata set off by a big red button. Robots, Meccano and more plastic combine to make a visual and audible melange.


'Childhood Remixed' is open to the public from May 29th to July 12th, 2010 in the Town Hall Galleries, Ipswich, Suffolk, UK. Thoroughly recommended.

Reblog this post [with Zemanta]

Saturday 3 April 2010

'Slango' SoundCloud track shared!

I think SoundCloud is a great concept. Unfortunately my experience with it as a service has been mixed. I've had upload problems in the past, and I can't get the share to work with Blogger at all (works fine with Facebook, btw), which is why this post is done manually. But I persist because SoundCloud ought to be the perfect solution, and I'm hoping that given time...

Slango1 by martinruss

So here's the track that I wanted to share. It's another rambling piece of electronica, this time inspired by the 1970s. So it's deliberately at a fixed 120 bpm, in a predictable 4/4, in the key of C, with a hackneyed chord sequence, minimalistic arpeggios, no development, etc. I used the ever-wonderful Ableton Live for the sequencing, and the essential Audacity (with Lame) for the final conversion to MP3.

I've also captured this track driving one of my recent visualizers too, and you can see it on my YouTube channel...

---

Oh, and as you will see immediately below this, I'm gradually becoming a fan of Oliver Chesler's 'Wire To The Ear' blog, which has a rare resonance with the way that my mind works. Thoroughly recommended!
From synthesizerwriter


Reblog this post [with Zemanta]

Wednesday 17 March 2010

Using the Apple General MIDI DLS Sound Bank Synthesizer in Ableton Live

One of my rules of thumb is that whenever I can't find something on the Internet, then I try to solve it and then write it up. You are reading this because I could not find any good guide to how to use the Apple General MIDI Down-Loadable Sound (DLS) Sound Bank Synthesizer (an Audio Unit plug-in provided in Mac OSX) in Ableton Live. The plug-in is also referred to as the Apple DLS Music Device, and this is how it appears in Ableton Live.

As with many things in life, there is more than one way to do it.

Here's the simple way:
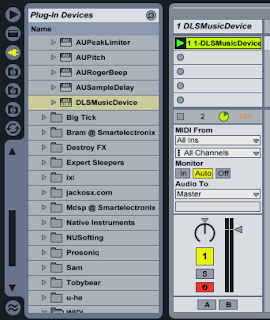
This is just a MIDI Track with the Apple DLS plug-in dropped into it, and then a MIDI Clip is created, and a few note events added. The result uses the first one of the 16 available MIDI channels in the Apple DLS plug-in, and so you can only use it for instrumental voices - there seems to be no way to change the MIDI channel that is used. So if you only need a single channel of basic General MIDI instrument sounds, then this may be all that you need.

Notice here that I've made the Inputs and Outputs visible by clicking on the I-O circle on the far right of the mixer, just to the right of the master volume sliders. What is interesting is that this MIDI Track is behaving exactly as it should - receiving MIDI inputs and converting them into audio outputs. Unfortunately, Live seems to always send MIDI information to the DLS plug-in on MIDI channel 1, and there is no control to change this in the I-O panel. In fact, for this simple example, you do not need to see the inputs and outputs at all.
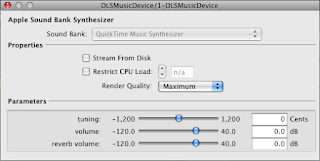


When you drop the DLSMusicDevice onto the MIDI Track, then you this dialogue box will appear. You can set the controls if you have a specific set-up you want to use, but in most cases you will just close this dialogue. You can get it back using the 'spanner' in the assignable X_Y control block that appears at the bottom of the screen in the Clip view.


But there's a better way:

It is more complex, but it allows you to utilise the full capabilities of the Apple DLS plug-in.
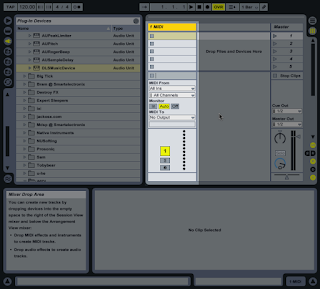
You start in exactly the same way - create a new MIDI Track.
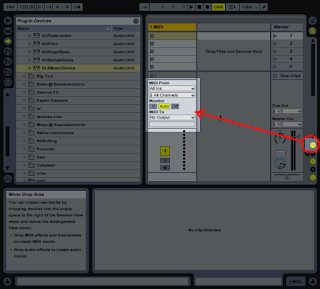


This time, you definitely need to make the Inputs and Outputs visible by clicking on the I-O circle on the far right of the mixer, just to the right of the master volume sliders.

This I-O panel is the key to assigning MIDI channels to the DLS Music Device.
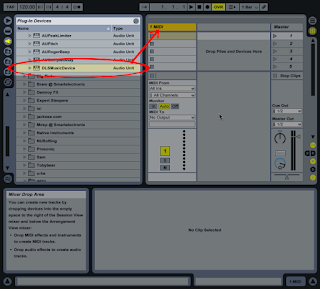


You then drop the Apple DLS plug-in into the MIDI Track. This sets up the DLS Music Device so that it receives MIDI Input and outputs audio into the mixer. But this time we are going to re-route where the MIDI Input is coming from...

(The Apple DLS plug-in is in the Plug-In Devices > Audio Units > Apple folder )
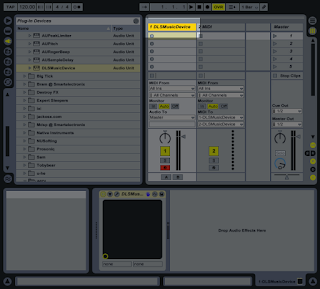


The Track name will have changed to DLSMusicDevice...


And the Apple Music Synthesizer dialogue box will have appeared... Note that the three 'Parameter' slider controls ( tuning, volume and reverb volume ) are global, and so they affect all the DLS sounds.
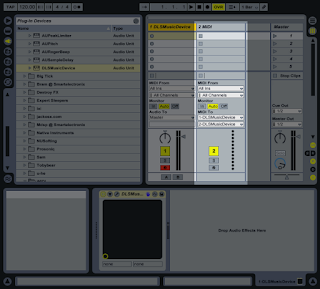


You now need to add a second MIDI Track... This is going to be used to hold the clip containing the note events, and to control the MIDI channel of those events...
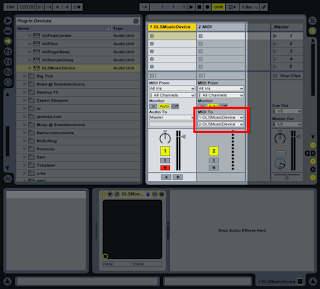


The I-O panel in this new MIDI Track contains this vital pair of controls, which aren't exactly obvious in what they do...
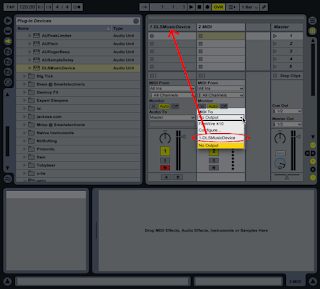


The upper pop-up list control shows a list of the Tracks that the MIDI output from this MIDI Track can be connected to. In this case, we want the output of this Track to go to the DLSMusicDevice, so we select the first Track that we created...

Any note events that we put into a piano roll Clip on this Track will now be routed as MIDI note events to the DLSMusicDevice, which will turn them into audio.
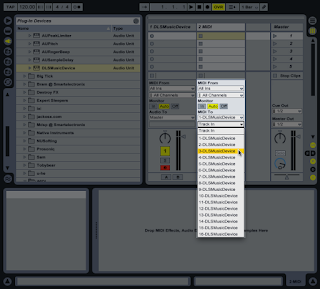


The lower pop-up list control lets you control the MIDI Channel of the note events that are sent to the DLSMusicDevice Track.
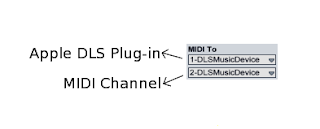


Here's a summary of what the two pop-up controls do...

Notice that the 1-DLSMusicDevice in the top pop-up refers to the plug-in being in Track 1, whilst the 2-DLSMusicDevice in the bottom pop-up refers to the MIDI Channel that the note events will be sent on... If the DLSMusicDevice was dropped into MIDI Track 3, then the top box would say 3-DLSMusicDevice. When you select the target Track with the top pop-up, then the DLSMusicDevice plug-in should be obvious - just make sure that you always look at the lower pop-up to check what MIDI Channel you are using.
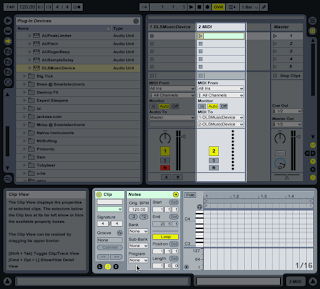
You can now create a new Clip in the new MIDI Track...
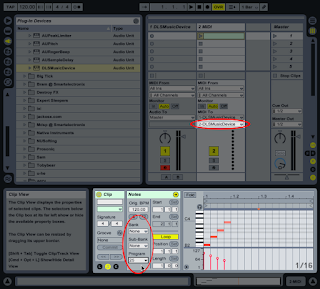


Remember that the lower pop-up selects the MIDI Channel that the DLSMusicDevice will use for this Clip, and the Program Number controls on the left of the Clip piano-roll will select the sound for that MIDI Channel...
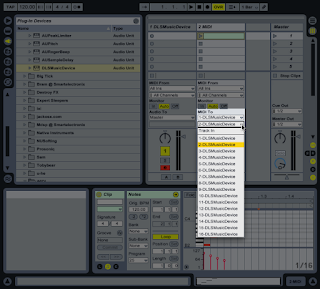


Here's the MIDI Channel pop-up control...
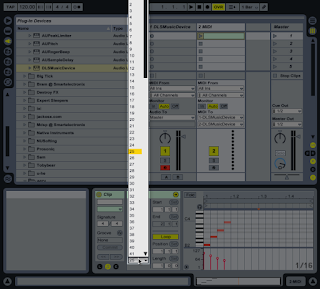


And here is the Program Number pop-up for selecting the sound or instrument. Note that you need to love the slider on the right to switch between low and high numbers, just like in any Live selector control with lots of options.
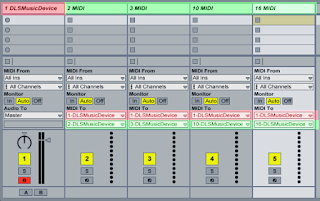


Remember that you can create several MIDI Tracks, assign them to different MIDI Channels (like Channel 10 for Drum sounds) and make the most of the multi-timbral capabilities of the Apple DLS Music Device.

In this example, the top pop-ups all route the MIDI events to the DLSMusicDevice plug-in on Track 1 (shown highlighted in Red), whilst the individual MIDI Channels (set by the lower pop-up) are shown highlighted in green.


Reblog this post [with Zemanta]

Saturday 27 February 2010

Importing, Editing and Exporting MIDI Files

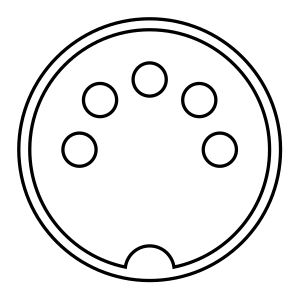
MIDI connector diagramImage via Wikipedia
Sometimes you get surprised. It happened to me today and I thought I'd note it down to see if anyone else has noticed the phenomenon.

Like many people, I use a music sequencer/DAW/host software/MIDI and Audio sequencer as a way of turning ideas into music. I tend to use the native file format of the software, because that usually has the most comprehensive support of all the features of that particular (I'll say 'sequencer' and show my age - I was raised in a time when little red lights flashed along sequencers on stage behind people like Edgar Froese or Keith Emerson) sequencer. This is just like the way that a very popular document format is the .doc format, used by Microsoft's 'Word' word processor.

At the back of my mind, there has always been the implicit assumption that if I needed to export the music, then apart from the obvious MP3 and FLAC (or even WAV) audio forms, I would use a MIDI File. Having used and/or reviewed The Music System and Ample on the BBC B Micro, C-Lab's Notator (now Apple Logic and on the Mac), Steinberg's Cubase (now a company within the Yamaha group), Trackman, Dr. T's KCS and Intelligent Music's RealTime (possibly my all-time favourite MIDI sequencer!) on Atari STs, and Pro Tools, Bill Southworth and company's Total Music, Opcode's Studio Vision, MOTU's Performer, Intelligent Music's M, etc on the Mac, plus a few others, then I knew that you could almost always also save as a MIDI File (.mid these days, although I remember the .smf 'smurf' (Standard MIDI File) suffix also being used in the days of floppy disks).

The shock came when I discovered that whilst MIDI File import is alive and well (in most cases: one 'you know who you are' sequencer I downloaded and tried today would not import MIDI Files at all!) the reverse is not necessarily true. Apple's Garageband is one example where you can't export a MIDI File, although apparently you can import the Garageband file into Logic and then export it as a MIDI File. Even my current favourite, Ableton Live, only exports MIDI Files of individual phrase clips, and not complete songs. In many cases, trying to find out exactly what the MIDI File capabilities of a specific piece of music software were was not easy. It seems that some people expect you to buy and then find out, which is a little sub-optimal for me. My preference is to have the manual downloadable (or browsable on-line) so that I can find out before I buy.

Mac MIDI Utilities

Once I realised that sequencers didn't seem to be quite as MIDI-frendly as I expected, then I started to assemble a 'toolkit' of useful utilities for the Mac. I have grouped them into 32-bit and 64-bit apps (the 32-bit apps won't work on Catalina and beyond, the 64-bit apps should work on earlier OSes...).

32-bit (Up to Mohave)


QuickTime Player 7. Note that QuickTime stopped supporting MIDI file playback in the Mavericks OS (OS 10.9 in 2013), but the QuickTime Player 7 still plays them. You can download the last QuickTime Player 7 from here: https://support.apple.com/kb/dl923?locale=en_GB The 'Pro' version was a purchasable version that provided additional editing and conversion facilities. I included the screenshot of the Windows version of QuickTime Player 7 because Apple stopped supporting QuickTime back in mid 2016...

64-bit (Catalina and beyond, plus earlier)


Hex Fiend. The Hex Editor shown here is the one that I also use to check what is in a MIDI File: Hex Fiend The web-site version was 2.8, but you could get a later version (2.12) from the GitHub site.


QuickTime Player 10+. No support for MIDI Files. (Included in macOS)


VLC. This video player makes a nice alternative to QuickTime Player 7 (or 10+), AND it plays MIDI Files! Download from: https://www.videolan.org/vlc/index.en-GB.html


MIDIKit 4.3.2 is a toolkit for MIDIFiles. SMF analysis, editing and some batch processing functions. For people who work with MIDI Files a lot, and who want detailed information and deep editing. Download from: https://www.mixagesoftware.com/index.html


Garageband is included with MacOS and is a pretty good way of visually examining a MIDI File.