Tuesday, 26 December 2017

Two-step, two-bar triad chord, film music generator...

The festive season is here, and the end of the year approaches rapidly, so here are a couple of free utilities to entertain you over the holidays…

I’ve released quite a few sound generators already, but this time I thought I would do something slightly different - a chord sequence generator. I will then show you a few ways that it can be used (simple orchestration and arranging tips for Live), as well as show you how to make a ‘missing’ preset for the Ableton ‘Random’ MIDI Effect.

What it is...

TR2gen_mr is a 2 step sequencer. Yes, just two steps, each one bar long, and looped forever. All it does is generate 2 chords made up of major or minor triads, so just three notes in each bar. You can set the pitch of each chord, if it is major or minor, how you want the fixed or random inversions to be applied to the three notes, and how long the notes last. Simple - in fact, so simple that you are probably wondering how this could be useful!


You may know that quite a lot of the music used in films follows some basic rules, and there are some excellent tutorials, explanations and demonstrations available on YouTube. Here are some examples:

How to Imitate a Whole Lot of Hollywood Film Music In Four Easy Steps:
https://www.youtube.com/watch?v=YSKAt3pmYBs

How to Imitate Even More Closely a Whole Lot of Hollywood Film Music with One More Easy Steps:
https://www.youtube.com/watch?v=W1DK4m2tuiw

(The two links above by Scott Murphy are nicely made and give very clear explanations - thoroughly recommended!)

Film Score Harmony: Chords by Thirds:
https://music.tutsplus.com/tutorials/film-score-harmony-chords-by-thirds--cms-21412

(The above link goes into music theory a bit more deeply...)

…and this link includes a very useful compilation summary chart of the first two links by Scott Murphy (Different intervals between the roots suit different genres of film!):
https://hitrecord.org/records/3124715

With all of this in mind, all that TR2gen_mr does is make it easy to create pairs of chords that have a fixed pitch interval between their roots, and have either fixed or random inversions applied to them.

The Controls


The main user interface element is the 2-step grid, which uses the standard M4L ‘live.step’ object, and so may be familiar to you already. Using a mouse, trackpad or other controller, just click, hold and drag the music keyboard up and down to choose the pitch range you want to use, and drag from side to side to zoom in and out. Click to the right of the music keyboard to set the two notes, which follow the usual left to right time ordering of Ableton’s piano roll.

Each of the two single bar steps has the root note set using the grid, and underneath that are the playback controls: duplicated for each bar. (I could have used the live.step object to do everything in this utility, but that requires multiple layers of controls, and from simple utilities I prefer to be able to see everything at a glance…) The uppermost buttons control the type of chord: MAJOR or minor, following the convention of major chords being in capital letters (M) and minor chords being in lower case letters (m).


Underneath the ‘MAJ/min’ buttons are three horizontal rows of buttons that control the three notes in the chords: Root at the top, then the 3rd, then the 5th. Each of these rows has a ‘note name’ that gives the fixed ‘no inversion’ form, and so is shown by ‘R’,’3’, and ‘5’. Each row has the same order, so, from the left hand side: the first button is ’-‘, indicating that the note will either be randomly inverted downwards by an octave, or will not be inverted at all. 50% chance of either occurrence. The next button to the right is the note name: ‘R’, ‘3’, or ‘5’, and these are all fixed (so no randomness), with no inversions. The next button to the right is ‘+’, and this works like the ‘-‘ button, but inverts upwards by an octave approximately half of the time. (In a future version, then I may provide fixed inversions without the randomness, but I’m in a bit of a ‘randomness is cool’ period at the moment…). The final button on the right is ‘+-‘, and this randomly inverts up or down by an octave, or doesn’t invert at all - so there’s a 33% chance of each of these happening this time. (Note: If you look at the 'Random' MIDI Effect plug-in from Ableton, they use 'Add', 'Sub', and 'Bi', where I have used '+', '-', and '+-' - my excuse is that I was running out of space...)

(Note also that the rows are horizontal - unfortunately the UI makes it look like they are vertical!)

The final control is the ‘Length’ rotary control, which sets the length of the notes that are produced. At 120 rpm, then this covers the range from staccato through to just over a bar long, and at very slow tempos then it may not completely fill a bar - one of these days I will figure out the transport-to-note-length conversion…

Playing and Recording

To set TR2gen_mr running, you just start Live's transport... To stop it, you stop Live's transport. You may find that the notes in the first bar are not correct, and so you should wait until the first repeat (bar three) before trusting the output. This means that if you are recording the output of TR2gen_mr, you should always ignore the first one or two bars...

I mentioned the MAJOR/minor notation convention earlier, but didn't say that you can include the interval between the two root notes in between, so a major chord followed by a minor chord with an interval of 5 could be written as 'M2m' - this is how the summary chart is annotated in the link above.

Orchestrating

The TR2gen_mr M4L plug-in can be connected to any of the Ableton Instruments, although my favourite for listening to harmonies and chords is a basic piano sound. This will produce a very simple sustained chord (for most of the bar: set by the ‘Length’ control), but it is easy to extend this using Live’s built-in MIDI Effects. The first thing I did was to add an Instrument Rack and drop a Piano instrument into it. Block chords are a bit boring after a few repetitions, even with added inversions, and so adding the Arpeggiator MIDI Effect can turn it into something rather busier.


The ‘classic’ instrument sound to accompany a piano is a string pad (as in the well-known example from the Korg M1, for example), and so dropping a String Ensemble instrument into the Rack and increasing the attack and release times gives the ‘hold notes to get the strings sweeping in, play staccato to hear just the piano’ time-based control between the two sounds. But Ableton Live’s Instrument Racks let you do much more interesting things that that, and so I added additional random inversions using the ‘Random’ MIDI Effect.

(The reason I didn’t do a much simpler TR2gen_mr device and let the Random MIDI Effect do the random inversions was to maintain detailed control over exactly which notes are inverted…) The presets that Ableton provide for the Random MIDI Effect don’t include one which randomly inverts notes up AND down, and so I’ve produced my own, and saved it as a ‘adv’ file. The screenshot shows exactly how to produce this ‘Random Inversions’ plug-in, and all you need to do is set Random up like this, and then save it as ‘Random Inversions’ for future use. (That’s the second ‘free’ giveaway this time, by the way…)

By dropping other instruments into the Rack, you can extend the ‘Orchestra’ that is playing the output of TR2gen_mr. I added some Double Basses and used the ‘Pitch’ MIDI Effect to drop them by an octave...


...and a Brass Ensemble that uses a separate instance of the ‘Random Inversions’ so the strings and brass are not just paralleling each other (paralleling is bad!).


The end result of all this ‘arranging’ is a lot more interesting than the block chords that TR2gen_mr produces, and could be used as the backing music for all sorts of projects. (YouTube/Vimeo (etc.) videos, animation demos, etc.)

The 'Arranger' Instrument Rack can be downloaded here:
https://drive.google.com/open?id=13ECzqF1f32EVqGCyTS1i30njoCCVCdr4

So there’s this blog’s seasonal presents to you! See you in the New Year.

Some examples of using TR2gen_mr are on SoundCloud:


Downloading TR2gen_mr

You can download TR2gen_mr for free from MaxForLive.com.

Here are the instructions for what to do with the .amxd file that you download from MaxForLive.com:

https://synthesizerwriter.blogspot.co.uk/2017/12/where-do-i-put-downloaded-amxd.html


Buy me a coffeeBuy me a coffee


Tuesday, 12 December 2017

Where do I put a downloaded .amxd MaxForLive (M4L) device file in Ableton Live?

This blog should answer some questions like these: How do you install a MaxForLive plug-in? What do you do with a .amxd file? Where do you put MaxForLive plug-in files?

Installing MaxForLive device/plug-in files

Many MaxForLive (M4L) devices/plug-ins can be downloaded from the MaxForLive.com web-site, and many other places on the Internet.

When you download a device/plug-in, you will often get just one file - this will have the name of the device/plug-in, followed by '.amxd'. The suffix indicates that the type of file: in this case it is a '.amxd' MaxForLive (M4L) device file. You will need to add this file to Ableton Live so that you can add it to the track device chain.

A '.amxd' device file is similar to VST, AU, etc., 'plug-in' files - it contains the code, user interface and other data required to make the plug-in work inside Ableton Live. In order for Ableton Live to recognise the file correctly, it needs to be added to Ableton Live.

How do I add it to Ableton Live?

Live 9 provides two ways to add a .amxd M4L device file. Both require you to set up the Ableton Live window and the window containing your downloaded file so that both windows are visible on the screen...

1) Drag the .amxd device file into a track, and then click on the save icon (right: floppy). This will automatically save the device to your ‘User Library’ folder in ‘Places’ (the ‘head outline’ icon), and will also save a '.adv' file which can be used to store your favourite initial setup.

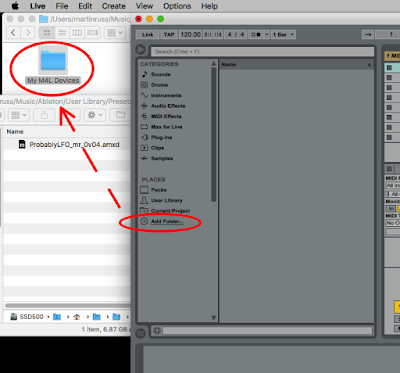
2) Put the .amxd device in a folder you have allocated to M4L devices, then add that folder to the Browser. Just scroll down to the bottom of ‘Places’ and click on ‘Add Folder’ . Then select the folder where you have saved the .amxd device file. (The ‘power user’ technique is to just drag that folder into ‘Places’)

Scroll down past the example download boxes for the same information - but with screenshots!

Some of my free .amxd device file downloads:

Max for Live
Missing Echo dark

This echo puts an LFO inside the feedback loop, so the number of echoes changes over time.

F R E E

Download
Max for Live
ProbablyLFO dark

This is no ordinary LFO. Lots of timing sources, edit waveforms, chance variations, and much more.

F R E E

Download
Max for Live
gFreez_mr

A 4-phase LFO blends four channels of granular atmospheric sound into a swirling audio experience...

F R E E

Download

How do I add it to Ableton Live (with screenshots)?

Live 9 provides two ways to add a .amxd M4L device file. Both require you to set up the Ableton Live window and the window containing your downloaded file so that both windows are visible on the screen...


Method 1: Drag the file into a track...

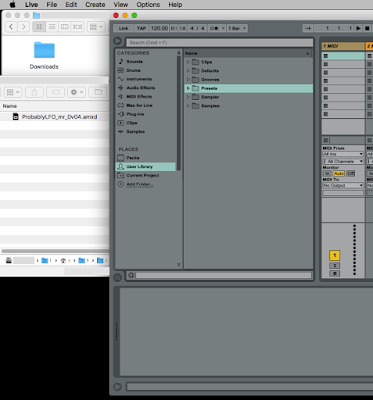
Here we have the 'Downloads' folder (where you have probably put the downloaded .amxd device file...), and inside it is the file itself.

(The screenshot also shows the User Library open in the 'Places' part of the Browser inside Live.)


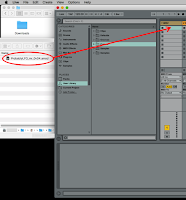
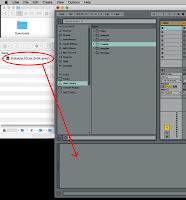
Drag the .amxd device file into a track... This can be a track strip,


or the track chain...


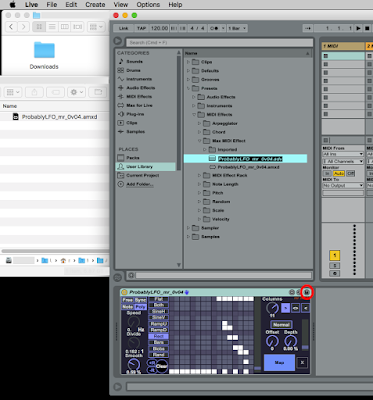
Then click on the save icon
(on the right hand side of the window: with a 'floppy disk' icon)...

This will automatically save the device to your ‘User Library’ folder in ‘Places’ (the ‘head outline’ icon), and will also save a '.adv' file which can be used to store your favourite initial setup.


Method 2. Folder dragging...

Make sure that you set up the Ableton Live window and the window containing your downloaded file so that both windows are visible on the screen...

Put the .amxd device in a folder you have allocated to M4L devices, then add that folder to the Browser.

(To add a folder to the Browser: Just scroll down to the bottom of ‘Places’ and click on ‘Add Folder’. Then select the folder where you have saved the .amxd device file.)


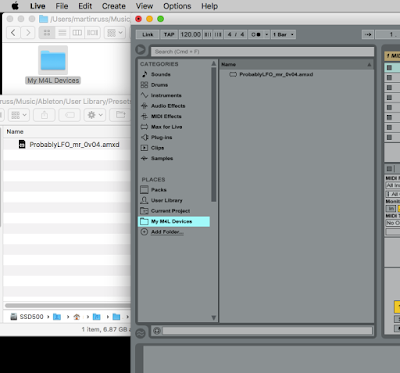
When you have done this, then you will have a new folder in your 'Places'


Method 2a. 'Power user!'

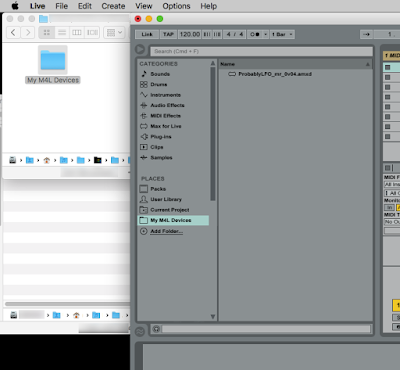
The ‘power user’ technique is to just drag the folder containing the .amxd file into ‘Places’...


... and it gets added. Easy and very quick.

The only difficult bits to the power user method are:
-  arranging the two windows on the screen!
- scrolling all the way down to the bottom of the 'Places' (it can get very long...)


Buy me a coffeeBuy me a coffee


Sunday, 3 December 2017

Complex timing generator for Max For Live and Ableton Live

The first presentation at Loop 2017 was Andrey Smirnov's wonderful talk and demo of Leon Theremin's 'Rhythmicon', ending with a superb live performance piece. It was an inspiring opener to a wonderful event, and it got me thinking...

Probably GENerator

If you've been following my 'Probably' series of MaxForLive devices, then you may have noticed that they have gradually been influenced more and more by modular synthesisers. ProbablyLFO could easily have some radical graphics, a name suggesting 'West Coast' influences, and be a hardware module in a rack, except that it is only in software in Ableton Live at the moment. Producing hardware is a time-consuming process, and I'm still considering what my next device will be...

But, as we have just passed through one annual winter 'holiday' event, and with another looming, this seemed like a good time to release yet another unusual giveaway, and with the 'Rhythmicon' still tucked away at the back of my mind, I wondered what I could do that was exploratory rather than just a dull copy... And, trust me, some of my previous M4L giveaways at this time of year have been useful, but just a little bland. 

The result is ProbablyGEN, (GEN is short for Generator, not Max's 'gen'!), and it is a three channel (after dFreez_mr, I've temporarily given up on trying to squeeze four channels in!) asynchronous / synchronous note generator. Each channel has a choice of free-running (async) or synchronous (divided from Live's transport), a probabilistic 'velocity' grid (with a special variation on the previous user interface specially for this type of application), length control per grid, direction controls (forwards, backwards, scanner), and completely straight-forward (gasp!) MIDI Note output selection. So you get three note polyphony (or use the 'Chord' MIDI plug-in) which is ideal for simple drum sounds, or simple three-part monophonic music.


The screenshot above shows three synchronised channels, all running at 1:1 (i.e., the same as Live's transport), and all playing 16 column grids (more on this in a moment). The far right hand side shows the MIDI Notes which are being generated, which is a giveaway for what this is doing: 36 is Kick, 38 is Snare, and 42 is Closed Hi-Hat. I did consider calling this ProbablyD, or ProbablyDrum, but then I realised that you could use it for other purposes than just drums, and so I went for the generic name of 'GENerator'.

The 'Columns' setting and the direction buttons on the right might need some explanation. Why is the middle channel 'Columns' control set to 17 instead of 16? Actually, this is a consequence of it running back and forth in a 'scanner' type pattern - the little '+' is there to remind you that when you choose the 'scanner' direction then you need to increment the 'Columns' control by 1 (or not, as you prefer!). So, actually, all of these channels have 16 columns in the active part of the grid - but there's more later on this... 

With these settings, from the lowest channel upwards: the bass drum is playing four 'on the beat' hits, with the final column (or the 16) exploiting the new UI twist that I have added: the upper white cell is indeed a '66' velocity. but the lower white cell is a '0' velocity on the black row, which doesn't mean 'zero velocity' (that would be a Note Off...), but means 'don't play this note. Now because the probability grid takes multiple instances of white cells in a vertical column as providing choices for that event, this means that there are two things that can happen here: a kick drum played at a velocity of 66, or no kick drum, and with each having the same probability - so the kick drum will play about half of the time. When you listen to this, then you hear that 'the drummer' keeps putting in extra little appoggiatura ('pick-ups') at random, just before the main beat at the start of the bar. So here we have a software emulation of an impatient foot...

The middle 'snare' channel is scanning back and forth, and so we get a single snare (at 33,66 or 99 velocity) or a cluster of 2 or 3 snares on alternate repeats. Again, the 'zero' bar is used to make that middle snare in the cluster happen about half of the time.

The 'hi-hat' channel has 'on the beat' hits, with off-beats at half probability using the 'zero' row again, and a cluster of 'sometimes' at the end of the bar, followed by an end of bar tick that always happens.

A rhythm less ordinary... 


The screenshot above shows a slightly more unusual setup. This time, the bass is as before, whilst the snare is playing slower, at 0.889:1 to Live's transport, and the active part of the grid is only 15 columns long (wide?). The hi-hat is now faster, at 1.333:1, and there are 22 columns in the active part of the grid. In this example, I have deliberately chosen the values of Divide and Column so that the lengths are the same duration in time, but this does reveal an interesting side-effect. It is quite difficult to change the Divide control and the Columns control at the same time, and so you will find that the timing gets out of alignment, as you can see by the three vertical cursor lines not being aligned in a vertical line. There are two ways to fix this: stop Live's transport and restart it; or hit the 'In' button in the top left hand corner, just underneath the 'start' light circle. This forces a reset of the internal counters, but doesn't sync it back to the bar or beat of Live's transport, which can be a useful effect. Either way, you get to control the channel timing alignment as you want.

The hi-hat is also busier in this last few columns, with 25% and 33% probabilities from the page of the 'zero' row. But you've probably not got the time to concentrate too much on this, with all of the timing complexity that this setup gives. Each of the channels is outputting notes in its own synced time, but the timing isn't the 'four-to-the-floor' many ears are used to hearing. Nope, this could perhaps be interpreted as being simultaneously an emulation in software of the best AND/OR the worst software drummer in the world...

This is only scratching the surface of the timing options that ProbablyGEN gives you - the 'Divide' range is deliberately set wide, so you can go fast and very slow (try increasing Live's tempo too!). And if you use the 'Free' button, then the tempo of that channel is completely independent of Live's transport, and so is totally asynchronous. For hi-hats, this can sound pretty cool! (This is also where tempo-aligned echo can be useful to explore...) But hey, that's enough presents given away in one blog article!

Notes

If you replace a drum kit with a synthesiser, then ProbablyGEN becomes a three channel monophonic step sequencer with potentially independent timing of the three channels (or any degree of sync that you want). As I said earlier, this is the sort of thing that many people associate with modular synthesiser racks, and not a laptop running Ableton Live.

By using the 'Chord' MIDI effect plug-in, then one, two or all of these notes can be expanded into chords. Depending on how you set this up, it can be described with words like 'jazzy', or 'obtuse'... (and if you've ever listened to the 'ChromatixT' demos on SoundCloud, then...)

MaxForLive.com

As usual, ProbablyGEN is available for free from MaxForLive.com. Enjoy doing interesting things away from 4:4 timing as we move into 2018!

Unexpected surprises!

ProbablyGEN outputs all three notes when you first instantiate it in a track, so beware!

Did someone mention a Parappa the Rapper reference?
PaRappa_the_Rapper
5 Minutes of Parappa the Rapper Remastered Gameplay - YouTube 2mins 10 seconds

Updates:


Update: version 0.04: Asynchronous timing generator for Max For Live in ...

Update: version 0.05: Constraint-driven modification grids in asynchronous drum timing generator


Buy me a coffeeBuy me a coffee