Wednesday, 30 September 2020

Taming LEDs - a practical guide to muting overly-bright indicators

Light Emiting Diodes (LEDs) started out 50-odd years ago as little red solid-state indicators that were expensive but soooooo much cooler than filament bulbs, and over time have replaced those old inefficient incandescent bulbs in lots of applications, particularly lighting. For indication purposes, though, there's a trend which seems to be growing, and that is using LEDS as power indicators that are way too bright, yep:

LEDs that are TOO bright!

The worst offenders are clear LEDs which can give very bright beams in some directions. There's a word for it: Glare! Quite a lot of my gear has LEDs that are far too visible, and my studio isn't dark! Some equipment provides control over the brightness of the UI (user interface), but this is quite rare, and doesn't always cover the power indicators. An interesting example is the awesome Synthstrom Deluge groovebox (and more), where there's a shortcut that allows the LED brightness to be set (the default is bright), but it works for all of the LEDs except the power LED, which glares yellow or green at the same eye-catching/distracting brightness regardless of the setting...

Impractical

One approach would be to open up the piece of equipment, find the series resistor that provides current to the LED, and increase its value. The problems with this quickly make it impractical for many reasons:

-   Voiding the warranty (and even just opening some modern gear is not easy!)

-   Requires basic reverse-engineering of the relevant circuitry to find the resistor.

-   Requires skill and tools, and for surface-mount resistors; a proper desoldering station.

Your circumstances may vary, but I tend to restrict my customising to old/vintage gear where I'm fixing a problem like dead capacitors, faded display backlights, or adding extra functionality. Messing around with new gear just to fix an LED that is way too bright doesn't feel like a good idea...

Practical (Well, quick and dirty, anyway...)

So are there any practical solutions that don't involve diving into the internals of the gear? For a long time, I've used Blu Tack as my quick fix (My grateful thanks to Bostik, who manufacture it!). Just put a small blob of the slightly sticky blue stuff over the LED, and then put your fingernail through the Blu Tack to expose just enough of the LED so that it is visible rather than exposing the normal 'Woah: That's way TOO bright!' mode. Rapid, and 'fix & forget', although it does, of course, look rather like, nope, look exactly like, a blob of Blu Tack.

The red power LED on an old Roland M-240 mixer bought from Turnkey in London... 

The blue power LED from a 'no-longer-supported' M-Audio Firewire audio interface...

Over time, the Blu Tack method does tend to attract dust, and it doesn't look any less like a blob of Blu Tack. If you happen to catch it with your hand, then you get a sudden bright LED and you need to reshape it and try to expose just enough of the LED with your fingernail to restore it to 'how it was before'. Curiously, getting back to how you remember it isn't as easy as you might think, although what is very simple is making it too bright or not bright enough. Maybe the Blu Tack method is better described as:

Semi-practical: imperfect in several ways

Fiddly

Now, you are probably expecting something a bit more nuanced from me, so here are the two solutions that I have developed, plus a third that may suit some specialist situations.

First, there's what I call the 'Yogurt pot' method. You cut a piece of the white plastic out of the base of a yogurt pot (where the plastic is thickest), and fix that in place over the LED. You can use Blu Tack, although I find that a tiny blob of the clear flexible glue often described as 'general purpose' is better! You can see this in use on my 'Tuner' - a chromatic guitar pedal that I use for tuning up analogue gear and even digital gear that requires it (FM sounds on the Deluge are one example...). The designers at Donner drive the LEDs very brightly, and whilst I can see that this might be good on a very bright stage, auto-brightness or a bright/dim selector switch could well be a good sales feature!


Then there's the 'Envelope' method. I cut a small disc out of the two layers of plain white paper from an old envelope, and then glue that over the LED. If I feel like ignoring the warranty, then I might open the case up, push the LED inwards a bit, and then put the paper on the inside. On my Deluge, I put the paper underneath the Mxpand overlay (a very useful and informative add-on that augments my poor memory very nicely!). 

Finally, there's the 'New Age' method, which twists the 'Quartz crystal lamp' meme (that you see in many studios) to suit my nefarious purposes. You must have seen them in those depressing 'Is your studio ever THIS neat and tidy?' publicity photos of other people's studios: big lumps of yellow quartz with LEDs inside them, that glow reassuringly, but which don't need watering like plants or cactii. So my variation is to go to the opposite end of the spectrum and get those tiny little lumps of quartz that have been polished smooth and are sold as decorations. A size of 5-10mm across seems to work well for glueing on top of an LED. 

'Tumbled' is the adjective often used to describe the polishing method, and you can find them in various sizes on Amazon and from craft shops. Rose quartz is good for red LEDs, but you can get purple Amethyst or green Aventurine or... My recommendation is to go to a craft shop because that way you get to see the size and smoothness of the polishing. Of course, you might want to get unpolished lumps if you prefer. Either way, the stone diffuses the light from the LED and prevents glare - and it looks rather natural and connected, if you are into that kind of thing. If 'Grand Designs' did studios, then the power LEDs on their gear would definitely be obscured by bits of tumbled quartz!

Just one more thing...

LEDs being too bright might seem to be trivial, and not worth considering at all. But anything that distracts can kill creativity. It is not an exaggeration when I say that the very first thing that I noticed about the Synthstrom Deluge was the power LED, and the very next thing I did was put a piece of Blu Tack over it and start to create music with the Deluge - which is totally wonderful, by the way. But as soon as I could, I used the 'Envelope' method to turn that bright distraction into a plain yellow or green dot that now does its job of telling me if the battery is charging or fully charged - and that's all that it does. 

Sometimes it isn't software, or firmware, or even fancy hardware.  

Consequences...

In a connected world, there are often fascinating consequences and misinterpretations of mundane actions. I bought some tiny tumbled rose quartz fragments from Smile.Amazon... (the bit where you force a charity donation) to cover up some glaring LEDs, and since then, I have had some intriguing emails and 'You may be interested in...' suggestions from Amazon. You may want to cover your tracks by using the 'I prefer not to use this for recommendations' tick-box...

Much more interesting, and very relevant to music gear, is what tends to happen when you buy stereo in/out, hi-end or boutique guitar pedals for processing synths in live rigs (and I'm definitely no stranger to this type of activity!). When you do this, then online music shops seem to assume that you must be interested in hi-end or boutique guitars as well...  (I'm not another pseudonym for the amazingly talented Benn Jordan, btw!) I did wonder if I could nullify the implied linkage by buying a hi-end or boutique synth from them - but that type of synth tends to come from specialist suppliers that rarely sell guitar pedals...  So, to help you (and me) I have added a few of the hi-end or boutique synth suppliers in the 'Links' section for your to browse.

Links

Grand Designs (TV Programme)

Blu-Tack    

Mxpand (Overlays) 

Synthstrom Deluge

Donner DT-1

Benn Jordan

LEDs (lighting)

LEDs (indicators) etc...

Hi-end or boutique synth suppliers, a biased non-comprehensive list:

Signal Sounds (Glasgow, Scotland) (Bastl, Doepfer, Motas, 1010, E-RM, Cyclone, Polyend, Squarp, Twisted Electrons...)

Rubadub (Glasgow, Scotland) (Soma Labs, AVP SYnth, Modor, Dreadbox, Studio Electronics...)

Elevator Sound (Bristol, England) (Critter & Guitari Organelle, Make Noise,  Erica Synths...) 

Synthstrom Audio (New Zealand) (The only source of the fabled Deluge

Expressive E (France) (Osmose, Touche, etc.)

Haken Audio (Illinois, USA) (The Continuum Fingerboard! (Plus the synth inside the Osmose!) and more...)

Black Corporation (Japan) (Deckard's Dream in Rack or Modular forms, plus more goodies...)

MFB (Berlin, Germany) (Tanzibar, Synth Pro, Dominion-1...)

Isla Instruments (Florida, USA) (The S2400 (wow!), Kordbot...)

(I'm happy to consider adding more entries to this list - just contact me!)

---

If you find my writing helpful, informative or entertaining, then please consider visiting this link:


Synthesizerwriter's StoreSynthesizerwriter's Store
 (New 'Modular thinking' designs now available!)


Tuesday, 29 September 2020

Selecting different effect paths in an Ableton Live MIDI Effects Rack...

The 'Racks' in Ableton Live are very neat solutions that contain a lot more functionality than you might think at first glance. The obvious application for the Audio or MIDI Racks is to put several effects in series into a rack, and then assign Macro Controls to specific important parameters in those effects, and then hide the effects leaving just the macro panel visible.

A simple example first...

Here's exactly this process for a very common set of MIDI Effects. 

The first effect is the 'Random' MIDI effect, which is being used to add an offset of -12 or +12 semitones to the incoming MIDI note number, with a 50% probability (so half of the time, the incoming note will be unchanged, and half of the time it will be transposed up or down by 1 octave). 

This is followed by the 'Velocity' MIDI effect, which is adding a random number (up to 29) to the MIDI velocity of the incoming MIDI note. 

The overall result of these two MIDI effects is to produce random inversions of chords (or transpositions of individual notes), with random 'voicing' (relative differences in timbre or volume caused by the velocity). This is very useful for string or synth pads, making it sound like the part, and the playing of that part, is much more complex than the contents of the source clip! 

To store these two MIDI effects as a single device, you just insert a blank MIDI Effect Rack into the track strip:


The MIDI Effect Rack will initially have no effects in it (just a grey bit in the middle), so you just add the two effects to the empty 'Drop MIDI Effects Here' area in the middle.:


Which gives us a neatly encapsulated effects 'chain' that can be named and saved, and re-used whenever pad 'sweetening' is needed. 

On the left hand side, there are some button that control which parts of the MIDI Effect Rack are visible. If we turn on the top button:

...then the left hand side opens up and we see the Macro Controls:

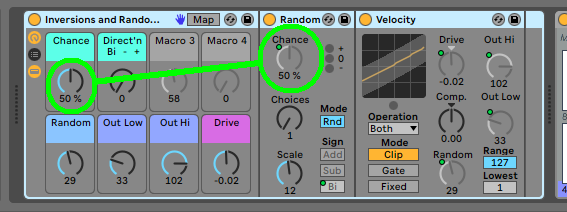
The Macro Controls have all been mapped here. So let's look at how that works. Some of the controls in the effects on the right hand side have a small green dot, and this means that they are actually controlled by one of the Macro Controls. 

All that you do ito set this up s click on the control on the right hand side (four little corners appear around the control) and then right-click on it. A pop-up menu appears, and you just select the appropriate Macro Control:

Because the mapping to the Macro Control is already set up, the highlighted option here says: 'Unpam from Chance'. If you were doing this from scratch, then it would say 'Map to Macro 1', much like some of the other menu options shown.

Once you have mapped the effects controls to Macro Controls, you can colour and name the Macros. If  you click on the middle button on the left hand side, you will see this:


The middle button unhides the middle section of the window, and it contains some buttons, then a large box called 'Chain', which represents the chain of effects over to the right, and then another empty grey space with 'Drop MIDI Effect Here' - just like where we added the two MIDI Effects right at the beginning of this blog post. Clicking on the middle button again will hide this centre section.

Finally, you can click on the lowest little button on the left hand side, and the effects will be hidden:


(You can see that the lowest button on the left hand side is no longer yellow!). 

And that's it! Two MIDI Effects turned into a useful composite effect that you can grab from Live's browser and insert on any pad track that needs inversions and velocity processing.

There's more...

But there are more advanced ways to use Racks, and this is where people seem to have problems. The metaphors used in the Racks appear to have been strongly influenced by the way that samplers manage samples: velocity switching ('Vel'), and the note range that a sample is assigned to ('Key'). But the 'Chain' button uses a different mind-set - kind of like multiple Racks that you can switch between. 

Now I have already used the word 'chain' to describe those two MIDI effects placed one after the other in the Rack - 'in series' is how techies describe this arrangement. But MIDI Effect Racks allow you to have more than one chain inside them...

Remember how the middle section had a 'Drop MIDI Effects Here' underneath the large 'Chain' box? Let's see what happens when we do that...

I'm not going to repeat the previous effects. Instead let's start by just making some chords:


This chain of two MIDI Effects uses the 'Chord' MIDI effect to generate a triad of three notes to make a Major chord based on the root note input from the Clip, followed by the same 'inversion generator' effect as before, using the 'Random' MIDI Effect. The 'Random' MIDI Effect is polyphonic, so when you pass the three note from the chord through it, it will apply the random inversion to each of the three notes separately. After the Rack, there's one of my MaxForLive note monitors, showing an inverted C Major chord, and then a Collision Instrument to make a sound.  

If we now click on that middle button, the middle section unhides, and we get the 'Chain' box with the 'Drop MIDI Effects Here' grey area underneath:


I have renamed 'Chain' to 'Major' because that box represents those two MIDI Effects that are producing inverted Major chords.

Next let's alter one of the MIDI Effects:


Above is another chain showing the same two MIDI Effects, but this time with the 'Chord' MIDI Effect set so that it produces a Minor chord. If we drop these two MIDI Effects into the grey 'Drop MIDI Effects Here' area, then we get this:

A second large box appears underneath the 'Major' box that used to be called just 'Chain'. I have renamed this new box 'Minor' because it contains the 'Chord' MIDI Effect that creates minor chords. I have also mapped across the Chance and Sign controls to Macro Controls on the left, and aded some colour. I have also added a 'Chord Maj Min' control because that seems like what we want to end up with... but what do we map to it?

Before we look at that, let's see what is happening inside this MIDI Effect Rack... 


In the above diagram, I have shown the two large chain boxes (Major and Minor) and how they map to the two chains of MIDI Effects. You don't actually ever see a view like this, but it shows how there are two chains in parallel.

What do those two chains do, and what are those controls to the right of the large boxes with 'Major' and 'Minor' in? There seems to be a loudspeaker button, a 'Solo' button, a 'Refresh' button, and a bar-graph like the ones in MIDI tracks. If the Major chain is soloed:


Then the output of the Rack is Major chords.

If the Minor chain is soloed:


Then the output of the Rack is Minor chords.

So only one chain can be active at any one time, which makes sense! But how do we control these two chains. Mapping the solo buttons doesn't work, of course!

The answer lies in the 'Chain' button. As I noted earlier, the 'Key' and 'Vel' buttons seem to be influenced by samplers, since in other Racks they deal with key ranges and velocity switching, but clicking on the 'Chain' button opens a similar looking section to the ones for 'Key' and 'Vel'...


Now it isn't immediately obvious what to do, but it looks a lot like the 'Key' range control, so if we assign the two ranges to 'Major' and 'Minor' then it looks like this:


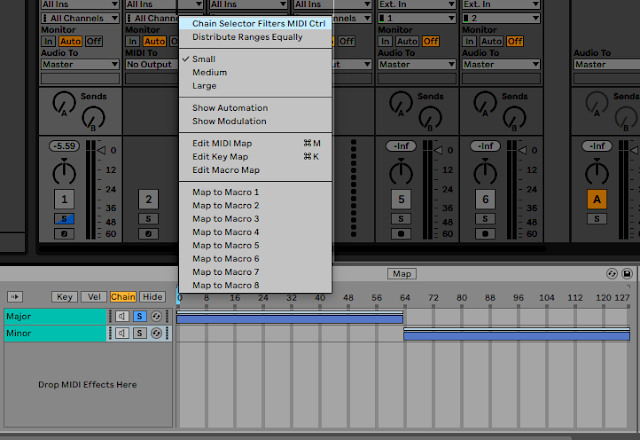
Unlike the 'Key' section, the numbers at the top go from 0 to 127, which looks like a MIDI range, and there's a light blue highlighted box for the '0' (zero) position. If you right-click on this box then you get  a pop-up:


'Chain Selection Filters MIDI Ctrl' tells us that this is a control for that 0-127 range. Also notice the 'Distribute Ranges Equally' - you can use this to set the ranges like this if you want... If we map this to that pre-defined Macro Control (Macro 5), then we get a result that looks like this:


Here are the mappings that have been added:

So the 0-127 horizontal bar in the 'Chain' view is for a 'Chain Selector', which means that when the value is from 0-63, then the Major MIDI Effect chain is active (soloed), and when the value is from 64-127 then the Minor MIDI Effect chain is active (soloed!).

So now we have a MIDI Effect rack which produces Major or Minor chords, with random inversions. But how can we automate the Major/Minor selection? You could map an LFO to Macro 5, but another way is to use a Clip Envelope (My Favourite!):


This Clip Envelope is mapped to 'Chord Major Minor', which is the mapping name for Macro 5, that controls the Chain Selector. So this clip envelope plays a Major chord first, then a Minor chord. You can, of course, change the clip envelope to suit when you want the chord type...

More chains!

Adding more chains just requires more dropping of MIDI Effects in the 'Drop MIDI Effect Here' area, and the setting of separate ranges in the 'Chain' view. Here's an example I prepared earlier:

Again, this isn't what you would actually see on screen!

Files


Downloads for the example Racks featured in this blog post (plus previous Racks) are available here.

---

If you find my writing helpful, informative or entertaining, then please consider visiting this link:


Synthesizerwriter's StoreSynthesizerwriter's Store
 (New 'Modular thinking' designs now available!)


Tuesday, 8 September 2020

USB to 9V 'Pedal' Cable

Histories of Electronic Music often  concentrate on hardware, in an 'insider' code: TR-808, DX7, MPC, D-50, RC-505, EIV, etc., or on bands/perfortmers/artists, again very 'insider' in nature: NIN, Erasure, Daft Punk, Deadmau5, Kraftwerk, Bassnectar, BT, Mili, Fluke, etc. Another possible method of categorisation might be recording technology, wire, tape, multi-track, portastudio, DAT, CD, mp3, SD card, etc. 

But there's one pivotal hardware technology that most people assign to the sidelines...

Power cables. Yep, those IEC mains leads, USB cables, the often-unloved wall-wart adapters and their captive leads, and... guitar pedal cables. At the risk of sounding like a movie trailer (remember going to the movies pre-lockdown?): 

In a world where data seems to be going wireless and enabled by lithium-ion batteries, distributing power to gear is still physical wires. 

Allegedly, the world nearly had wireless power via Nikolai Tesla's Wardenclyffe Tower experiments funded by J.P.Morgan (yes, that J.P.Morgan!), and magnetic induction on the grand scale may now be impossible because of the way we have developed electronics, but applications like mobile phone charging are viable, albeit over very short distances. Instead, we have mains electricity, or batteries. Batteries are increasingly not the throw-away zinc-carbon et al cells, but rechargeable lithium-ion et al, and the current knowledge of physics suggests that there aren't any huge leaps in energy density - so significantly smaller/lighter batteries with huge power storage will require huge advances in physics. Lithium-ion batteries are increasingly used in power-banks that can power more than just phones, and USB has become a pretty ubiquitous delivery mechanism.

However, guitar pedals are different...

Unfortunately, guitar pedals come from an era of 9V batteries made up of stacks of six 1.5 Volt cells: PP9s as they were called before the modern obsession with renaming battery sizes every few years started, which sounds a bit like the way that USB connectors and video connectors get changed every few years. But modern pedals often no longer have any provision for a removable 9V battery, instead a centre-negative 2.1mm barrel connector provides the DC power. - from the mains! But that DC power is 9V, not the 5 Volts that you get from USB...

Up until very recently, that was the end of the story. Pedals were 9V, (not USB!) and you used a wall-wart power supply to convert mains to 9V DC, with daisy-chained connectors for pedal boards (or better, but more expensive: isolated outputs). However, the last decade has seen a lot of advances in Power Converter chips, and they have got smaller and lighter... To the point where you can put them into connector plugs. So it is now possible to convert the 5 Volts that you get from a USB charger to 9V with what appears to be just a cable.

A Deluge of Ideas

It was the Synthstrom Deluge FAQs that reminded me about USB-to-9V cables. The Deluge groovebox is quite unusual because it can work of an internal lithium-ion battery (Yep, it really is very close to the 'Novation Circuit on steroids, or Circuit 2' that many people have wanted for some time...). I've got a small 'classic' Boss BCB-30 pedal board that is mains powered, plus several pedals (An OWL, a Poly Digit and various other 'boutique' pedals that might get put onto a board eventually (none of which have 9V batteries!). But power has always been the problem, and it goes well beyond the usual 'serious' pedal board design advice:

'Don't daisy-chain one adaptor: Use a power supply with multiple isolated outputs.'   

Synthstrom Audible suggest that one way to power the Deluge is to use a lithium-ion USB power-bank with a USB-to-9V cable to do the voltage conversion. So I ordered a couple of cables from Songbird FX...

BirdCords from Songbird FX

Here's what I got: two bags (everything is in bags these days!) with the ubiquitous stickers! What looks like a cable with a 2.1mm barrel connector on one end, and a USB plug on the other end, is the USB-to-9V converter cable. It can provide a peak of 1 Amp, which means that as long as your USB power-bank (or USB charger/mains adaptor) can provide enough current, then you can power quite demanding devices. I tried my Deluge, and with my usual 'LEDs almost at lowest brightness' setting, the current consumption was just over 300mA, and with full LED brightness, it went up to around 425mA. The Default 'full brightness' LEDs on the Deluge is very bright, by the way:

Deluge LED brightness illustrated
The Deluge can be very bright!

I powered the Deluge through the USB-to-9V cable for just under an hour in an ambient temperature of 25 degrees Centigrade, and the plug only got slightly warm, so it looks like there's no problem with providing about half an amp continuously. 


The cable is disarmingly small and light - the plug isn't a big heavy blob at all! I then tried it with a pedal, captured here in an 'action' shot:


As you can see, the 9V connector is plugged into a pedal, and I'm just about to power it via the USB connector. Stunning cinematography, eh?

I'm very pleased with my BirdCords. They are small, neat, do what they say, and are useful gadgets to have around for emergencies, as well as a perfect way to reduce the proliferation of different mains adaptors. 10/10 from me.

Mobile

Okay, so the Deluge already has a battery inside, but there's lots of gear that doesn't! And none of my boutique pedals have batteries inside! So having USB-to-9V cables means that I can remove my dependence on mains power, by using power banks, which is great for live performance - especially unreliable mains power.  Even if mains power is available, then having just USB adapters/chargers means that I have more interchangeability in case something goes wrong... Losing power mid-set isn't my favourite experience: the thumps and clicks in the audio are bad, but having a laptop still powered up when your synths, drum machine and effects are all rebooting to an unknown state is pure stress and embarrassment. 

So my aspirational mobile rig would have a high power (20,000 mAh or more) USB power bank to power USB-powered gear, with USB-to-9V cables powering my pedal board. But my 'ideal' mobile rig would be to have two power banks with auto-switching between them... I'm trying to find something that does this...

Links

Songbird FX - BirdCords, including the USB-to-9V cable featured here.

https://synthstrom.com/product/deluge/ - The Synthstrom Audible Deluge web-page...

http://n.wikipedia.org/wiki/Lithium-ion_battery - Info about lithium-ion batteries...

---

If you find my writing helpful, informative or entertaining, then please consider visiting this link:


Synthesizerwriter's StoreSynthesizerwriter's Store
 (New 'Modular thinking' designs now available!)