
I have been gradually refining my live rig, and something unexpected has started to irk me. So I made a workaround, maybe a fix, and now I'm going to share it with you.
Power Switches
I was going to say that everything had them, but one of the interesting features of many guitar pedals is that almost all of them do not have power switches - instead, you insert or remove the (more or less standard) barrel connector that carries the power.
But apart from that, then I am very used to having to reach behind gear to access the power switch, which is usually (but not always, of course) on the right hand side (from the front), close to the power input connector (which isn't standardised very well at all...). Yep, muscle memory means that my hands know where the switch is, and all I do is reach over and around and down and... ah, there it is!
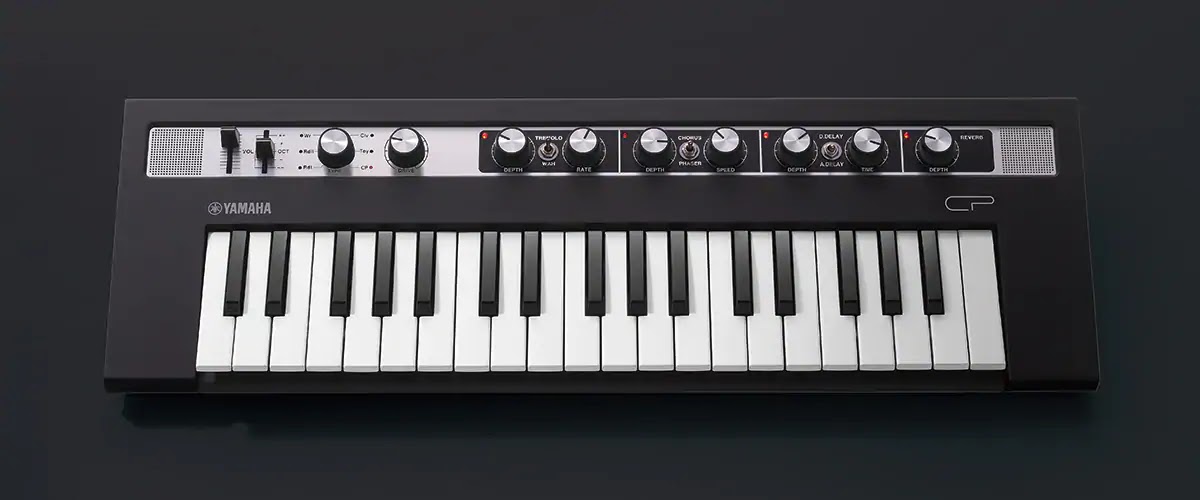
Which is fine, except when it isn't. And after putting it off for ages, I finally succumbed to the amazing piece of modern-take on vintage classic gear that is Yamaha's Reface CP .
 |
| https://uk.yamaha.com/en/products/music_production/synthesizers/reface/reface_cp.html |
I'm not going to do a full review here, but... Whilst sturdily built, it is considerably lighter than a vintage electric piano, and way, way lighter than three electric pianos! It is lots smaller than a Clavinet or a CP-70 electric grand piano! It doesn't need tuning. It is very quiet and very low noise in terms of the audio output! It has built-in effects that are perfect and contemporary with the keyboard sounds! Oh, and 128 note polyphony! The digital delay is like a looper! The sounds are very authentic, imho.
I would say that it can be battery powered as well, but that is completely out of context for this blog post!
(I have to say that the Reface CS is also very appealing as well, for many and different reasons.)
Anyway, it has a power switch on the rear panel. But unfortunately, having shoe-horned it into exactly the perfect place in my keyboard rack, there's a problem. The 37mm aluminium tube above it, which has my mixers and sub-mixers on it, is so close that it isn't actually possible to get my fingers up and over and around and down to access the power switch. I've done all sorts of little incremental shuffles, like anyone with a tube-based keyboard stand does whenever they get new gear, but all in vain. I can't get enough of a gap to get at the power switch!
I considered buying a remote-controlled mains switch for the wall wart power supply, you know, the sort of trendy 'smart home' device that is used for controlling things like lights or hi-fi, or for saving power when standby consumes too much electricity, but these all seemed expensive, and awkward (Do I really want to use a mobile phone to turn a musical instrument on and off via Bluetooth or WiFi?). And they all seemed to use energy in stand-by mode as well, which seemed like a recursive trip into a sustainability hell.
At moments like this, resorting to old fashioned technology is often worth considering. A quick search told me that you could get single-ended 'pigtail' cables intended for security camera installations that had male or female barrel connectors on them. Combined with a switch and a tiny box intended for electronics, I had everything I needed to make a device that is 'electrical' rather than 'electronic', and all that it does is move a switch from the rear panel of my Reface CP to the side, where my fingers can get to it very easily.
Simple, easy to make, and it improves the usability of my keyboard rig immensely. I'm considering making a few more...
The Components
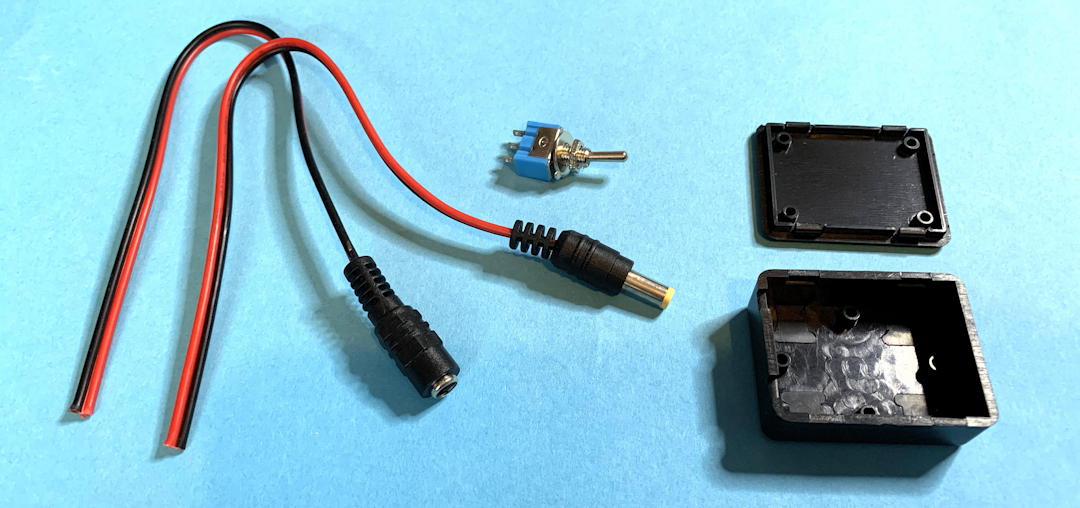
It's a very short list. Two pigtails, one of each gender. A SPST switch (for some applications, then a DPDT switch would isolate both power rails), and a tiny black plastic box. I also used some heat-shrink tubing to cover all the soldered joints.

Three small holes need to be drilled in the box for the switch, and the two pigtails. I didn't put grommets on the pigtail holes. I used a Dremel to remove some of the plastic on the lid so that it was not held proud by the body of the switch.


And the final assembly, on one side of the Reface CP. I used Blu-Tak (other slightly sticky stuff is available) to hold the box in place. The barrel connector that connects to the power connector was inserted, and a multimeter was used to check yet again that I had the correct polarity on the switched barrel connector. Once I was happy, then I connected the new switched barrel connector into the Reface CP, and turned the new switch on. After a few seconds, the Reface CP powered up and worked as usual.
Success!
As with any user-modification, even one like this where the device is not opened up or altered in any way, you should still take care, check everything at least twice, and make sure that polarities are the same (don't reverse anything.) You do anything like this at your own risk!
---
If you find my writing helpful, informative or entertaining, then please consider visiting this link:


No comments:
Post a Comment